Can You Tile Over Cement Board In a Shower Wall?
The question of whether one can tile over cement board in a shower wall is fundamental for anyone embarking on a bathroom renovation project. The short answer is a resounding yes; cement board is specifically designed as a tile substrate for wet environments like showers. However, the process requires careful planning, proper installation techniques, and the use of appropriate materials to ensure a waterproof and long-lasting result. This article will delve into the details, exploring the necessary steps and considerations involved in tiling over cement board in a shower setting.
Cement board, also known by various trade names, offers a stable and durable surface for tile installation, far superior to alternatives like drywall or plywood in moisture-prone areas. Its composition, typically a mixture of cement, aggregates, and reinforcing fibers, renders it resistant to water damage, mold growth, and warping, all common problems encountered in shower environments. The key to a successful shower installation rests on creating a waterproof barrier *behind* the tile, and cement board plays a significant role in achieving this.
Before delving into the specifics of tiling, it's crucial to understand the prerequisites. The structural integrity of the wall framing must be verified. Any weakness or instability in the studs will translate into cracking and failure of the tiled surface over time. Ensure the studs are plumb, level, and spaced according to local building codes, usually 16 inches on center. Furthermore, any existing damage, such as rot or water stains, must be addressed and repaired before proceeding. This proactive approach is vital for preventing future problems and ensuring the long-term performance of the shower enclosure.
Once the framing is sound, attention must be paid to choosing the appropriate cement board. Different thicknesses are available, typically ranging from 1/4 inch to 1/2 inch. The selection will depend on the stud spacing and the type of tile being used. Thicker cement board provides greater rigidity and is generally recommended for larger, heavier tiles. Consult with a tile supplier or building materials expert to determine the optimal thickness for the specific project requirements. Proper planning and preparation are paramount to a successful tile installation.
Preparing the Cement Board for Tiling
Preparing the cement board for tiling involves several critical steps aimed at creating a smooth, stable, and waterproof surface. These steps are not merely cosmetic; they directly influence the adhesion of the tile and the overall longevity of the shower installation. Neglecting these preparatory measures can lead to tile cracking, grout failure, and water infiltration, potentially resulting in costly repairs.
The first step is to properly install the cement board to the studs. This involves using corrosion-resistant screws designed specifically for cement board. These screws prevent rust and degradation over time, which could compromise the integrity of the installation. The screws should be spaced according to the manufacturer's recommendations, typically every 6 to 8 inches along the edges and in the field of the board. Countersinking the screws is essential; the screw heads should be flush with the surface of the cement board, without tearing or damaging the material. Avoid over-tightening, which can weaken the board around the screw. Leaving a small gap, approximately 1/8 inch, between the cement board sheets is also recommended to allow for expansion and contraction. This gap will be filled with joint compound later.
Sealing the seams between the cement board sheets is a crucial step in creating a waterproof barrier. This is typically achieved using fiberglass mesh tape and a cement-based joint compound specifically designed for tiling applications. Apply a layer of joint compound over the seams, embedding the mesh tape into the compound. Use a taping knife to smooth the compound and feather the edges, creating a seamless transition between the boards. Allow the compound to dry completely according to the manufacturer's instructions. Multiple coats may be necessary to achieve a smooth, even surface. Inspect the seams carefully for any imperfections or voids, and address them before proceeding.
Finally, consider applying a waterproofing membrane over the entire surface of the cement board. While cement board is water-resistant, it is not completely waterproof. A waterproofing membrane provides an additional layer of protection, preventing water from penetrating through the cement board and into the wall cavity. Several types of waterproofing membranes are available, including liquid-applied membranes and sheet membranes. Liquid-applied membranes are typically applied with a roller or brush, creating a seamless, monolithic barrier. Sheet membranes are self-adhesive and are applied directly to the cement board. Follow the manufacturer's instructions carefully when applying the waterproofing membrane. Pay particular attention to corners and edges, ensuring that they are properly sealed. Allow the membrane to cure completely before proceeding with tiling.
Choosing the Right Mortar and Grout
Selecting the appropriate mortar and grout is just as vital as the cement board installation itself. These materials are responsible for bonding the tile to the substrate and providing a waterproof, aesthetically pleasing finish. Using the wrong type of mortar or grout can lead to tile failure, staining, and water damage. Careful consideration should be given to the type of tile being used, the environment in which it is being installed, and the desired aesthetic.
For shower installations, a modified thin-set mortar is generally recommended. Modified thin-set mortars contain polymers that enhance their adhesion, flexibility, and water resistance. These properties are critical for ensuring that the tile stays bonded to the cement board in the demanding environment of a shower. When selecting a modified thin-set mortar, look for products that are specifically designed for use with porcelain or ceramic tile, as these are the most common types of tile used in showers. Read the manufacturer's instructions carefully to ensure that the mortar is mixed and applied correctly. The consistency of the mortar should be similar to that of peanut butter; it should be sticky enough to hold the tile in place but not so thick that it is difficult to spread. Apply the mortar to the cement board using a notched trowel, creating ridges that will help to bond the tile to the substrate. The size of the notch on the trowel will depend on the size of the tile; consult with a tile supplier or building materials expert to determine the appropriate trowel size.
The choice of grout is also important. For showers, an epoxy grout is often preferred over cement-based grout, although certain high-performance cement-based grouts offer comparable performance. Epoxy grout is inherently waterproof and resistant to staining, mold, and mildew. It is also more durable and long-lasting than cement-based grout. However, epoxy grout can be more difficult to work with and is typically more expensive. If using a cement-based grout, look for products that are specifically designed for use in wet environments and that are fortified with polymers to enhance their water resistance. Regardless of the type of grout chosen, it is important to seal the grout lines after installation. Grout sealers penetrate the grout and create a barrier that prevents water and stains from penetrating the grout lines. Apply the grout sealer according to the manufacturer's instructions. Reapply the grout sealer periodically to maintain its effectiveness.
Furthermore, the type of tile being used will influence the choice of grout. For example, natural stone tiles may require a specific type of grout that is designed to prevent staining. Some tiles are also more porous than others, which means that they are more likely to absorb water and stains. In these cases, it is important to use a grout that is specifically designed for porous tiles. Consulting with a tile supplier or installer is advisable to ensure the selection of appropriate materials for the specific tile chosen.
Proper Tiling Techniques for Showers
Even with the best materials, improper tiling techniques can compromise the entire shower installation. Precise tile placement, consistent grout lines, and proper sealing are essential for creating a waterproof and aesthetically pleasing shower enclosure. Attention to detail and adherence to best practices are crucial for ensuring a long-lasting and trouble-free installation.
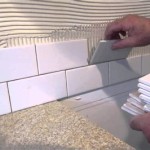
Before installing the tile, it is important to plan the layout carefully. This involves measuring the shower walls and determining the best way to arrange the tiles to minimize cuts and create a symmetrical appearance. Start by finding the center point of each wall and laying out the first row of tiles along the center line. Use spacers to maintain consistent grout lines between the tiles. The size of the spacers will depend on the desired width of the grout lines. Press each tile firmly into the mortar, ensuring that it is level and aligned with the adjacent tiles. Use a rubber mallet to gently tap the tiles into place if necessary. Remove any excess mortar from the tile surface with a damp sponge. Allow the mortar to dry completely according to the manufacturer's instructions before proceeding with grouting.
When cutting tiles to fit around corners or fixtures, use a wet saw or a tile nipper. A wet saw provides clean, accurate cuts and is ideal for cutting large or hard tiles. A tile nipper is a hand tool that can be used to make small, irregular cuts. When cutting tiles, always wear eye protection to prevent debris from entering the eyes. After cutting the tiles, smooth the edges with a rubbing stone to remove any sharp edges. Prior to installing the cut tiles, dry-fit them to ensure they fit properly before adhering with the mortar.
After the mortar has dried completely, apply the grout to the tile surface. Use a grout float to force the grout into the grout lines. Remove any excess grout from the tile surface with a damp sponge. Rinse the sponge frequently to prevent grout haze from forming on the tile surface. After the grout has dried completely, polish the tile surface with a clean, dry cloth to remove any remaining grout haze. Allow the grout to cure completely according to the manufacturer's instructions before using the shower. The quality of the tiling installation will impact the shower's aesthetics and longevity.

Installing Cement Board In The Bathroom

Drywall And Cement Board For The Downstairs Bathroom Blog Homeandawaywithlisa

Diy Bathroom Remodeling Part 4 Cement Board For Shower Walls

Installing Cement Board In The Bathroom

Cement Backer Board For Shower A Pro Busts All The Myths

Proper Way To Set Wallboard For Shower

How To Install Backer Board Around A Bathtub

Here S How Install A New Shower Stall With Tile Floor

Drywall And Cement Board For The Downstairs Bathroom Blog Homeandawaywithlisa

Backerboard Drywall Transition Tile Shower Wall
Related Posts