Can You Put Vinyl Flooring On Top of Ceramic Tiles?
The prospect of installing new flooring can often be daunting, particularly when dealing with existing surfaces. Many homeowners contemplating a flooring upgrade face the question of whether they can install new flooring directly over their existing material. A common query revolves around the feasibility of installing vinyl flooring over ceramic tiles. The answer, while generally affirmative, is nuanced and depends on several factors that warrant careful consideration.
Vinyl flooring, known for its durability, water resistance, and relatively easy installation, is a popular choice for various rooms. Its versatility extends to different types, including sheet vinyl, vinyl planks, and vinyl tiles, each offering unique aesthetic and functional benefits. Ceramic tiles, on the other hand, are renowned for their longevity and resistance to wear and tear. However, they can be cold and hard underfoot, leading some homeowners to seek the warmth and comfort offered by vinyl flooring.
The decision to install vinyl over ceramic tiles should not be taken lightly. A successful outcome hinges on proper preparation and understanding of the potential challenges. Skipping crucial steps can lead to issues such as uneven surfaces, compromised adhesion, and ultimately, a flooring installation that is both aesthetically displeasing and functionally deficient. Therefore, a meticulous assessment of the existing ceramic tile floor and a thorough understanding of the vinyl flooring installation process are paramount.
Key Considerations Before Installation
Before embarking on the installation of vinyl flooring over ceramic tiles, several key factors must be evaluated. These considerations will determine the suitability of the project and influence the necessary preparatory steps.
Tile Condition: The existing ceramic tile floor must be in good condition. This means that tiles should be securely adhered to the subfloor, without any loose, cracked, or broken tiles. Any imperfections in the ceramic tile surface will telegraph through the vinyl flooring, resulting in an uneven and visually unappealing finish. Loose tiles should be re-adhered or replaced entirely. Cracked or broken tiles must also be repaired or replaced, ensuring a smooth and stable base for the vinyl flooring. Ignoring these issues will inevitably lead to problems down the line, potentially compromising the lifespan and appearance of the new flooring.
Surface Level: Maintaining a level surface is crucial for a successful vinyl flooring installation. Ceramic tile floors often have grout lines, creating an uneven texture. These grout lines, even if seemingly minimal, can cause indentations or visible lines on the vinyl flooring over time. To mitigate this, the grout lines must be filled with a leveling compound. Self-leveling compounds are designed to create a smooth, even surface, effectively eliminating the texture of the grout lines. Applying the leveling compound according to the manufacturer's instructions is essential for optimal results. This step is particularly important for thinner vinyl flooring options, as they are more susceptible to telegraphing underlying imperfections.
Moisture Levels: Moisture is a significant concern when installing any type of flooring, and vinyl is no exception. Excess moisture can lead to mold growth, adhesive failure, and ultimately, the deterioration of both the vinyl flooring and the underlying ceramic tiles. Before installation, the moisture levels of the subfloor and the ceramic tiles should be tested using a moisture meter. If moisture levels are elevated, the source of the moisture must be identified and addressed before proceeding. This may involve repairing leaks, improving ventilation, or applying a moisture barrier. Ignoring moisture issues can have serious consequences, potentially requiring the entire flooring installation to be redone.
Preparing the Ceramic Tile Surface
Proper preparation of the ceramic tile surface is paramount to ensure a successful and long-lasting vinyl flooring installation. The preparation process involves several steps, each designed to create a clean, smooth, and stable surface for the vinyl flooring adhesive to bond to.
Cleaning: The first step in preparing the ceramic tile surface is a thorough cleaning. This involves removing any dirt, dust, grease, or other contaminants that may be present on the tiles. A strong cleaning solution, such as trisodium phosphate (TSP), can be used to effectively remove stubborn stains and grease. After cleaning, the surface should be rinsed thoroughly with clean water and allowed to dry completely. Any remaining dirt or residue can compromise the adhesion of the vinyl flooring adhesive.
Repairing Imperfections: As mentioned earlier, any loose, cracked, or broken tiles must be repaired or replaced before proceeding with the installation. Loose tiles can be re-adhered using a suitable tile adhesive. Cracked or broken tiles should be removed and replaced with new tiles of the same size and thickness. Ensure that the new tiles are properly grouted and allowed to cure completely before moving on to the next step. Failure to address these imperfections will result in an uneven and unstable surface.
Leveling the Surface: Leveling the grout lines is perhaps the most crucial step in preparing the ceramic tile surface. A self-leveling compound is applied to fill the grout lines and create a smooth, even surface. The self-leveling compound should be mixed according to the manufacturer's instructions and poured onto the floor. A trowel can be used to spread the compound evenly and ensure that all grout lines are completely filled. Allow the self-leveling compound to dry completely before proceeding to the next step. The drying time will vary depending on the specific product and the environmental conditions.
Priming: Applying a primer to the leveled ceramic tile surface is often recommended. A primer helps to improve the adhesion of the vinyl flooring adhesive, ensuring a stronger and more durable bond. Choose a primer that is specifically designed for use with vinyl flooring and follow the manufacturer's instructions for application. Allow the primer to dry completely before proceeding with the vinyl flooring installation.
Installation Techniques for Vinyl Flooring Over Ceramic Tiles
The installation of vinyl flooring over ceramic tiles requires careful attention to detail and adherence to the manufacturer's instructions. The specific installation technique will vary depending on the type of vinyl flooring being used, but some general principles apply.
Choosing the Right Adhesive: Selecting the appropriate adhesive is crucial for a successful vinyl flooring installation. The adhesive should be compatible with both the vinyl flooring and the ceramic tile surface. Consult the vinyl flooring manufacturer's recommendations to determine the best adhesive for your specific product. Apply the adhesive evenly to the prepared ceramic tile surface using a notched trowel. The size of the notches on the trowel will determine the amount of adhesive applied, so choose a trowel that is recommended by the manufacturer.
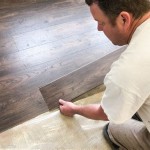
Laying the Vinyl Flooring: Once the adhesive has been applied, carefully lay the vinyl flooring over the surface. Ensure that the vinyl flooring is properly aligned and that there are no air bubbles or wrinkles. Use a roller to press the vinyl flooring firmly into the adhesive, ensuring a strong bond. Work in small sections to prevent the adhesive from drying before the vinyl flooring is laid. For vinyl planks or tiles, ensure that the seams are tightly butted together and that there are no gaps. Use a tapping block and mallet to gently tap the planks or tiles into place.
Cutting and Trimming: Cutting and trimming the vinyl flooring to fit the room's dimensions is an essential part of the installation process. Use a sharp utility knife to cut the vinyl flooring to size. Make precise cuts to ensure that the vinyl flooring fits snugly against the walls and around any obstacles, such as pipes or doorways. A cutting board or straight edge can be used to guide the utility knife and ensure a clean, straight cut. When trimming around pipes or doorways, use a template to accurately mark the shape and size of the cut.
Sealing and Finishing: After the vinyl flooring has been installed, seal the edges with a suitable sealant to prevent moisture from seeping underneath. A silicone sealant is often used for this purpose. Apply the sealant evenly along the edges and smooth it out with a finger or a sealant tool. Allow the sealant to dry completely before using the floor. Install baseboards or quarter-round molding to cover the edges of the vinyl flooring and create a finished look.
By carefully considering the condition of the existing ceramic tile floor, properly preparing the surface, and using the appropriate installation techniques, it is possible to successfully install vinyl flooring over ceramic tiles, creating a beautiful and durable new floor.

Installing Luxury Vinyl Over Existing Tiles Choices Flooring

Transform Your Home Installing Vinyl Flooring Over Ceramic Tiles City Wall And Floor

How To Install Ceramic Tile Over Vinyl Flooring

How To Lay Vinyl Flooring Sheet Over Tiles

What Type Of Flooring Can You Put Over Ceramic Tile

What Type Of Flooring Can You Install Over Ceramic Tile

Should You Install Vinyl Floor Over Tile

New Vinyl Plank Flooring Over Tile Table And Hearth

Can You Put Lvp Over Tile Wc Supply Whole Cabinet

Can You Put Vinyl Flooring Over Tile A Complete Guide Teka
Related Posts