Essential Aspects of Installing Tiles in Your Garage
Introduction
Transforming your garage from a cluttered storage space into a functional and appealing area requires careful consideration. One of the key elements to enhance its aesthetics and durability is the flooring, and tiles offer an excellent solution. This article delves into the essential aspects of installing tiles in your garage, providing a comprehensive guide for a successful project.
Choosing the Right Tiles
Selecting suitable tiles for your garage flooring is paramount. Consider the following factors:
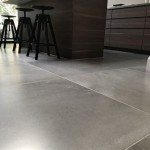
- Durability: Opt for tiles with high durability ratings, such as porcelain or ceramic tiles, which can withstand the wear and tear of vehicles, heavy equipment, and moisture.
- Slip Resistance: Ensure the tiles have a high coefficient of friction to prevent slipping when wet, especially in areas exposed to water or grease.
- Chemical Resistance: Consider tiles that are resistant to chemicals, such as oil, gasoline, and cleaning solutions, which are commonly used in garages.
- Style and Color: Choose tiles that complement the overall aesthetic of your garage and consider the size and pattern to create the desired visual effect.
Preparing the Garage Floor
Before installing tiles, proper surface preparation is crucial:
- Clean and Level the Surface: Thoroughly clean the floor to remove dirt, grease, and other debris. Ensure the floor is level using a self-leveling compound if necessary.
- Check for Moisture: Verify that the garage floor is not damp or has any moisture issues. Address any leaks or moisture problems before proceeding.
- Apply Primer: Apply a bonding primer to the floor to improve adhesion between the tiles and the substrate.
Installing the Tiles
Follow these steps for proper tile installation:
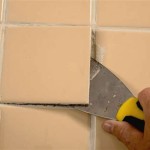
- Spread Thin-set Mortar: Using a notched trowel, spread thin-set mortar onto the floor, ensuring even coverage.
- Lay the Tiles: Place the tiles firmly into the mortar, pressing them down to ensure proper bonding.
- Space the Tiles: Use spacers between the tiles to create consistent joints and ensure proper drainage.
- Grout the Joints: Once the tiles are set, apply grout to the joints using a grout float. Remove excess grout and allow it to cure according to the manufacturer's instructions.
Maintenance and Care
To ensure the longevity and appearance of your garage tiles:
- Regular Cleaning: Sweep or vacuum the floor regularly to remove dirt and debris. Use a mild cleaner and warm water to mop the floor periodically.
- Protect from Chemicals: Avoid using harsh chemicals or abrasives that may damage the tiles. Clean up any spills immediately.
- Seal the Grout: Seal the grout periodically to protect it from stains and moisture penetration.
Conclusion
By following these essential aspects, you can successfully install tiles in your garage, enhancing its functionality, durability, and aesthetic appeal. Remember to choose tiles wisely, prepare the floor properly, and follow the installation instructions carefully. With proper maintenance, your garage tiles will provide a durable and stylish flooring solution for years to come.

Porcelain Tile The Ideal Surface For Garage Flooring Vault Custom Design

Installing Garage Floor Tiles Step By Rubi Blog Usa

How To Install Plastic Garage Flooring Raised Tile Floor Guide

How To Install Garage Floor Tiles Step By The Diy Playbook

Garage Flooring Guide Fitting By Dura Ltd

A Porcelain Tile Garage Floor Long Term Review All Floors

Perforated Garage Floor Tiles Diy Interlocking System Mesh Drain

Garage Flooring Guide

How To Install Garage Floor Tile Motordeck Example

How To Install Interlocking Garage Floor Tiles Locktile Pvc Tileslocktile
Related Posts