Can You Put Tile On Wood Floor? Essential Aspects to Consider
Tiling over a wood floor is a popular renovation method that can enhance the aesthetics and durability of your space. However, this process requires careful consideration and proper execution to ensure a successful outcome. This article explores the essential aspects to keep in mind when contemplating tiling over a wood floor.
1. Assess the Wood Floor's Condition
Before embarking on the tiling project, it is crucial to assess the condition of your wood floor. Ensure that the floor is stable, level, and free of any damage, such as loose planks or creaking boards. If the floor is in poor condition, it may be necessary to repair or replace it before tiling.
2. Choose the Right Tile
The choice of tile is an important factor to consider. Ceramic, porcelain, and natural stone tiles are suitable options for wood floors. Select tiles that are durable, moisture-resistant, and compatible with your desired style. Consider the weight of the tiles, as heavier tiles may require additional support.
3. Prepare the Subfloor
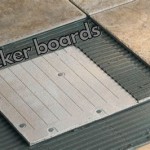
Preparing the subfloor is essential for ensuring a secure and stable base for the tiles. This involves removing any existing flooring, leveling the surface, and installing a backer board, such as plywood or cement board. The backer board provides a smooth, flat surface for the tile installation.
4. Use the Proper Adhesive
Choosing the right adhesive is crucial for bonding the tiles to the subfloor. Use a modified thin-set mortar specifically designed for tiling over wood floors. This type of adhesive provides flexibility and prevents cracking due to potential movement in the wood.
5. Install the Tiles
When installing the tiles, start at the center of the room and work your way outward. Use a notched trowel to apply a thin layer of adhesive to the backer board. Press the tiles firmly into place, ensuring they are level and evenly spaced. Use spacers to maintain consistent grout lines.
6. Grout the Tiles
Grouting is the final step in the tiling process and involves filling the gaps between the tiles. Use a grout float to apply the grout and work it into the joints. Wipe away any excess grout with a damp sponge. Allow the grout to cure according to the manufacturer's instructions.
7. Seal the Grout
To protect the grout from moisture and stains, apply a grout sealer. Grout sealers penetrate the pores of the grout, making it water-resistant and preventing discoloration. Use a brush or sponge to apply the sealer and allow it to dry completely.
Conclusion
Tiling over a wood floor can be a valuable home improvement project when done correctly. By assessing the wood floor's condition, choosing the right tile, preparing the subfloor, using the proper adhesive, installing the tiles carefully, grouting the tiles, and sealing the grout, you can create a durable and aesthetically pleasing floor that will enhance the beauty and functionality of your space for years to come.

Can You Tile Onto Wood Floors Stonesuper

Blog Expert Advice How To Tile Onto Wood Plywood Or Chipboard

Install Hardwood Flooring Over Tile Floor Double Glue Down Method

Tiling Onto Wood Training Blog Bal Adhesives

Wood Look Tile Flooring How To Lay Professionally Blog Rubi

How To Lay Tile Over Plywood

Step By Installation Guide For Wood Floor Tiles

Blog Expert Advice How To Tile Onto Wood Plywood Or Chipboard
:max_bytes(150000):strip_icc()/SPR-can-i-install-tile-on-plywood-1822594-step-01_53492-cfebcee9013a456eab01d7ef14c4bddf.jpg?strip=all)
How To Lay Tile On A Plywood Subfloor

How To Make Tile Flush With Hardwood Floor
Related Posts


