Can You Put Tile On Backer Board? A Comprehensive Guide
Tile installations, whether in bathrooms, kitchens, or other areas, require a stable and reliable substrate to ensure longevity and prevent cracking or other failures. Backer board, specifically designed for wet areas and tile applications, is a common and generally recommended choice. This article provides a comprehensive examination of using backer board as a substrate for tile, covering its benefits, installation methods, and considerations for various applications.
Understanding Backer Board
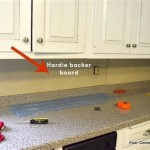
Backer board, also known as cement board or cementitious backer unit (CBU), is a composite panel made primarily of cement, reinforced with fiberglass mesh. This composition gives it exceptional strength, water resistance, and dimensional stability compared to alternatives like drywall or plywood. Crucially, backer board is designed to accept thin-set mortar, the adhesive used to bond tiles, creating a strong and durable bond.
Traditional gypsum drywall is porous and can deteriorate rapidly when exposed to moisture, making it unsuitable for tile applications in wet areas. While moisture-resistant drywall (often referred to as "green board" or "blue board") offers some improvement, it still lacks the structural integrity and water resistance necessary for long-term tile performance. Plywood, while structurally sound, is susceptible to warping and rotting when exposed to moisture, which can lead to tile cracking and detachment.
Backer board overcomes these limitations. Its cementitious composition is inherently resistant to water damage, preventing mold growth and structural degradation. The fiberglass mesh reinforcement provides added strength and resistance to cracking, ensuring a stable substrate for the tile. Furthermore, backer board's surface provides a textured surface ideal for accepting thin-set mortar, creating a strong mechanical bond with the tile.
Different types of backer board are available, each with slightly different properties and intended applications. Cement board is the most common and versatile type, suitable for floors, walls, and countertops. Lightweight backer boards, often made with a polymer-modified cement core, are easier to handle and install, particularly on walls. Fiber-cement boards offer a smooth, paintable surface, making them suitable for areas where a seamless transition between tiled and painted surfaces is desired.
The Advantages of Using Backer Board Under Tile
The use of backer board as a substrate for tile offers numerous advantages, contributing to a longer-lasting and more aesthetically pleasing tile installation. These advantages stem from its superior water resistance, strength, and compatibility with thin-set mortar.
Water Resistance: This is arguably the most significant advantage. Backer board's cementitious composition prevents water from penetrating the substrate, protecting the underlying structure from moisture damage. This is particularly crucial in bathrooms, showers, and kitchens, where exposure to water is frequent. By preventing water damage, backer board helps prevent mold growth, rot, and structural deterioration, extending the life of the installation and preventing costly repairs.
Dimensional Stability: Backer board exhibits minimal expansion and contraction when exposed to changes in temperature and humidity. This stability is essential for preventing cracks in the tile and grout lines. Unlike wood-based substrates, backer board will not warp or swell when exposed to moisture, ensuring a consistent and even surface for the tile.
Strength and Durability: The cementitious composition and fiberglass mesh reinforcement give backer board exceptional strength and resistance to impact. This is particularly important for floor installations, where the substrate must be able to withstand heavy loads and foot traffic. The strength of backer board also helps prevent cracking and ensures that the tile remains securely bonded to the substrate.
Bonding Compatibility: Backer board is specifically designed to accept thin-set mortar, the adhesive used to bond tiles. Its textured surface provides an excellent mechanical key for the mortar, creating a strong and durable bond. This strong bond prevents the tile from becoming loose or detaching from the substrate over time.
Mold Resistance: The cementitious composition of backer board is naturally resistant to mold and mildew growth. This is a significant advantage in wet areas, where mold growth is a common problem. By preventing mold growth, backer board helps maintain a healthy indoor environment and prevents the deterioration of the tile installation.
Key Considerations for Backer Board Installation
Proper installation of backer board is critical to ensure its effectiveness as a tile substrate. Following the manufacturer's instructions and adhering to industry best practices will help ensure a long-lasting and trouble-free tile installation. Key considerations include substrate preparation, fastening methods, and seam treatment.
Substrate Preparation: The surface beneath the backer board must be clean, level, and structurally sound. Any loose debris, paint, or adhesive residue should be removed before installing the backer board. On wood-framed floors, ensure that the subfloor is adequately supported and that there is no excessive deflection. Uneven surfaces should be leveled with a self-leveling compound or shims before installing the backer board.
Fastening Methods: Backer board should be attached to the framing or subfloor using corrosion-resistant screws specifically designed for this purpose. These screws typically have a countersinking head that allows them to be driven flush with the surface of the backer board. The screws should be spaced according to the manufacturer's recommendations, typically every 6-8 inches along the edges and every 8-12 inches in the field of the board. For floors, consider using a layer of thin-set mortar between the subfloor and the backer board for added support and adhesion.
Seam Treatment: The seams between backer board panels should be treated with fiberglass mesh tape embedded in thin-set mortar. This helps to prevent cracking along the seams and creates a waterproof barrier. Apply a thin layer of thin-set mortar to the seams, then press the fiberglass mesh tape into the mortar. Cover the tape with another layer of thin-set mortar, feathering it out to create a smooth transition between the panels. Allow the thin-set mortar to cure completely before tiling.
Moisture Barrier: While backer board is water-resistant, it is not waterproof. In areas with prolonged or direct water exposure, such as shower walls and floors, it is recommended to install a waterproof membrane over the backer board. These membranes can be applied as a liquid or as a sheet membrane, and they provide an additional layer of protection against water damage. Always follow the manufacturer's instructions for installing the waterproof membrane.
Cutting Backer Board: Backer board can be cut using a utility knife and a straight edge, or with a circular saw equipped with a cement board blade. When using a utility knife, score the board deeply several times, then snap it along the score line. When using a circular saw, be sure to wear a dust mask and eye protection, as cutting backer board produces a significant amount of dust. Always work in a well-ventilated area.
Choosing the Right Backer Board: Select the appropriate type of backer board for the specific application. For floors, choose a thicker backer board that can withstand heavy loads and foot traffic. For walls, a thinner and lighter backer board may be sufficient. Consider using a lightweight backer board for overhead applications to reduce the weight load. Always consult the manufacturer's specifications to ensure that the chosen backer board is suitable for the intended use.
Acclimation: Allow the backer board to acclimate to the room's temperature and humidity for at least 24 hours before installation. This will help to prevent warping or expansion after installation.
Proper Ventilation: Ensure adequate ventilation during and after backer board installation. This helps to prevent the buildup of moisture and allows the thin-set mortar to cure properly.
By carefully considering these factors and following proper installation techniques, one can ensure that backer board provides a stable, durable, and water-resistant substrate for tile, resulting in a long-lasting and aesthetically pleasing tile installation.

Tile Backerboard Material Options Fine Homebuilding

How To Install Tile Backer Board On A Wood Subfloor Diy

Tiling On Wooden Floors Part 4 Overboarding Bathroom Guru

Tile Installation Backer Board Around A Bathtub Family Handyman

How To Install Hardiebacker Cement Board On Floors James Hardie Pros

6mm No More Ply Tile Backer Board

Tile Backer Board Benefits Uses Insulation

How To Install Cement Board The Home Depot

Blog Expert Advice How To Tile Onto Wood Plywood Or Chipboard

How To Install Goboard Tile Backer Board Diytileguy
Related Posts