Can You Put Ceramic Tile Over Concrete? A Comprehensive Guide
The question of whether ceramic tile can be installed over concrete is a common one in both residential and commercial construction and renovation projects. The short answer is yes, ceramic tile can indeed be installed over concrete. However, the success of such an installation hinges on several crucial factors related to the condition of the concrete substrate and the proper application techniques.
This article will delve into the necessary considerations and processes required to ensure a durable and aesthetically pleasing ceramic tile installation over a concrete surface. We will explore the required preparations, the types of materials that are best suited for this type of project, and the potential issues that can arise if proper procedures are not followed.
Ensuring Concrete Substrate Suitability
The primary prerequisite for a successful ceramic tile installation over concrete is the suitability of the concrete surface itself. This involves assessing several key characteristics of the concrete to determine if it can adequately support the weight and stresses associated with the tile installation. These characteristics include flatness, cleanliness, stability, and moisture content.
Flatness: An uneven concrete surface will translate to an uneven tile installation. Deviations in the flatness of the concrete can cause tiles to sit improperly, leading to cracking, chipping, and an overall unsightly appearance. Before any tile is laid, the concrete surface must be assessed for flatness. This is typically done using a long, straight edge or a laser level. Any significant dips or humps in the concrete must be addressed. Self-leveling compounds are often used to correct minor imperfections in the flatness of the concrete. These compounds are poured onto the concrete surface and allowed to spread and harden, creating a new, level surface upon which the tile can be installed. For more severe unevenness, grinding the concrete may be necessary, or even a concrete overlay could be considered.
Cleanliness: The concrete surface must be thoroughly cleaned before any tile adhesive is applied. Any dirt, dust, grease, oil, paint, or other contaminants will interfere with the bond between the adhesive and the concrete. These substances prevent the adhesive from properly adhering to the concrete, which can lead to tile loosening and failure over time. Cleaning methods may include sweeping, vacuuming, scrubbing with a suitable cleaning solution, and even power washing. It is essential to select a cleaning solution that will not leave behind a residue that could affect the adhesive bond. After cleaning, the concrete should be allowed to dry completely before proceeding with the installation.
Stability: Cracks in the concrete are a major concern for tile installations. While minor hairline cracks may not be a significant issue, larger cracks indicate underlying structural problems that could compromise the integrity of the tile installation. Before installing tile over concrete, any cracks must be thoroughly inspected and repaired. Small, non-structural cracks can often be filled with a crack isolation membrane or a flexible patching compound. Larger, structural cracks may require more extensive repairs, involving injecting epoxy or other stabilizing materials into the crack. In some cases, it may be necessary to consult with a structural engineer to determine the cause of the cracking and the appropriate repair method. Ignoring cracks in the concrete will almost certainly lead to cracking in the tile as well.
Moisture Content: The moisture content of the concrete is perhaps the most critical factor to consider before installing tile. Excess moisture in the concrete can prevent the adhesive from bonding properly, and it can also lead to mold growth and other moisture-related problems beneath the tile. Concrete is porous and can absorb moisture from the ground or the surrounding environment. A moisture test should always be performed to determine the moisture content of the concrete. Common methods for testing moisture content include using a calcium chloride test kit or an electronic moisture meter. If the moisture content exceeds the manufacturer's recommendations for the tile adhesive, it will be necessary to take steps to reduce the moisture level. This may involve applying a moisture barrier to the concrete surface or allowing the concrete to dry for an extended period. It is crucial to ensure that the concrete is sufficiently dry before proceeding with the tile installation to prevent future problems.
Selecting the Right Materials for the Job
Choosing the appropriate materials is crucial for a long-lasting and successful ceramic tile installation over concrete. This includes selecting the right type of tile adhesive (mortar), grout, and potentially a crack isolation membrane, depending on the specific conditions of the concrete substrate.
Tile Adhesive (Mortar): The type of mortar used to adhere the tile to the concrete is paramount. There are several types of mortars available, each designed for specific applications and types of tile. For most ceramic tile installations over concrete, a modified thin-set mortar is recommended. Modified thin-set mortars contain polymers that enhance their bonding strength, flexibility, and water resistance. These mortars are better able to withstand the stresses associated with temperature changes and slight movement in the concrete. When selecting a modified thin-set mortar, it is important to choose one that is specifically formulated for use with ceramic tile and concrete. Read the manufacturer's instructions carefully to ensure proper mixing and application. Some mortars may require specific trowel sizes or techniques to achieve the best results. Using the wrong type of mortar or applying it incorrectly can lead to tile loosening and failure.
Grout: Grout fills the spaces between the tiles and provides a finished look to the installation. It also helps to prevent water from seeping beneath the tiles. There are two main types of grout: cement-based grout and epoxy grout. Cement-based grout is the most common and is available in sanded and unsanded varieties. Sanded grout is used for wider grout joints, while unsanded grout is used for narrower joints to prevent scratching the tile surface. Epoxy grout is more expensive but offers superior water resistance, stain resistance, and durability. It is often used in high-moisture areas, such as bathrooms and kitchens. When selecting grout, it is essential to choose a color that complements the tile. It is also important to seal the grout after installation to protect it from staining and moisture damage. Regular cleaning and maintenance of the grout will help to keep it looking its best for years to come.
Crack Isolation Membrane (Optional): As previously mentioned, cracks in the concrete can pose a significant threat to the integrity of a tile installation. Even if the cracks are repaired, they may still be prone to movement in the future. A crack isolation membrane is a thin, flexible layer that is applied to the concrete surface before the tile is installed. This membrane allows the concrete to move slightly without transferring the stress to the tile, thereby preventing cracking. Crack isolation membranes are available in several different forms, including liquid-applied membranes and sheet membranes. The choice of membrane will depend on the size and type of cracks present in the concrete. While a crack isolation membrane is not always necessary, it is a worthwhile investment in situations where the concrete is known to be prone to cracking or movement.
Proper Installation Techniques for Lasting Results
Even with a properly prepared substrate and the right materials, a successful ceramic tile installation over concrete depends heavily on the correct application techniques. This includes proper mortar application, tile placement, and grout application.
Mortar Application: Applying the mortar correctly is crucial for achieving a strong and lasting bond between the tile and the concrete. The mortar should be mixed according to the manufacturer's instructions to achieve the proper consistency. It should not be too wet or too dry. Using a notched trowel of the correct size is also essential. The size of the notch will determine the amount of mortar that is applied to the concrete, which affects the bond strength. The mortar should be applied to the concrete in even, consistent rows, with the notches running in the same direction. This will create a smooth, uniform bed of mortar for the tile to adhere to. Only apply enough mortar to cover a small area at a time, as the mortar can dry out quickly. Avoid applying mortar to large areas all at once.
Tile Placement: Once the mortar is applied, the tiles should be placed carefully and accurately. Press the tiles firmly into the mortar with a slight twisting motion to ensure good contact and adhesion. Use spacers to maintain consistent grout lines between the tiles. Regularly check the alignment of the tiles to ensure that they are level and straight. Use a level to make any necessary adjustments. If the tiles are not properly aligned, they can create an uneven surface and detract from the overall appearance of the installation. After the tiles are placed, allow the mortar to cure completely before proceeding with the grouting process. The curing time will vary depending on the type of mortar used and the ambient temperature and humidity.
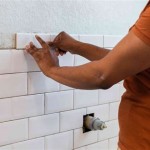
Grout Application: After the mortar has cured, the grout can be applied. Remove the spacers between the tiles and clean any excess mortar from the grout lines. Mix the grout according to the manufacturer's instructions. Apply the grout to the tile surface using a grout float, pressing it firmly into the grout lines. Work in small sections, and remove any excess grout from the tile surface with a damp sponge. Rinse the sponge frequently to prevent the grout from drying on the tile. After the grout has dried slightly, use a clean, dry cloth to polish the tile surface and remove any remaining grout haze. Allow the grout to cure completely before sealing it. Sealing the grout will help to protect it from staining and moisture damage. Apply the sealant according to the manufacturer's instructions, and allow it to dry completely before exposing the tile to water or heavy foot traffic.
:max_bytes(150000):strip_icc()/can-you-install-tile-directly-on-concrete-1822600-04-458f7bb6c78348c1835cf8054ef36553.jpg?strip=all "How To Install Tile Over Concrete")
How To Install Tile Over Concrete

Tiling Over A Ed Concrete Slab Fine Homebuilding

How To Tile Onto Concrete Floors Porcelain Super

Sound Dampening Ceramic Tile Over A Concrete Floor Fine Homebuilding
:max_bytes(150000):strip_icc()/can-you-install-tile-directly-on-concrete-1822600-01-8a89ceab1a274fb8ac81890ab7fc6b1b.jpg?strip=all "How To Install Tile Over Concrete")
How To Install Tile Over Concrete

How To Install Ceramic Tiles On Concrete Floor Tile Installation

Can You Lay Outdoor Tiles Over Concrete Premier Porcelain

How To Lay Floor Tiles On Concrete Welcome The Rubi Tools Blog

Concrete Patio Transformation 7 Steps To Diy A New Outdoor Oasis

Can You Install Ceramic Tile On Top Of Vinyl Flooring 2024 Today S Homeowner
Related Posts