Can I Tile Directly On Hardiebacker?
Hardiebacker cement board is a common choice for subflooring and wall backing in areas prone to moisture, such as bathrooms and kitchens. Its durability and resistance to water damage make it an ideal surface for tile installation. However, the question of whether one can tile directly onto Hardiebacker is a complex one, influenced by several factors including installation methods, tile type, and environmental conditions. This article will explore these factors in detail, offering a comprehensive guide to tiling over Hardiebacker cement board.
The primary reason Hardiebacker is favored for tiling is its stability compared to traditional drywall or plywood. Wood-based substrates can expand and contract with changes in humidity, potentially causing tiles to crack or detach over time. Hardiebacker, made from cement, sand, and cellulose fibers, exhibits minimal expansion and contraction, providing a more stable base for the tile. This inherent stability is a significant advantage when considering direct tiling.
Despite its stability, a successful tile installation on Hardiebacker requires careful preparation and adherence to industry best practices. This includes proper fastening of the Hardiebacker to the underlying framing, appropriate treatment of the seams between boards, and the selection of compatible adhesives and grouts. Neglecting these steps can lead to issues regardless of the substrate's inherent qualities.
Proper Installation of Hardiebacker is Critical
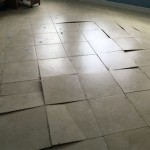
The foundation of any successful tile installation on Hardiebacker relies on a correctly installed substrate. This means the Hardiebacker sheets must be securely fastened to the studs or floor joists using appropriate fasteners – typically corrosion-resistant screws designed specifically for cement board. The spacing of these fasteners is critical; generally, they should be placed every 6 to 8 inches along the edges of the board and every 8 to 12 inches in the field. Incorrect spacing can lead to movement in the Hardiebacker, potentially causing tile cracking or grout failure.
Moreover, the framing beneath the Hardiebacker must be structurally sound and properly spaced. Insufficient framing support will allow the entire assembly to flex, negating the benefits of using cement board. Deflection guidelines for flooring are especially important. The allowable deflection under live load should be no more than L/360 for ceramic tile and L/720 for natural stone. Failure to meet these deflection criteria can lead to significant problems with the tile installation.
Seams between Hardiebacker sheets must also be properly treated to prevent cracking and movement. This is typically achieved by using fiberglass mesh tape embedded in a thin-set mortar specifically designed for cement board. The mortar fills the gaps between the sheets and creates a continuous, level surface. Some manufacturers recommend a two-coat application of thin-set over the mesh tape to ensure complete coverage and a smooth transition.
Leaving the Hardiebacker seams untreated, or using an inappropriate taping method, will likely result in cracks appearing in the grout lines over time. This is because the area around the untreated seam will be weaker and more susceptible to movement compared to the surrounding areas. Therefore, careful attention to seam treatment is paramount to a durable tile installation.
Choosing The Right Thin-Set Mortar
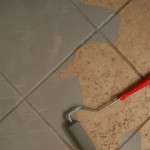
Selecting the correct thin-set mortar is another crucial aspect of tiling directly onto Hardiebacker. Not all thin-set is created equal, and using the wrong type can compromise the bond between the tile and the substrate. Modified thin-set mortars, those containing polymer additives, are generally recommended for tiling over Hardiebacker.
Modified thin-set mortars offer several advantages over unmodified versions. The polymer additives enhance the mortar's flexibility, allowing it to better accommodate slight movement in the substrate without cracking. They also improve the mortar's bond strength, ensuring a strong and durable connection between the tile and the Hardiebacker. Furthermore, many modified thin-sets are specifically formulated for use with cement boards, offering superior performance in these applications. Look for thin-sets that meet or exceed ANSI A118.4 or ANSI A118.15 standards for modified mortars.
The appropriate thin-set should be chosen based on the type of tile being installed. Large format tiles, tiles larger than 15 inches on any side, often require a specialized large and heavy tile thin-set (LHT thin-set). These mortars are designed to prevent lippage, where one tile sits higher than its neighbor, and to support the weight of the larger tiles during installation. Natural stone tiles also require specific mortars, as some stones are porous and can be stained by certain thin-set formulations.
Mixing the thin-set according to the manufacturer's instructions is equally important. Adding too much water will weaken the mortar, while adding too little will make it difficult to work with. Using a mixing paddle and a drill is recommended to ensure a consistent and thorough mix. Let the mortar slake, or rest, for the recommended time before using it. This allows the polymers to fully activate, enhancing the mortar's performance.
Considering Environmental Conditions and Tile Type
The success of tiling directly onto Hardiebacker is also influenced by the environmental conditions in the area where the tile is being installed. Areas with high humidity or frequent temperature fluctuations can place additional stress on the tile installation, potentially leading to problems. In such environments, it is even more important to choose high-quality materials and follow best practices.
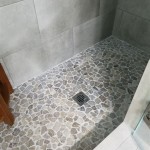
For example, in shower areas, a waterproofing membrane is often recommended even when using Hardiebacker. While Hardiebacker is water-resistant, it is not waterproof. Water can still penetrate through the grout lines and potentially damage the framing behind the Hardiebacker. A liquid-applied waterproofing membrane or a sheet membrane installed over the Hardiebacker can provide an extra layer of protection against moisture intrusion.
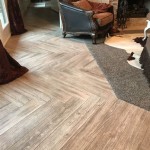
The type of tile being installed also plays a role. Different types of tile have different properties, such as porosity and weight, which can affect the choice of thin-set and the installation method. For instance, glass tiles require a special thin-set that will not show through the translucent tile. Natural stone tiles may require sealing before grouting to prevent staining from the grout. Heavy tiles, as mentioned earlier, need a thin-set designed to support their weight.
Furthermore, the size and shape of the tile can impact the installation. Larger tiles require flatter and more level substrates to avoid lippage. Smaller mosaic tiles may require a notched trowel with smaller teeth to ensure proper thin-set coverage. Consulting with a tile professional or referring to industry guidelines can help ensure the appropriate materials and methods are used for the specific type of tile being installed.
In conclusion, while tiling directly onto Hardiebacker cement board is generally acceptable and often preferred due to its stability and water resistance, several factors must be considered to ensure a successful and long-lasting installation. Proper installation of the Hardiebacker itself, selection of the appropriate thin-set mortar, and consideration of environmental conditions and tile type are all critical elements in the process. By paying close attention to these details, one can create a beautiful and durable tiled surface that will stand the test of time.

How To Install Hardiebacker Cement Board On Floors James Hardie Pros

How To Install Cement Board On A Floor Diy Family Handyman

Easily Install Cement Board To Prep For Tile Installation

Tile Backerboard Material Options Fine Homebuilding

How To Install Cement Board The Home Depot

How To Install Cement Board The Home Depot

How To Install Cement Board For Tile Projects Diy Family Handyman

How To Install Cement Board For Tile Bower Power

Tile Installation Backer Board Around A Bathtub Family Handyman

Hardie Backer Boards Everything You Need To Know Walls And Floors
Related Posts