Can I Put Backsplash Tile On Drywall? Understanding Backsplash Installation Over Drywall
Installing a backsplash is a common method for enhancing the aesthetic appeal and protecting the walls in kitchens and bathrooms. A frequent question that arises during the planning phase involves the compatibility of drywall as a substrate for tile installation. While drywall can be a suitable surface for a backsplash, careful preparation and adherence to best practices are necessary to ensure a durable and long-lasting result. Failure to properly prepare the drywall or utilize appropriate materials can lead to tile delamination, moisture damage, and ultimately, a costly repair.
The suitability of drywall for tiling depends on several factors, including the type of drywall, the size and weight of the tile, and the environmental conditions of the room. Standard drywall, commonly referred to as white board, is generally less resistant to moisture than specialized moisture-resistant drywall. Large, heavy tiles place a greater strain on the adhesive bond and require a more robust substrate. High-humidity environments, such as bathrooms and kitchens, necessitate enhanced moisture protection to prevent drywall deterioration.
Therefore, before proceeding with tile installation over drywall, a thorough assessment of these factors is crucial. This assessment will inform the choice of materials, the extent of surface preparation, and the installation techniques employed.
Assessing Drywall Condition and Type
Prior to any tile installation, the condition of the existing drywall must be carefully inspected. Look for signs of water damage, such as discoloration, swelling, or crumbling. Damaged drywall must be replaced before proceeding. Even seemingly minor water damage can compromise the integrity of the drywall and lead to tile failure. Pay particular attention to areas around sinks, countertops, and other potential sources of moisture.
The type of drywall also plays a significant role. Standard drywall, while commonly used, is not ideal for areas prone to moisture exposure. Moisture-resistant drywall, often referred to as "green board" or "blue board," is designed to withstand higher levels of humidity. These types of drywall incorporate a water-resistant coating and a modified gypsum core. Cement board is also a better option. While they are more expensive, cement boards provide superior moisture resistance and enhanced support for tile installations, particularly in wet environments.
For kitchen backsplashes, moisture exposure is less of a concern compared to bathroom showers. However, spills and splashes are still common, making moisture-resistant drywall a preferable choice. For bathroom applications, consider using cement board or a waterproof membrane over the drywall for maximum protection.
Preparing the Drywall Surface for Tiling
Proper surface preparation is essential for ensuring a strong and lasting bond between the tile and the drywall. The first step involves cleaning the drywall surface to remove any dust, dirt, grease, or other contaminants. A mild detergent and water solution can be used for this purpose. Ensure the surface is thoroughly rinsed and allowed to dry completely before proceeding.
Next, inspect the drywall for any imperfections, such as loose paper or uneven surfaces. Repair any imperfections with drywall compound and sand smooth. This will create a uniform surface for the tile to adhere to. Apply a primer specifically designed for tile installation. The primer helps to improve the bond between the drywall and the adhesive, preventing the adhesive from being absorbed into the porous drywall. Choose a primer that is compatible with the type of adhesive being used. Apply the primer according to the manufacturer's instructions, typically requiring one or two coats.
Consider using a waterproofing membrane over the drywall, especially in areas with high moisture exposure. These membranes create a waterproof barrier that protects the drywall from moisture penetration. Apply the membrane according to the manufacturer's instructions, ensuring all seams and corners are properly sealed.
For particularly heavy tiles, consider reinforcing the drywall with additional screws or by adding a layer of cement board over the drywall. This will provide extra support and prevent the drywall from sagging under the weight of the tile.
Selecting the Right Mortar and Installation Techniques
The choice of mortar is crucial for a successful tile installation. Different types of mortar are formulated for different types of tile and substrates. For most backsplash applications over drywall, a modified thin-set mortar is recommended. Modified thin-set mortars contain polymers that enhance their bond strength, flexibility, and water resistance. These mortars are available in various formulations, including rapid-setting and slow-setting options. Rapid-setting mortars are useful for smaller projects where quick setting is desired, while slow-setting mortars provide more time to work with the tile and make adjustments.
When selecting a mortar, consider the size, weight, and type of tile being used. Large, heavy tiles require a mortar with higher bond strength. Porcelain and ceramic tiles typically require different types of mortar than natural stone tiles. Read the mortar manufacturer's instructions carefully to ensure compatibility with the tile and substrate.
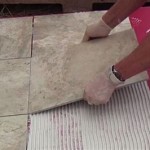
Apply the mortar to the drywall using a notched trowel. The size of the notch should be appropriate for the size of the tile being used. Larger tiles require a larger notch to provide adequate mortar coverage. Comb the mortar with the notched trowel to create ridges that will help the tile adhere to the surface. Press the tile firmly into the mortar, using a twisting motion to ensure good contact. Use spacers between the tiles to maintain consistent grout lines. After the mortar has set, typically after 24-48 hours, remove the spacers and apply grout to fill the joints between the tiles. Clean the excess grout from the tile surface with a damp sponge.
Grout is the material used to fill the spaces between the tiles. It provides a watertight seal and helps to prevent moisture from penetrating behind the tile. Select a grout that is appropriate for the type of tile being used and the environment in which it is being installed. Epoxy grouts are more resistant to stains and chemicals than cement-based grouts, making them a good choice for kitchen backsplashes. Seal the grout with a grout sealer to protect it from moisture and stains.
Proper installation techniques are essential for a successful tile installation. Ensure the tiles are properly aligned and level. Use a level to check the alignment of the tiles and make adjustments as needed. Cut the tiles to fit around outlets, switches, and other fixtures. Use a tile saw or a wet saw to cut the tiles accurately and cleanly. Take your time and pay attention to detail to ensure a professional-looking result.
In conclusion, installing backsplash tile on drywall is feasible, but requires meticulous preparation and the use of appropriate materials. Thorough assessment of the drywall's condition, proper surface preparation, and the selection of suitable mortar and grout are crucial for ensuring a durable and aesthetically pleasing backsplash. Ignoring these key factors can lead to costly repairs and premature failure of the tile installation.

How To Add Subway Tile Backsplash Over Drywall Transform Your Kitchen For 100

How To Install Tile Backsplash Fixthisbuildthat

How To Prepare Drywall For A Tile Backsplash Mr Handyman

How To Install Tile Backsplash Fixthisbuildthat

How To Prepare Drywall For A Tile Backsplash Mr Handyman

Help Cement Board Sheetrock More Drywall For Tiling Kitchen Backsplash Hometalk

Subway Tile Backsplash Diy For Beginners Bless This Nest

A Subway Tile Backsplash Install Art Renovation

Removing Backsplash And Repairing Drywall Made With Grace Grit

How To Install Tile Backsplash Fixthisbuildthat
Related Posts