Best Ways to Remove Excess Grout From Ceramic Tile
Excess grout, often referred to as grout haze or grout residue, is a common byproduct of tile installation. This undesirable film or buildup can obscure the beauty of the newly installed ceramic tiles and detract from the overall aesthetics of the space. Removing it effectively requires understanding the type of grout used, the appropriate tools, and the proper techniques. Addressing excess grout promptly is crucial, as the longer it remains, the harder it becomes to remove.
The composition of grout, typically a mixture of cement, sand, polymers, and pigments, dictates the best approach for removal. Different grout types, such as cement-based grout, epoxy grout, and pre-mixed grout, react differently to cleaning agents and physical removal methods. Failing to identify the grout type can lead to ineffective cleaning or, worse, damage to the tile surface. This article will outline several effective methods for removing excess grout from ceramic tile, focusing on techniques that are safe, efficient, and suitable for various grout types and tile finishes.
Identifying the Type of Grout
Determining the type of grout used is the first and most crucial step in the removal process. Cement-based grout is the most common and is typically sanded or unsanded. Sanded grout contains fine sand particles to add strength and prevent cracking in wider grout lines. Unsanded grout is used for narrower grout lines, typically less than 1/8 inch. Epoxy grout is a two-part system that is highly durable, stain-resistant, and water-resistant. It is typically used in areas prone to moisture, such as showers and backsplashes. Pre-mixed grout is a ready-to-use option that is convenient but generally less durable than cement-based or epoxy grout.
Visual inspection can often help identify the grout type. Sanded grout will feel gritty to the touch, while unsanded grout will be smooth. Epoxy grout typically has a glossy appearance and is exceptionally hard. However, if you are unsure, consulting with the tile installer or referring to the product packaging is always recommended. Misidentification can lead to the selection of inappropriate cleaning methods, potentially damaging the tile or the grout itself.
Knowing the age of the grout is also important. Freshly installed grout is easier to remove than grout that has been allowed to cure for an extended period. The longer the grout remains on the tile surface, the more it hardens and adheres, making removal significantly more difficult.
Essential Tools and Materials
Successful grout removal requires having the right tools and materials readily available. The specific tools needed will vary depending on the severity of the grout haze and the type of grout used. However, some essential items are common to most grout removal projects.
A clean water source is essential for rinsing and cleaning. A grout sponge, specifically designed for tile work, is ideal for wiping away excess water and grout residue. These sponges are typically more absorbent and durable than regular sponges. White vinegar, diluted with water, is a common and effective cleaning solution for cement-based grout haze. Commercial grout haze removers are also available and are specifically formulated to dissolve grout residue without damaging the tile. A plastic grout scraper or a nylon scrub brush can be used to gently agitate and loosen stubborn grout residue. For more persistent grout haze, a grout removal tool with a specialized blade may be necessary.
Personal protective equipment (PPE) is also crucial. Wearing rubber gloves protects the skin from harsh cleaning agents and abrasive tools. Eye protection, such as safety glasses or goggles, prevents splashes and airborne particles from entering the eyes. Proper ventilation is important, especially when using chemical cleaning solutions. Opening windows or using a fan can help circulate air and minimize exposure to fumes.
Finally, having clean cloths or towels on hand is essential for drying the tile surface and preventing water spots. Microfiber cloths are particularly effective at removing residue and leaving a streak-free finish.
Effective Grout Removal Techniques
Several techniques can be employed to remove excess grout from ceramic tile, ranging from simple cleaning solutions to more aggressive mechanical methods. The best approach depends on the type and severity of the grout haze.
The simplest method involves using a damp grout sponge and clean water. After the grout has partially cured (usually within 24-48 hours of installation, but check the specific product instructions), dampen the sponge with clean water and wring out the excess so it is damp, not soaking wet. Wipe the tile surface in a circular motion to loosen the grout haze. Rinse the sponge frequently in clean water and continue wiping until the grout residue is removed. This method is most effective for removing fresh grout haze before it has had a chance to harden.
For more stubborn grout haze, a mixture of white vinegar and water can be used. Dilute the vinegar with water in a 1:1 ratio. Apply the solution to the tile surface and allow it to sit for a few minutes to soften the grout haze. Use a grout sponge or a nylon scrub brush to gently agitate the grout residue. Rinse the surface thoroughly with clean water and dry with a clean cloth. Vinegar is a mild acid and can be effective at dissolving cement-based grout haze. However, it should be used with caution on certain types of tile, such as natural stone, as it can etch the surface. Always test the solution in an inconspicuous area first.
Commercial grout haze removers are formulated to dissolve grout residue without damaging the tile. These products typically contain stronger acids than vinegar and should be used with caution. Always follow the manufacturer's instructions carefully. Apply the grout haze remover to the tile surface, allow it to sit for the recommended time, and then scrub with a grout sponge or nylon brush. Rinse thoroughly with clean water and dry with a clean cloth. Ensure adequate ventilation when using these products and wear appropriate PPE.
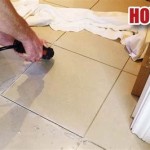
For particularly stubborn grout haze, a plastic grout scraper can be used. This tool is designed to gently scrape away the grout residue without scratching the tile surface. Hold the scraper at a slight angle and apply gentle pressure. Work in small sections and be careful not to gouge the tile or grout lines. This method is best suited for removing hardened grout residue that is not easily dissolved by cleaning solutions.
In cases where the grout haze is extremely persistent, a grout removal tool with a specialized blade may be necessary. These tools are designed to remove excess grout from the grout lines and can also be used to remove grout haze from the tile surface. Use caution when operating these tools, as they can easily damage the tile if not used properly. Practice on a scrap piece of tile first to get a feel for the tool and to avoid damaging the installed tiles.
Preventing Grout Haze
While removing excess grout is often necessary, prevention is always the best approach. Several steps can be taken during the tile installation process to minimize the formation of grout haze.
Proper grout mixing is crucial. Following the manufacturer's instructions regarding water-to-grout ratio is essential. Adding too much water can weaken the grout and increase the likelihood of grout haze. Thoroughly mix the grout to ensure that all the ingredients are properly combined. Uneven mixing can result in inconsistent grout properties and increased grout haze.
Applying the grout correctly is also important. Use a grout float to press the grout firmly into the grout lines, ensuring that they are completely filled. Avoid applying excess grout to the tile surface. Work in small sections and wipe away excess grout as you go. Allowing excess grout to remain on the tile surface for an extended period increases the likelihood of grout haze.
Proper cleaning during the installation process is essential. After grouting a small section, wipe the tile surface with a damp grout sponge to remove excess grout. Rinse the sponge frequently in clean water. Do not allow the dirty water to dry on the tile surface. Repeat this process until all the excess grout has been removed. This initial cleaning will significantly reduce the amount of grout haze that forms.
Following the manufacturer's recommendations for curing time is also important. Do not allow foot traffic on the newly grouted tiles until the grout has fully cured. Protecting the grout from moisture and excessive temperatures during the curing process will help ensure that it hardens properly and minimizes the formation of grout haze.
Sealing the grout lines after the grout has fully cured can also help prevent grout haze and protect the grout from stains and moisture. A good quality grout sealer will create a barrier that prevents grout residue from adhering to the tile surface. Apply the sealer according to the manufacturer's instructions.
By following these preventative measures, you can significantly reduce the amount of grout haze that forms and minimize the effort required to remove it. This proactive approach will help ensure that your ceramic tile installation looks its best and remains beautiful for years to come.
In summary, the successful removal of excess grout from ceramic tile involves identifying the type of grout, selecting the appropriate tools and materials, and employing effective cleaning techniques. Furthermore, preventative measures taken during the installation process can significantly reduce the likelihood of grout haze formation.

Grouting Help How To Remove Dry Grout From Tile Surface

How To Get Rid Of Leftover Grout Haze Quickly And Easily The Creek Line House

How To Remove Grout From Tile Rubi Blog Usa

How To Remove Hard Grout From Tiles Diy Doctor

How To Remove Dried Grout Or Mortar From Tile

How To Remove Grout Haze A Fast Easy Method Revealed See Before After

Grout Haze Remover How To Remove From Tiles

How To Get Rid Of Leftover Grout Haze Quickly And Easily The Creek Line House

Cleaning Mrs Hinch Fans Shares Amazing Tips To Remove Mould From Tile Grout Express Co

How To Clean Grout Tips For Natural Stone Flooring Granite Gold
Related Posts