A Step-by-Step Guide to Painting Ceramic Tile Floors
Transforming ceramic tile floors with a fresh coat of paint is an affordable and rewarding DIY project. By following a few simple steps, you can achieve professional-looking results that will enhance your home's aesthetics for years to come.
Materials You'll Need:
- TSP cleaner or degreaser
- Lint-free cloths or microfiber towels
- Claw hammer or pry bar (optional)
- Painter's tape
- Etching or bonding primer
- Ceramic tile paint
- Paint roller and tray
- Angled paint brush
- Polyurethane sealant
Step 1: Prepare the Floor
Begin by thoroughly cleaning the tile floor with TSP cleaner or degreaser. This step removes dirt, grime, and any remaining adhesive or grout residue that could interfere with paint adhesion. Use lint-free cloths to wipe away any excess cleaner.
Inspect the floor for any loose or damaged tiles. If necessary, use a claw hammer or pry bar to remove them and replace with new tiles. Smooth out any uneven edges or divots using a tile file.
Step 2: Tape Off Baseboards and Fixtures
Protect baseboards, fixtures, and any areas you don't want to paint with painter's tape. Ensure that the tape adheres firmly to the surfaces.
Step 3: Apply Primer
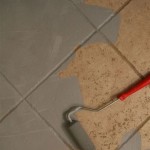
Use a synthetic paint roller to apply an etching or bonding primer to the entire floor. This primer creates a rough surface that promotes paint adhesion on the glossy surface of ceramic tiles.
Step 4: Paint the First Coat
Pour the ceramic tile paint into the paint tray. Use the paint roller to apply a thin, even coat of paint to the floor, working in sections. Use an angled paint brush to carefully paint around baseboards, corners, and other detailed areas.
Allow the first coat to dry completely according to the manufacturer's instructions.
Step 5: Paint the Second Coat
Once the first coat is dry, apply a second coat of paint using the same technique as before. Ensure that you apply the paint evenly and cover any areas that may have been missed during the first coat.
Step 6: Seal the Floor
To protect the painted finish and enhance durability, apply a polyurethane sealant to the floor. Use a clean paint roller to apply a thin, even coat. Allow the sealant to cure according to the manufacturer's instructions.
Step 7: Remove Tape and Clean Up
Once the sealant has fully cured, carefully remove the painter's tape. Clean any paint spatters or smudges using a damp cloth. Let the floor dry thoroughly before walking or placing furniture on it.
Tips for Success:
- Choose a ceramic tile paint specifically designed for flooring.
- Allow ample drying time between coats to prevent peeling or chipping.
- Test the paint in an inconspicuous area before painting the entire floor.
- Apply multiple thin coats for a durable finish.
- Use a non-slip additive to the paint for areas with high traffic or moisture.
By following these steps, you can revamp your ceramic tile floors with a fresh look that will complement your home's style and create a stunning focal point for years to come.

How To Paint A Tile Floor Artsy Rule

How To Paint Your Ceramic Floor Tiles What Do And Not The Farmhouse Life

How To Paint Tile Floor Angela Marie Made

Complete Guide To Painting Tile Making Pretty Spaces Blog

How To Paint Stencil Ceramic Tile

Painted Ceramic Tile Floors Plus A 1 Year Update The Beauty Revival

Painting Floor Tiles Revamping Your Space Ultratech Cement

How To Paint Your Ceramic Floor Tiles What Do And Not The Farmhouse Life

How To Paint Tile Floor Angela Marie Made

Complete Guide To Painting Tile Making Pretty Spaces Blog
Related Posts


