A Guide To Installing Cork Board Tiles On Wall
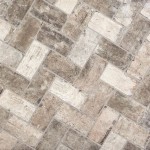
Cork board tiles provide a versatile and aesthetically pleasing solution for creating bulletin boards, adding insulation, or enhancing sound dampening properties within a space. Their natural texture and warm tones can complement various interior design styles. The installation process, while generally straightforward, requires careful planning and execution to ensure a professional and long-lasting result. This guide provides a detailed explanation of the steps involved in installing cork board tiles on a wall, covering preparation, adhesion methods, and finishing touches.
Preparing the Wall Surface
The success of any tiling project hinges on proper surface preparation. A clean, smooth, and structurally sound wall is essential for achieving optimal adhesion and a visually appealing finished product. Failure to properly prepare the surface can lead to tiles detaching, uneven surfaces, and a compromised aesthetic.
The first step is a thorough cleaning. Remove any existing debris, dust, dirt, or cobwebs from the wall. A vacuum cleaner with a brush attachment is effective for removing loose particles. Following the vacuuming, wipe down the wall with a damp cloth and a mild detergent solution. This will remove any remaining surface contaminants, such as grease or grime, that could interfere with the adhesive bond. Ensure the wall is completely dry before proceeding to the next step.
Next, examine the wall for any imperfections, such as holes, cracks, or uneven areas. Small holes can be filled with spackle or wall filler. Apply the filler evenly, using a putty knife to smooth the surface and remove any excess. Allow the filler to dry completely according to the manufacturer's instructions. Once dry, sand the filled areas with fine-grit sandpaper to create a smooth, flush surface. For larger cracks or uneven areas, more extensive repair work may be necessary. This could involve applying multiple layers of filler or even patching sections of the wall with drywall compound.
If the wall has a glossy or semi-gloss paint finish, it is advisable to lightly sand the surface to create a better grip for the adhesive. Use fine-grit sandpaper (around 120-grit) and gently scuff the surface. This will create microscopic scratches that allow the adhesive to bond more effectively. After sanding, wipe down the wall with a damp cloth to remove any sanding dust.
Priming the wall is an optional but highly recommended step, particularly if the wall is porous or has been recently repaired. A primer helps to seal the surface, creating a uniform base for the adhesive. Choose a primer that is compatible with both the wall surface and the chosen adhesive. Apply the primer evenly with a brush or roller and allow it to dry completely according to the manufacturer's instructions.
Finally, plan the layout of the cork board tiles before applying any adhesive. This involves determining the placement of the tiles and ensuring a balanced and visually appealing arrangement. Measure the wall and calculate the number of tiles needed. Consider starting with a center tile and working outwards to ensure symmetry. If necessary, trim the tiles to fit around corners, edges, or obstacles. A utility knife or sharp scissors can be used for this purpose. Mark the tile positions on the wall with a pencil or painter's tape to serve as a guide during installation.
Adhesive Application Methods
Selecting the appropriate adhesive is crucial for ensuring the cork board tiles remain securely attached to the wall over time. Various adhesive options are available, each with its own advantages and disadvantages. The choice will depend on factors such as the type of wall surface, the size and weight of the tiles, and the desired level of permanence.
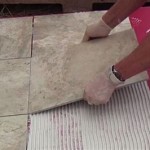
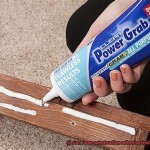
One common method involves using construction adhesive. This type of adhesive is typically available in tubes and applied with a caulking gun. Construction adhesive provides a strong and durable bond, making it suitable for larger or heavier tiles. Apply the adhesive to the back of each tile in a consistent pattern, such as a grid or a series of dots. Avoid applying too much adhesive, as this can cause the tiles to slide or ooze out at the edges. Press the tile firmly onto the wall in the predetermined position, ensuring it is aligned correctly with the adjacent tiles. Hold the tile in place for a few seconds to allow the adhesive to grip. Repeat this process for each tile, maintaining consistent spacing between the tiles.
Another option is to use cork adhesive, which is specifically formulated for bonding cork to various surfaces. Cork adhesive typically comes in liquid or paste form and is applied with a brush or trowel. Apply a thin, even layer of adhesive to both the back of the tile and the wall surface. Allow the adhesive to become slightly tacky before pressing the tile onto the wall. This ensures a stronger bond. As with construction adhesive, maintain consistent spacing between the tiles and hold each tile in place for a few seconds to allow the adhesive to grip.
Double-sided adhesive tape is a convenient option for smaller, lightweight cork board tiles. This method is relatively clean and easy to apply, but it may not provide as strong or durable a bond as construction adhesive or cork adhesive. Apply strips of double-sided tape to the back of each tile, ensuring they are evenly distributed. Remove the protective backing from the tape and press the tile firmly onto the wall in the desired position. This method is best suited for temporary or semi-permanent installations.
Regardless of the chosen adhesive method, it is essential to follow the manufacturer's instructions carefully. Pay attention to recommended application techniques, drying times, and safety precautions. Proper ventilation is crucial when working with adhesives, as some may release fumes. Wear gloves to protect your hands and avoid getting adhesive on your skin. Clean up any excess adhesive immediately with a damp cloth.
Ensuring Proper Alignment and Finishing Touches
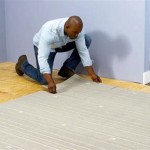
Maintaining consistent alignment and spacing between the tiles is crucial for achieving a professional-looking finished product. Even slight variations in alignment can be noticeable and detract from the overall aesthetic. Proper alignment also ensures that the tiles fit together snugly and prevent gaps from forming.
Use a level or laser level to ensure the first row of tiles is perfectly horizontal. This will serve as a reference point for all subsequent rows. Check the alignment of each tile as you install it, making adjustments as needed. Use spacers, such as small pieces of cardboard or plastic, to maintain consistent spacing between the tiles. The size of the spacers will depend on the desired gap width. Place the spacers between the tiles as you install them and remove them once the adhesive has dried.
After all the tiles have been installed, allow the adhesive to dry completely according to the manufacturer's instructions. This may take several hours or even overnight. Avoid disturbing the tiles during this time to prevent them from shifting or detaching. Once the adhesive has dried, inspect the tiles for any gaps or imperfections. If necessary, fill small gaps with caulk or wood filler that matches the color of the cork. Smooth the caulk or filler with a wet finger or a putty knife and allow it to dry completely.
The edges of the cork board tiles can be finished in a variety of ways, depending on the desired aesthetic. One option is to leave the edges exposed, creating a natural, rustic look. Another option is to trim the edges with molding or trim pieces. Molding can be attached with nails, screws, or adhesive and provides a clean, finished look. Choose molding that complements the style of the cork board and the surrounding decor.
If the cork board tiles are intended for use as a bulletin board, consider adding a frame around the perimeter. A frame not only enhances the aesthetic appeal but also provides a defined boundary for pinning items. Frames can be made from wood, metal, or plastic and come in a variety of styles and finishes. Attach the frame to the wall around the cork board using nails, screws, or adhesive.
Finally, thoroughly clean the installed cork board tiles with a soft cloth and a mild cleaner. This will remove any dust, dirt, or adhesive residue that may have accumulated during the installation process. Avoid using harsh chemicals or abrasive cleaners, as these can damage the surface of the cork. With proper care and maintenance, cork board tiles can provide years of functional and aesthetic enjoyment.

How To Install Your Own Cork Board Wall Area Elena Wilken

Diy Corkboard Wall The Secret To Organising A Home Office

Cork Wall Tiles Installation Icork Floor

Diy The Easiest Cork Board Wall In An Afternoon Chrissy Marie Blog

A Comprehensive Guide To Installing Cork Wall Tiles Or Panels

Cork Wall Tile Installation How To

How To Install Your Own Cork Board Wall Area Elena Wilken

How To Create A Cork Board Wall Network News

How To Install Corkwall Tiles Fitting Guides Naturewall

Cork Wall Tile Installation How To
Related Posts