How To Replace a Loose Floor Tile
A loose floor tile is more than just an aesthetic nuisance. It can quickly become a trip hazard, lead to damage to the subfloor beneath, and potentially affect neighboring tiles if left unattended. Addressing a loose tile quickly and correctly is crucial for maintaining the integrity and appearance of the flooring. This article provides a comprehensive guide to replacing a loose floor tile, covering preparation, removal, installation, and aftercare.
Understanding the Cause of the Loose Tile
Before commencing the tile replacement, it's important to understand why the tile became loose in the first place. Common causes include inadequate adhesive application during the initial installation, moisture infiltration weakening the adhesive bond, subfloor movement or settling, and impact damage. Identifying the underlying cause helps prevent recurrence of the issue. For instance, if moisture is the culprit, addressing any leaks or sources of humidity before replacing the tile is essential. Ignoring the root cause will likely result in the new tile also becoming loose over time.
If subfloor movement is suspected, a thorough inspection of the subfloor's condition is warranted. Signs of subfloor instability include cracking, unevenness, or significant deflection under weight. Remedying subfloor issues may involve patching cracks, reinforcing weak areas, or, in severe cases, replacing sections of the subfloor entirely. Failure to address subfloor problems will invariably lead to the replaced tile, and potentially adjacent tiles, experiencing similar issues.
In situations where inadequate adhesive application is the suspected cause, the subsequent replacement should focus on using a high-quality adhesive and ensuring proper coverage across the tile's underside and the subfloor. A notched trowel, used at the correct angle, helps achieve consistent and sufficient adhesive application. Proper adhesive application is a cornerstone of long-lasting tile installation.
Preparing for Tile Replacement
Proper preparation is paramount for a successful tile replacement. This involves gathering the necessary tools and materials, as well as preparing the work area. Rushing this stage can lead to unsatisfactory results and potential damage to surrounding areas.
Tools and materials required typically include: a replacement tile (matching the existing tile in size, color, and texture), a utility knife, a grout saw or scoring tool, a hammer, a chisel, a putty knife or scraper, thin-set mortar (adhesive), a notched trowel, a sponge, clean water, safety glasses, and work gloves. Having all these items readily available will streamline the replacement process.
Before initiating the removal process, protect the surrounding area with drop cloths or protective sheeting. This safeguards against scratches, dust, and adhesive splatters. Clearly marking the area around the loose tile also helps maintain focus and prevent accidental damage to adjacent tiles. Good protection measures save time and effort in post-replacement cleanup.
Matching the replacement tile to the existing tiles is crucial for a seamless repair. If the original tiles are no longer available, consider sourcing them from tile retailers specializing in discontinued or hard-to-find products. Alternatively, a tile that closely matches in terms of size, color, and texture can be used, though the difference may be subtly noticeable. It is often advisable to purchase slightly more tile than needed to account for potential breakage during the process or for future repairs.
Removing the Loose Tile
Removing the loose tile requires a careful approach to avoid damaging the surrounding tiles. The aim is to separate the loose tile from the adhesive bed without causing chips, cracks, or dislodgement of adjacent tiles. Haste in this stage can result in further damage, requiring the replacement of multiple tiles.
Begin by removing the grout surrounding the loose tile. A grout saw or scoring tool is used to carefully cut through the grout lines. Apply even pressure and avoid excessive force, as this can crack the surrounding tiles. The goal is to create a clean separation between the loose tile and its neighboring tiles. A thorough grout removal is key to facilitating tile removal without collateral damage.
Once the grout has been removed, use a utility knife to score the perimeter of the tile where it meets the surrounding tiles. This helps to further weaken the bond and prevent chipping or cracking of the adjacent tiles during removal. Scoring should be done with multiple light passes rather than a single deep cut.
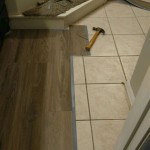
Next, carefully use a chisel and hammer to gently tap the loose tile. Position the chisel at an angle along the edge of the tile and tap lightly with the hammer. Work around the perimeter of the tile, gradually loosening it from the adhesive bed. Avoid applying excessive force, as this can fracture the tile or damage the subfloor. The objective is to coax the tile free rather than forcefully pry it loose. If the tile remains stubbornly attached, consider using a heat gun to soften the adhesive slightly before continuing. Exercise caution when using a heat gun to avoid overheating and potentially damaging the surrounding surfaces.
Once the tile is loose enough to remove, carefully lift it away from the adhesive bed. Use a putty knife or scraper to remove any remaining adhesive from the subfloor. Ensure that the subfloor is clean, level, and free of debris before proceeding with the installation of the replacement tile.
Installing the Replacement Tile
Proper installation of the replacement tile is essential for a durable and aesthetically pleasing repair. This involves applying the adhesive correctly, ensuring proper alignment, and allowing sufficient curing time.
Prepare the thin-set mortar according to the manufacturer's instructions. Mix the mortar to a smooth, creamy consistency, ensuring that there are no lumps or dry patches. The consistency should be similar to that of peanut butter. Using the correct mixing ratio is crucial for achieving optimal adhesion and preventing cracking.
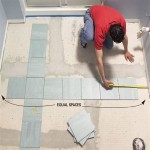
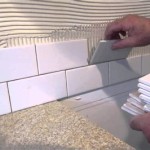
Apply a generous layer of thin-set mortar to the subfloor using a notched trowel. Hold the trowel at a 45-degree angle and create ridges in the mortar. The size of the notches will depend on the size and type of tile being used. Consult the adhesive manufacturer's recommendations for the appropriate notch size. Ensure that the entire area where the tile will be placed is covered with mortar.
Carefully position the replacement tile onto the mortar bed, aligning it with the surrounding tiles. Press down firmly on the tile to ensure good contact with the mortar. Use a level to check that the tile is flush with the adjacent tiles. If necessary, gently tap the tile with a rubber mallet to adjust its height and alignment. Remove any excess mortar that squeezes out from between the tiles.
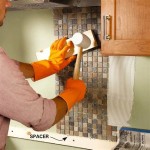
Use tile spacers to maintain consistent grout lines between the replacement tile and the surrounding tiles. The size of the spacers will depend on the desired grout line width. Leave the spacers in place for at least 24 hours to allow the mortar to cure properly.
After the mortar has cured, remove the tile spacers and apply grout to the grout lines. Use a grout float to press the grout firmly into the joints, ensuring that they are completely filled. Remove any excess grout from the surface of the tiles with a damp sponge. Allow the grout to dry according to the manufacturer's instructions before sealing it.
Post-Installation Care and Maintenance
Proper post-installation care is crucial for prolonging the life of the replaced tile and preventing future issues. This involves cleaning the tile and grout regularly, sealing the grout to prevent staining, and addressing any potential problems promptly.
Clean the tile and grout regularly with a mild detergent and water. Avoid using abrasive cleaners or scouring pads, as these can damage the surface of the tile and grout. Use a soft cloth or sponge to clean the tile and grout lines. Rinse thoroughly with clean water and dry with a soft towel.
Seal the grout lines with a grout sealer to prevent staining and water damage. Apply the sealer according to the manufacturer's instructions. Reapply the sealer every few years, or as needed, to maintain its effectiveness. Sealing the grout is particularly important in areas that are exposed to moisture, such as bathrooms and kitchens.
Inspect the replaced tile regularly for any signs of loosening, cracking, or damage. Address any problems promptly to prevent them from escalating. If the tile becomes loose again, repeat the replacement process, but first investigate and address the underlying cause of the loosening.
Avoid dropping heavy objects onto the tile, as this can cause cracking or chipping. Use rugs or mats in high-traffic areas to protect the tile from wear and tear. By following these simple maintenance tips, the longevity and aesthetic appeal of the replaced tile can be ensured.

Fixing Loose Floor Tiles And Why They In New Builds

How To Fix Loose Hollow Tile Floors Don T Remove Or Replace Just Drill Fill

How To Fix A Loose Floor Tile Without Removing It

Tile Repair Loose Tiles Part 1 How To Identify And The Proper Way Remove Them

Why Are My Floor Tiles Loose And How To Fix This A

How To Fix Loose Tile Tips And Tricks Rubi Blog Usa

Repairing Loose Hollow Tiles On Underfloor Heated Areas Tsj
.png?strip=all "How To Fix Loose Or Broken Ceramic Floor Tiles")
How To Fix Loose Or Broken Ceramic Floor Tiles

Removing Popped Tiles And Putting Them Back Down

Loose Floor Tiles Here S How To Fix Them Fast And
Related Posts