How To Remove Grout From Tiles and Replace It
Replacing grout is a common home maintenance task that can significantly improve the look and longevity of tiled surfaces. Over time, grout can become stained, cracked, or even crumble, leading to an unsightly appearance and potentially allowing moisture to penetrate beneath the tiles, causing damage. Removing and replacing grout is a manageable DIY project, although it requires patience, the right tools, and a careful approach to avoid damaging the surrounding tiles.
This article provides a detailed guide on how to effectively remove old grout and replace it with fresh grout, enhancing the aesthetic appeal and structural integrity of tiled areas. The process involves several key steps, from preparing the work area and selecting the appropriate tools to meticulously removing the old grout, cleaning the tile surface, and applying new grout correctly. Following these instructions ensures a professional-looking result and a longer lifespan for the tiled surface.
Preparing for Grout Removal
Before commencing the grout removal process, it is crucial to properly prepare the work area. This involves gathering the necessary tools and materials, protecting surrounding surfaces, and ensuring adequate ventilation. A well-prepared workspace streamlines the process and minimizes potential damage or complications.
The first step is to assemble the required tools. The type of tool used for grout removal depends on the width of the grout lines and the type of grout used. Common tools include a grout saw, a grout removal tool (oscillating multi-tool with a grout removal attachment), a utility knife, and a triangular scraper. A grout saw is a manual tool with a hardened blade designed to grind away grout. Oscillating multi-tools provide a powered alternative, often more efficient for larger areas, and offer varying blade types for different grout consistencies. A utility knife can be useful for scoring along the grout lines, while a triangular scraper can help remove stubborn pieces. Safety glasses, a dust mask, gloves, and knee pads are essential personal protective equipment to safeguard against dust, debris, and potential injury.
Next, protect the surrounding surfaces. Lay down drop cloths or plastic sheeting around the work area to protect floors, walls, and nearby fixtures from dust and debris. Secure the plastic sheeting with painter's tape to prevent it from shifting during the grout removal process. This preventative measure saves time and effort in cleaning up after the project is complete.
Adequate ventilation is also critical. Grout removal generates a significant amount of dust, which can be irritating to the respiratory system. Open windows and doors to allow fresh air to circulate. Consider using a fan to further improve ventilation. If possible, a vacuum cleaner with a HEPA filter can be used to collect dust as it is generated, minimizing airborne particles.
Removing the Old Grout
The actual grout removal process requires a methodical and careful approach. Rushing the process can lead to damage to the tiles, making subsequent repairs more complex and costly. The key is to work slowly and steadily, focusing on removing the grout without chipping or scratching the surrounding tiles.
Regardless of the tool chosen, the basic technique remains the same: carefully remove the grout without damaging the tiles. When using a manual grout saw, apply steady pressure and guide the blade along the grout line. Avoid pressing too hard, as this can cause the blade to slip and scratch the tile. Work in short, controlled strokes, gradually grinding away the grout. With an oscillating multi-tool, hold the tool at a low angle and gently move it along the grout line. Allow the tool to do the work, avoiding excessive pressure. Change blades as needed, as they can become dull over time.
For wider grout lines, it may be necessary to make multiple passes along the grout line to remove all of the grout. Focus on removing the bulk of the grout first, then use a smaller tool or the corner of a scraper to remove any remaining grout from the corners and edges of the tiles. If using a utility knife to score the grout lines, run the blade along the edge of the grout, where it meets the tile, to create a clean edge. This can help prevent the grout from chipping or crumbling during removal.
Periodically vacuum the work area to remove dust and debris. This improves visibility and prevents the dust from accumulating, making it easier to see the grout lines and avoid damaging the tiles. Be particularly attentive to corners and edges where grout can be difficult to remove. Use a small brush or a pointed tool to dislodge any remaining grout particles. Thoroughness at this stage ensures a clean surface for the new grout to adhere to.
After the majority of the grout has been removed, inspect each grout line carefully. Look for any remaining grout, especially in corners or along edges where it might be difficult to reach. Use a small scraper or a utility knife to remove these last remnants. Ensure that the grout lines are clean and free of any debris before proceeding to the next step.
Applying New Grout
After thoroughly removing the old grout and cleaning the surface, applying new grout is the final step in the process. Proper application is crucial for achieving a durable, aesthetically pleasing finish. This involves selecting the right type of grout, mixing it to the correct consistency, applying it evenly, and carefully cleaning the excess grout from the tile surface.
Select the appropriate type of grout for the project. There are two main types of grout: sanded and unsanded. Sanded grout is used for wider grout lines (typically 1/8 inch or wider) and contains fine sand particles to provide strength and prevent cracking. Unsanded grout is used for narrower grout lines (less than 1/8 inch) and is smoother in texture. Consider the width of the grout lines and the type of tile being used when making this selection. Epoxy grout is an alternative that offers superior stain and water resistance but is more difficult to work with. Choose a grout color that complements the tiles and the overall design of the room.
Mix the grout according to the manufacturer's instructions. Follow the recommended water-to-grout ratio to achieve the correct consistency. Avoid adding too much water, as this can weaken the grout and make it prone to cracking. Mix the grout thoroughly until it reaches a smooth, creamy consistency, free of lumps. Allow the grout to slake (rest) for the recommended time before mixing it again briefly. This allows the chemicals in the grout to activate fully.
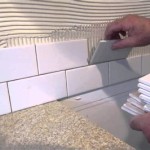
Apply the grout using a grout float at a 45-degree angle to the tile surface, forcing the grout into the grout lines. Work in small sections, ensuring that all of the grout lines are completely filled. Apply firm pressure to pack the grout tightly into the joints, eliminating any air pockets. Remove excess grout from the tile surface as you work, using the edge of the grout float. It is important to work efficiently, as the grout will begin to set relatively quickly.
After applying the grout, allow it to set for the time recommended by the manufacturer, typically 15-30 minutes. Once the grout has partially set, use a damp sponge to wipe away the excess grout from the tile surface. Rinse the sponge frequently in clean water to avoid spreading the grout around. Use a gentle, circular motion to remove the grout without disturbing the grout lines. Pay close attention to corners and edges, where grout tends to accumulate. This initial cleanup is crucial for achieving a clean, professional finish.
After the initial cleanup, allow the grout to dry for at least 24-48 hours, or according to the manufacturer's instructions. During this time, avoid walking on the tiled surface or exposing it to moisture. Once the grout is fully dry, a haze may appear on the tile surface. This grout haze can be removed with a clean, dry cloth or a grout haze remover. Follow the instructions on the grout haze remover carefully, as some products can damage certain types of tile.
Finally, seal the grout to protect it from stains and moisture. Apply a grout sealer according to the manufacturer's instructions. This will help to prolong the life of the grout and keep it looking its best. Reapply grout sealer periodically, as needed, to maintain its effectiveness. Regular cleaning with a mild detergent and water will also help to keep the grout clean and prevent the buildup of stains.
Key Considerations and Troubleshooting
While the process of removing and replacing grout is relatively straightforward, certain challenges and considerations can arise. Addressing these issues proactively ensures a successful outcome and minimizes potential problems. Recognizing common pitfalls and knowing how to troubleshoot them is essential for achieving a professional-looking result.
One common issue is damaging the tiles during grout removal. This can be avoided by using the correct tools and techniques, working slowly and carefully, and avoiding excessive pressure. If a tile is accidentally chipped or scratched, it may be necessary to repair or replace the tile. Small chips can often be repaired with a tile repair kit. Larger chips or cracks may require replacing the entire tile. Always have extra tiles on hand for this purpose.
Another potential problem is grout that crumbles or cracks soon after it is applied. This can be caused by using the wrong type of grout, mixing it improperly, or not allowing it to dry properly. Ensure that the correct type of grout is used for the width of the grout lines. Follow the manufacturer's instructions carefully when mixing the grout. Allow the grout to dry completely before exposing it to moisture. Applying a grout sealer can also help to prevent cracking.
Staining can be a persistent challenge with grout, particularly in areas that are exposed to moisture, such as bathrooms and kitchens. Regular cleaning is essential for preventing stains. Use a mild detergent and water to clean the grout regularly. For stubborn stains, a grout cleaner or a mixture of baking soda and water can be used. Apply the cleaner to the grout, allow it to sit for a few minutes, and then scrub with a brush. Rinse thoroughly with water. Apply grout sealer to protect the grout from future stains.
Furthermore, choosing the right color grout is a crucial consideration. The grout color can significantly impact the overall appearance of the tiled surface. Consider the color of the tiles and the overall design of the room when selecting a grout color. A lighter grout color can brighten up a room, while a darker grout color can create a more dramatic look. Test a small area of grout before applying it to the entire surface to ensure that it looks as expected.
Finally, proper curing of the grout is essential for its long-term durability. Curing involves keeping the grout moist for a certain period of time after it is applied. This allows the grout to hydrate properly and develop its full strength. Follow the manufacturer's instructions for curing the grout. This may involve covering the grout with plastic sheeting or misting it with water periodically. Proper curing ensures that the grout will be strong and durable, preventing cracking and crumbling.

How To Remove And Replace Grout In A Shower Diy For Beginners

How To Remove Grout Replacing Stonesuper

How To Remove Grout Without Power Tools Cutting Tool Roff

How To Remove Grout Without Power Tools Cutting Tool Roff

Remove Grout From Ceramic Tile Protile Repair Tricks

How To Remove Grout And Broken Floor Tiles

How To Remove And Replace Grout From Tiles The Easy Way

How To Remove Grout

How To Replace Grout Ace Hardware

Can I Put New Grout Over My Old
Related Posts