How to Remove Tile From a Concrete Wall
Removing tile from a concrete wall is a common task undertaken during home renovations, particularly in bathrooms and kitchens. While it can be a labor-intensive process, understanding the proper techniques and utilizing the right tools greatly improves efficiency and minimizes damage to the underlying concrete substrate. This article outlines the steps involved in removing tile, preparing for the task, and addressing potential complications that may arise.
Preparation and Safety Precautions
Before commencing tile removal, several preparatory steps are critical. The initial stage involves gathering the necessary tools and protective equipment. Essential tools include a hammer, chisel (various sizes, including a cold chisel and a thin-set chisel), a putty knife or scraper, a pry bar or flat bar, and a utility knife. Power tools, such as an oscillating multi-tool with a grout removal blade or a small demolition hammer with a chisel attachment, can significantly expedite the process, especially for larger areas. A wet/dry vacuum cleaner is invaluable for dust and debris removal.
Safety is paramount during this type of project. Eye protection, such as safety glasses or goggles, is vital to shield against flying debris. Work gloves protect hands from sharp edges and impacts. A dust mask or respirator protects the respiratory system from airborne particles, especially when using power tools or working with older tiles that may contain asbestos (in which case, professional testing and removal are required). Ear protection, such as earplugs or earmuffs, is recommended when using power tools.
Protecting the surrounding area is equally important. Covering the floor with drop cloths or plastic sheeting prevents damage from falling tile and debris. Sealing off the work area with plastic sheets can also help contain dust and minimize cleanup in other rooms. Disconnecting any electrical outlets in the immediate vicinity is another crucial safety measure.
It is also advisable to assess the presence of any plumbing or electrical lines behind the tile. If there is any uncertainty, consulting with a qualified electrician or plumber is highly recommended to avoid potential hazards during the removal process. Marking the locations of these lines can prevent accidental damage.
The Tile Removal Process
The process of removing tile from a concrete wall is a methodical one, involving several distinct stages. The initial stage involves grout removal. This step is critical because it weakens the bond between the tiles and facilitates easier removal. Several methods can be used to remove grout.
A manual grout saw is a commonly used tool. It is used to carefully scrape away the grout lines between the tiles. The process is tedious but provides a high degree of control. An oscillating multi-tool equipped with a grout removal blade is a more efficient alternative. This tool vibrates at high speeds, effectively grinding away the grout without damaging the surrounding tiles (although care must be taken to control the depth and prevent damage to the concrete wall behind the tile). A utility knife can be used to score the edges of the tiles, further weakening the bond.
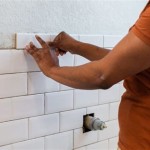
Once the grout is removed, the next step is to begin removing the tiles individually. Start by choosing a strategic point on the wall to begin the removal process. A good place to start is a loose tile or a tile near an edge or corner. Use a hammer and chisel to carefully pry the tile away from the concrete. Position the chisel at an angle between the tile and the wall and gently tap the chisel with the hammer. Apply steady, controlled pressure to avoid breaking the tile into small fragments, as larger pieces are easier to handle. Continue working around the tile, gradually loosening it until it comes free from the wall.
For tiles that are more difficult to remove, a pry bar or flat bar may be needed. Insert the pry bar behind the tile and gently apply leverage to break the bond. Be cautious not to apply excessive force, as this can damage the concrete behind the tile. If using a demolition hammer with a chisel attachment, exercise extreme care to avoid gouging or cracking the concrete. Use short, controlled bursts to loosen the tiles. Maintain a shallow angle and avoid pressing too hard against the wall.
As tiles are removed, immediately dispose of them in a designated container to prevent tripping hazards and maintain a safe work environment. Periodically use the wet/dry vacuum to remove dust and debris from the work area. This improves visibility and prevents the spread of dust throughout the workspace. If tiles are stubbornly adhered, applying heat can sometimes soften the adhesive. A heat gun, held at a safe distance, can be used to gently warm the tile before attempting removal. Always exercise caution when using heat guns to avoid burns and fire hazards.
Cleaning and Repairing the Concrete Surface
After all the tiles have been removed, the concrete wall will likely have residual thin-set mortar or adhesive. This must be removed to create a smooth, clean surface for future installations. The method used to remove the thin-set depends on its type and thickness.
For thin layers of thin-set, a putty knife or scraper may be sufficient. Hold the scraper at a shallow angle and apply firm, even pressure to scrape away the adhesive. For thicker or more stubborn layers, a chisel and hammer may be necessary. Use a thin-set chisel, which is designed specifically for this purpose, and carefully chip away the mortar. Again, avoid applying excessive force that could damage the concrete.
Chemical solvents can be used to soften the thin-set mortar. Follow the manufacturer's instructions carefully and ensure adequate ventilation. Always test the solvent in an inconspicuous area first to ensure it does not discolor or damage the concrete. Apply the solvent to the thin-set, allow it to dwell for the recommended time, and then scrape away the softened mortar. Power tools, such as a concrete grinder or sander with a suitable abrasive pad, can also be used to remove thin-set mortar. However, these tools generate a significant amount of dust, so proper respiratory protection is essential.
After removing the thin-set, inspect the concrete wall for any damage, such as cracks, holes, or gouges. Small cracks can be filled with concrete patching compound using a putty knife. Apply the compound evenly and allow it to cure according to the manufacturer's instructions. For larger holes or gouges, a more substantial concrete repair mortar may be needed. Clean the damaged area thoroughly, dampen it slightly, and then apply the repair mortar. Trowel the mortar smooth and allow it to cure completely before proceeding with any further work. If the concrete surface is uneven, a skim coat of concrete leveling compound can be applied to create a smooth, uniform base for new tile or other finishes.
Once the concrete surface is cleaned and repaired, it should be properly primed before any new materials are installed. A concrete primer helps to improve adhesion and prevent moisture migration. Apply the primer according to the manufacturer's instructions, ensuring complete and even coverage. Allow the primer to dry fully before proceeding with the next stage of the project. This meticulous preparation ensures that the new finish adheres properly and provides a durable, long-lasting result.
It's crucial to document the entire process, taking pictures before, during, and after the tile removal. This documentation will be helpful if any issues arise later on, such as identifying hidden plumbing or wiring, assessing the extent of damage to the concrete substrate, or matching the existing surface texture. These images can also be useful for future reference should additional work be required on the wall.

How To Remove Tiles From The Wall Using A Multi Tool Carefully Without Damage

How To Remove Bathtub Shower Wall Tiles

How To Remove Tile From Wall Like A Pro

Methods For Removing Wall Tiles Pma Imperio

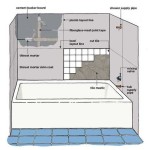
Old Tile Removal Mud Bed Walls Plan Learn Build

How To Remove Tiles From The Wall Using A Multi Tool Carefully Without Damage

How To Remove Tile Adhesive Maid2match

How To Remove Wall Tiles 11 Steps With Pictures Wikihow

How To Remove Wall Tile Howtospecialist Build Step By Diy Plans

The Best Way To Remove Old Shower Tile
Related Posts


