How To Remove Tile From Concrete Slab
Removing tile from a concrete slab is a common task undertaken during renovations, repairs, or when preparing a surface for a new flooring installation. This process can be challenging due to the bond between the tile and the concrete, which is typically achieved using a strong adhesive mortar. Successful tile removal requires the right tools, techniques, and a methodical approach to minimize damage to the concrete slab and ensure a clean surface for subsequent applications.
Before commencing the tile removal process, it is imperative to assess the scope of the project. This includes determining the type of tile, the type of mortar used, the size of the area to be cleared, and the presence of any potential hazards, such as asbestos (especially in older buildings). Understanding these factors will inform the selection of appropriate tools and safety measures.
Safety should be the primary concern throughout the tile removal process. Protective gear, including safety glasses, work gloves, and a dust mask or respirator, is essential to prevent injuries from flying debris and dust inhalation. Hearing protection may also be advisable, particularly when using power tools. The work area should be well-ventilated to minimize exposure to dust and fumes.
Preparation of the work area is crucial. Cover nearby surfaces with drop cloths or plastic sheeting to protect them from dust and debris. Remove any furniture or obstructions from the area. Ensure adequate lighting to provide clear visibility during the removal process. If dealing with a large area, consider dividing it into smaller, manageable sections.
Key Point 1: Essential Tools and Materials
Selecting the appropriate tools is critical for efficient and effective tile removal. The specific tools required may vary depending on the type of tile, the strength of the adhesive, and the size of the area. However, the following tools and materials are generally recommended:
*Safety Glasses:
To protect eyes from flying debris. *Work Gloves:
To protect hands from cuts and abrasions. *Dust Mask or Respirator:
To prevent inhalation of dust and harmful particles. *Hearing Protection:
To protect ears from loud noise generated by power tools. *Chisel:
A cold chisel or masonry chisel is used to break the tile and separate it from the mortar bed. *Hammer:
A standard hammer is used to strike the chisel. *Scraper:
A floor scraper or putty knife is used to remove residual mortar and adhesive. *Grout Saw or Knife:
Used to remove grout around the tiles to facilitate removal. *Pry Bar:
A pry bar can be used to lift tiles after they have been loosened. *Power Scraper (Optional):
A power scraper with a chisel attachment can significantly speed up the removal process, especially for large areas. *Angle Grinder with Diamond Blade (Optional):
Can be used to score grout lines or to carefully cut through stubborn tiles. Use with extreme caution. *Wet/Dry Vacuum:
To clean up dust and debris. *Buckets or Trash Bags:
For disposing of removed tiles and mortar. *Drop Cloths or Plastic Sheeting:
To protect surrounding surfaces. *Floor Leveler/Patching Compound:
To repair any damage to the concrete slab after tile removal.The choice between manual tools and power tools depends on the size and scope of the project, the type of tile, and the individual's skill level. Power tools can significantly reduce the amount of physical labor required, but they also require careful handling and adherence to safety precautions.
When selecting a power scraper, choose one with adjustable speed and impact settings to accommodate different tile types and mortar strengths. Ensure that the scraper blade is sharp and in good condition. Regularly inspect the blade for wear and tear and replace it as needed. When using an angle grinder, select a diamond blade designed for cutting tile and concrete. Wear appropriate safety gear, including a full-face shield, when operating an angle grinder.
Key Point 2: Tile Removal Techniques
There are several different techniques that can be used to remove tile from a concrete slab. The most appropriate technique will depend on the type of tile, the strength of the adhesive, and the tools available. A combination of techniques may be required to effectively remove all of the tiles.
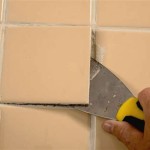
*Manual Removal with Chisel and Hammer:
This is the most common method for removing tile. Start by removing the grout around the tile using a grout saw or knife. Position the chisel at the edge of the tile, angled slightly downward toward the concrete slab. Strike the chisel with the hammer, applying consistent force to break the tile's bond with the mortar. Work your way around the tile, gradually lifting it from the slab. If the tile is particularly stubborn, try striking the chisel at multiple points around the perimeter. *Using a Pry Bar:
Once the tile has been loosened with the chisel and hammer, a pry bar can be used to carefully lift it from the slab. Insert the pry bar under the edge of the tile and gently apply pressure to lift it. Avoid using excessive force, as this can damage the concrete slab. *Power Scraper Method:
A power scraper can significantly speed up the tile removal process. Position the scraper blade at the edge of the tile and turn on the power. Guide the scraper along the edge of the tile, allowing the vibrating blade to break the bond with the mortar. Work your way around the tile until it is completely separated from the slab. Be careful not to apply too much pressure, as this can damage the concrete. *Heat Gun Technique:
In some cases, applying heat to the tile can help to soften the adhesive and make it easier to remove. Use a heat gun to heat the tile for several minutes, then attempt to remove it with a chisel and hammer or a pry bar. Be careful not to overheat the tile, as this can cause it to crack or shatter. Use caution to avoid burns. *Chemical Solvents:
Chemical solvents designed to dissolve tile adhesive can also be used. These solvents are typically applied to the grout lines and allowed to penetrate the adhesive. Follow the manufacturer's instructions carefully. Ensure adequate ventilation and wear appropriate safety gear.When removing tiles, work systematically to avoid damaging the concrete slab. Start at one corner of the room and work your way across, removing tiles in rows or sections. If you encounter stubborn tiles, try using a combination of techniques or consider using a power tool to speed up the process.
If the tiles are cracking or breaking into small pieces during removal, it may be necessary to adjust your technique or use a different tool. Try using a smaller chisel or applying less force with the hammer. If you are using a power scraper, try adjusting the speed and impact settings. It is important to minimize the amount of debris generated during the removal process to reduce the risk of injury and simplify cleanup.
Key Point 3: Concrete Slab Preparation After Tile Removal
After the tiles have been removed, the concrete slab will likely have residual mortar and adhesive. It is essential to thoroughly clean the slab and repair any damage before installing new flooring or applying a new surface treatment. Proper preparation is crucial for ensuring a strong bond and a smooth, level surface.
*Removing Residual Mortar and Adhesive:
Use a floor scraper or putty knife to remove as much of the residual mortar and adhesive as possible. For stubborn residue, a chemical solvent or a power scraper with a specialized blade may be necessary. Ensure the solvent is compatible with the concrete and any subsequent coatings. *Grinding the Surface:
Using a concrete grinder with a diamond grinding wheel is an effective way to remove remaining mortar and adhesive and to smooth out any imperfections in the slab. Start with a coarse grit grinding wheel and gradually switch to finer grits to achieve a smooth, level surface. Wear appropriate safety gear, including a dust mask or respirator, when grinding concrete. *Cleaning the Slab:
Thoroughly clean the concrete slab with a wet/dry vacuum to remove all dust and debris. This will ensure that the surface is clean and free of contaminants that could interfere with the adhesion of new flooring or surface treatments. *Repairing Damage:
Inspect the concrete slab for any cracks, holes, or other damage. Use a concrete patching compound or floor leveler to repair any imperfections. Follow the manufacturer's instructions carefully. Allow the patching compound to dry completely before proceeding to the next step. *Sealing the Slab (Optional):
Sealing the concrete slab can help to protect it from moisture and stains. A concrete sealer can also improve the adhesion of new flooring or surface treatments. Choose a sealer that is compatible with the concrete and any subsequent coatings.Once the concrete slab has been thoroughly cleaned and prepared, it is ready for the installation of new flooring or the application of a new surface treatment. Follow the manufacturer's instructions carefully for the installation of new materials. With proper preparation and technique, the resulting surface will be durable and aesthetically pleasing.
Consider renting specialized equipment, such as a concrete grinder or a power scraper, if undertaking a large-scale tile removal project. These tools can significantly improve efficiency and reduce the amount of physical labor required. Consult with flooring professionals for advice on selecting the appropriate tools and techniques for your specific project. A professional assessment can identify potential challenges and ensure that the tile removal process is completed safely and effectively.
Proper disposal of removed tiles and mortar is also important. Check with local regulations regarding the disposal of construction debris. Consider using a dumpster or other appropriate container for disposal. Recycling options may be available for certain types of tile and mortar. Clean up the work area thoroughly after completing the tile removal process. This includes removing all drop cloths, plastic sheeting, and debris. Sweep or vacuum the area to remove any remaining dust and particles.

How To Remove Tile From A Concrete Floor

Removing Tile And Thinset From Concrete Sawdust Girl

How To Remove Tile From Concrete Floor Central Florida Dust Free Flooring Demo Removal Llc

How To Remove Floor Tiles From Concrete Our Guide

How To Remove Tile Floor From Concrete

The Best Way To Remove Thinset From A Cement Foundation House Of Hepworths

Tile Removal Melbourne Concrete Floor Renovations

How To Remove A Tile Floor Complete Step By Guide Apollo

How To Remove Ceramic Tile And Thinset The Nifty Nester

How To Remove Tile From A Concrete Floor
Related Posts