How To Remove Tile From Concrete
Removing tile from concrete can be a challenging task, often requiring patience, the right tools, and a systematic approach. The difficulty arises from the strong adhesive bond between the tile and the concrete substrate. This bond is designed to withstand considerable stress and environmental factors, making removal labor-intensive. Success hinges on weakening or breaking this bond without significantly damaging the concrete beneath, which is especially crucial if the concrete surface will be used for a new flooring installation. This article outlines a comprehensive method for removing tile from concrete, emphasizing preparation, technique, and safety.
Preparing for Tile Removal
Before commencing the physical removal process, adequate preparation is paramount. This stage involves assessing the project scope, assembling the necessary equipment, and implementing appropriate safety measures. A thorough preparation minimizes complications and ensures a smoother, safer execution.
The initial step is to accurately gauge the area covered with tile. This measurement determines the quantity of materials needed, such as adhesive removers, and helps estimate the project's duration. Consider the type of tile and the age of the installation, as older installations might feature more tenacious adhesives.
Next, gather the following tools and materials. A hammer, a chisel (ideally a cold chisel), a floor scraper (both manual and powered options are available), a pry bar, a utility knife, safety glasses, work gloves, a dust mask or respirator, knee pads, a shop vacuum, and plastic sheeting are essential. Depending on the adhesive type and thickness, a heat gun or chemical adhesive remover may also be necessary. A large trash receptacle dedicated to tile debris is equally important.
Safety precautions are non-negotiable. Tile removal generates substantial dust, which can contain harmful materials such as silica. Prolonged inhalation of silica dust can lead to serious respiratory ailments. Therefore, wearing a properly fitted dust mask or, preferably, a respirator is crucial. Safety glasses protect the eyes from flying debris, and work gloves shield the hands from sharp edges and potential cuts. Knee pads provide comfort and prevent injury during extended periods of kneeling. Properly ventilating the work area is also advisable, accomplished by opening windows and doors or using a fan to circulate air.
Protecting surrounding areas is important. Cover nearby furniture and fixtures with plastic sheeting to prevent dust contamination. Seal doorways with plastic sheets and tape to contain the dust within the work area. This reduces the cleanup effort and prevents the spread of potentially hazardous dust to other parts of the building.
The Tile Removal Process
The actual removal of tiles from concrete involves a stepwise approach, beginning with loosening the grout and progressing to carefully separating the tile from the underlying concrete. The technique employed may need adjustment based on the tile type, the adhesive strength, and the concrete's condition.
Begin by removing the grout surrounding the tiles. A utility knife or a grout saw can effectively accomplish this. Carefully run the knife or saw along the grout lines, cutting through the grout to weaken its bond with the tile. This step is particularly important for preventing damage to adjacent tiles if you intend to salvage any. Removing grout provides a pathway for tools to access and weaken the adhesive bond beneath the tiles. Ignoring this step can significantly increase the difficulty of tile removal and the likelihood of damaging the concrete subfloor.
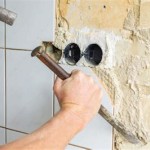
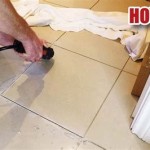
Next, using a hammer and chisel, carefully strike the edge of a tile at a low angle. Aim to insert the chisel between the tile and the concrete surface. Apply gentle, controlled force to try to lift the tile. Avoid excessive force, as this can shatter the tile into sharp fragments and potentially damage the concrete. If the tile resists, reposition the chisel and try again from a different angle. For larger tiles, start along the edges and gradually work towards the center. If the tile breaks, carefully remove the fragments using gloves to avoid cuts.
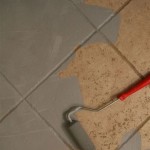
A floor scraper, whether manual or powered, can be highly effective for removing tiles, especially across larger areas. Position the scraper blade under the edge of a tile and apply pressure to lift it. A powered floor scraper oscillates the blade, which significantly reduces the manual effort required. Operate the scraper slowly and deliberately, maintaining control to prevent damage to the concrete. A pry bar can offer additional leverage when lifting stubborn tiles. Insert the pry bar under the edge of the tile and gently apply upward pressure. Use a piece of wood or other protective material as a fulcrum to prevent damaging the surrounding floor or wall.
If the adhesive proves particularly stubborn, consider employing heat or chemical adhesive removers. A heat gun can soften the adhesive, making it easier to scrape away. Apply heat evenly across the tile surface for a short period, then attempt to lift the tile with a scraper or chisel. Exercise caution when using a heat gun, as excessive heat can damage the tile or concrete. Chemical adhesive removers are available in various formulations, designed to dissolve different types of adhesives. Follow the manufacturer's instructions carefully regarding application and safety precautions. Ensure adequate ventilation when using chemical removers and wear appropriate protective gear.
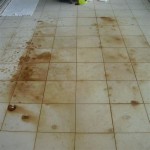
After removing the majority of the tiles, there will likely be residual adhesive remaining on the concrete surface. This adhesive needs to be removed to create a clean, level surface for any subsequent flooring installation. Use a floor scraper, either manual or powered, to scrape away the adhesive. For stubborn adhesive residue, chemical adhesive removers can be employed. Apply the remover according to the manufacturer's instructions, allow it to dwell for the recommended time, and then scrape away the softened adhesive. Multiple applications may be necessary for thick or aged adhesive.
Once the adhesive has been removed, thoroughly clean the concrete surface with a shop vacuum to remove dust, debris, and any remaining adhesive residue. Inspect the concrete for any cracks, chips, or other damage. Repair any damage with a concrete patching compound before proceeding with any new flooring installation. Allowing the patching compound to fully cure is important before further work is conducted.
Addressing Common Issues and Troubleshooting
During the tile removal process, several challenges can arise. Knowing how to address these issues can save time and prevent further complications.
One common problem is tile breakage. Tiles can shatter into small, sharp pieces, making removal difficult and potentially hazardous. Wear thick work gloves and safety glasses to protect yourself from injury. Carefully collect and dispose of the broken tile fragments in a designated trash receptacle. Use a smaller chisel and hammer to remove the surrounding grout and adhesive before attempting to lift the remaining pieces of the tile.
Adhesive that is extremely difficult to remove is another frequent challenge. This often occurs with older installations or with the use of particularly strong adhesives. Consider using a combination of methods, such as heat, chemical adhesive remover, and a powered floor scraper. Apply the adhesive remover multiple times, allowing sufficient dwell time for it to penetrate and soften the adhesive. A heat gun can be used in conjunction with the adhesive remover to further soften the adhesive.
Damage to the concrete subfloor during tile removal is a concern. This can occur if excessive force is used or if the wrong tools are employed. If the concrete is chipped or cracked, repair it with a concrete patching compound. Follow the manufacturer's instructions for mixing and applying the patching compound. Allow the patching compound to fully cure before proceeding with any new flooring installation. For more extensive damage, professional concrete repair may be necessary.
Dust control is paramount to maintain air quality and avoid health problems. Regularly vacuum the work area with a shop vacuum equipped with a HEPA filter. Cover nearby furniture and fixtures with plastic sheeting to prevent dust contamination. Seal doorways with plastic sheets and tape to contain the dust within the work area. Ensure adequate ventilation by opening windows and doors or using a fan to circulate air. Consider using a wet method, such as spraying the tiles with water before removing them, to reduce dust generation. However, exercise caution when using water, as it can make the work area slippery.

How To Remove Tile From A Concrete Floor

Removing Tile And Thinset From Concrete Sawdust Girl

The Best Way To Remove Thinset From A Cement Foundation House Of Hepworths

How To Remove Floor Tiles From Concrete Our Guide

How To Remove Tile From Concrete Floor Central Florida Dust Free Flooring Demo Removal Llc

How To Remove Tile Floor

How To Remove Tile Floor From Concrete

Dust Free Thinset Removal

How To Remove A Tile Floor Complete Step By Guide Apollo

The Best Way To Remove Thinset From Concrete House Home
Related Posts