Can You Tile Directly On Concrete? A Comprehensive Guide
The question of whether you can tile directly on concrete is a common one for homeowners and contractors alike. The short answer is yes, you often can. However, a successful tiling project on concrete requires careful preparation, assessment, and the use of appropriate materials. Ignoring these crucial steps can lead to costly failures, including cracked tiles, loose grout, and even separation of the tile from the concrete subfloor.
This article will explore the factors influencing the feasibility of tiling directly on concrete, encompassing the necessary preparation steps, suitable materials, and potential problem areas to avoid. Understanding these aspects is fundamental for achieving a durable and aesthetically pleasing tiled surface.
Assessing the Concrete Slab
Before embarking on any tiling project over concrete, a thorough assessment of the concrete slab's condition is paramount. This assessment involves evaluating several key characteristics: its flatness, stability, cleanliness, and moisture content. Neglecting any of these aspects can compromise the entire tiling installation.
Flatness: Concrete slabs are rarely perfectly level. An uneven surface can lead to uneven tile lines, difficulties in grout application, and increased stress on the tiles, potentially causing them to crack under pressure. The industry standard for flatness typically requires variations of no more than 1/8 inch over a 10-foot span. A long, straight edge combined with a level or measuring tape can identify any significant deviations. Corrective actions may involve self-leveling compounds or grinding down high spots.
Stability: A stable concrete slab is crucial for a long-lasting tiling installation. Examine the concrete for any cracks, crumbling, or signs of movement. Existing cracks, even hairline fractures, can propagate through the tile and grout lines over time. Addressing these cracks with crack isolation membranes or epoxy crack fillers is essential for preventing future problems. A structurally unsound concrete slab may require more extensive repairs or even replacement before tiling.
Cleanliness: The concrete surface must be free from any contaminants that could interfere with the bonding of the tile adhesive. This includes dirt, dust, oil, grease, paint, and any existing coatings. Thorough cleaning with a degreaser and scrubbing is often necessary. Acid etching can also be used to create a slightly porous surface, enhancing the adhesion of the thin-set mortar. Ensure that all cleaning agents are completely rinsed away before proceeding.
Moisture Content: Concrete is porous and can absorb moisture from the ground or the surrounding environment. Excessive moisture can compromise the bond between the tile adhesive and the concrete, leading to tile delamination. A moisture test is crucial to determine the moisture vapor emission rate (MVER) or relative humidity (RH) of the concrete. Various testing methods are available, including calcium chloride tests and electronic moisture meters. The allowable moisture levels will depend on the specific type of tile adhesive being used. If moisture levels are too high, moisture mitigation strategies, such as applying a moisture barrier, are necessary.
Preparing the Concrete Surface
Once the concrete slab has been assessed and deemed suitable for tiling, the next step involves preparing the surface to ensure optimal adhesion and a long-lasting installation. This preparation phase includes cleaning, patching, leveling, and potentially applying a primer.
Cleaning: Even after the initial assessment, a final cleaning is essential to remove any remaining dust or debris. Vacuuming the entire surface is a good starting point, followed by wiping down the concrete with a damp cloth. For oily or greasy surfaces, a suitable degreaser should be used, followed by thorough rinsing.
Patching: Any minor cracks, chips, or surface imperfections should be patched with a concrete patching compound. These compounds are designed to bond strongly with the existing concrete and provide a smooth, even surface for tiling. Follow the manufacturer's instructions for mixing and application. Allow the patching compound to fully cure before proceeding.
Leveling: As mentioned earlier, concrete slabs are often not perfectly level. Self-leveling compounds can be used to create a perfectly flat and level surface. These compounds are mixed with water and poured onto the concrete. They flow to fill low spots and irregularities, creating a smooth, even base for tiling. Follow the manufacturer's instructions carefully for mixing and application, as improper mixing can lead to problems with setting and adhesion.
Priming: Applying a primer to the concrete surface can improve the bond between the thin-set mortar and the concrete. Primers help to seal the concrete surface, reduce its porosity, and promote better adhesion. Choose a primer that is specifically designed for use with tile adhesives. Apply the primer according to the manufacturer's instructions, ensuring that it is evenly distributed and allowed to dry completely before proceeding.
Selecting Appropriate Materials
Choosing the right materials is critical for a successful tiling project on concrete. This includes selecting the appropriate type of tile, thin-set mortar, grout, and potentially crack isolation membranes. The specific materials chosen will depend on the type of tile being used, the expected traffic load, and the environmental conditions.
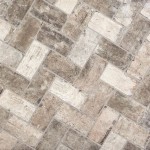
Tile Selection: A wide variety of tiles can be used on concrete floors, including ceramic, porcelain, natural stone, and glass. Porcelain tiles are generally a good choice for high-traffic areas due to their durability and low water absorption. Natural stone tiles can add a touch of elegance, but they may require sealing and more frequent maintenance. Consider the specific requirements of the space when selecting the tile type.
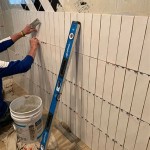
Thin-Set Mortar: Thin-set mortar is the adhesive that bonds the tile to the concrete surface. Choose a thin-set mortar that is specifically designed for use with the type of tile being installed and the concrete substrate. Modified thin-set mortars, which contain polymers, are often recommended for their enhanced bonding strength and flexibility. Consider the size and weight of the tiles when choosing the thin-set mortar, as larger and heavier tiles may require a more robust adhesive. Follow the manufacturer's instructions carefully for mixing and application.
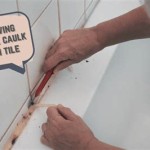
Grout: Grout fills the spaces between the tiles and provides a waterproof seal. Choose a grout that is appropriate for the type of tile being used and the expected traffic load. Cement-based grouts are a common choice, but epoxy grouts offer superior stain resistance and durability, making them a good option for high-traffic areas or areas prone to moisture. Consider the width of the grout joints when selecting the grout type, as some grouts are better suited for wider joints.
Crack Isolation Membranes: In areas where concrete movement is a concern, such as over expansion joints or areas with a history of cracking, a crack isolation membrane may be necessary. These membranes are applied to the concrete surface before tiling and are designed to absorb movement in the concrete, preventing it from transferring to the tile and grout. Choose a crack isolation membrane that is compatible with the thin-set mortar and tile being used. Follow the manufacturer's instructions carefully for installation.
Sealers: Certain types of tile, especially natural stone, require sealing to protect them from staining and water damage. Apply a sealer according to the manufacturer's instructions after the grout has cured. Regular resealing may be necessary to maintain the protection.
Proper preparation, suitable material selection, and adherence to manufacturer's instructions are crucial for a successful and lasting tile installation over concrete. Taking the time to understand and address these issues will help prevent costly problems and ensure an aesthetically pleasing and durable result.

How To Install Tile Over Concrete Greenbuildingadvisor
:max_bytes(150000):strip_icc()/can-you-install-tile-directly-on-concrete-1822600-04-458f7bb6c78348c1835cf8054ef36553.jpg?strip=all "How To Install Tile Over Concrete")
How To Install Tile Over Concrete

How To Install Tiles On Concrete Floors Stonesuper

How To Tile Onto Concrete Floors Porcelain Super
:max_bytes(150000):strip_icc()/can-you-install-tile-directly-on-concrete-1822600-01-8a89ceab1a274fb8ac81890ab7fc6b1b.jpg?strip=all "How To Install Tile Over Concrete")
How To Install Tile Over Concrete

How To Lay Tile On Concrete With Pictures Wikihow

How To Install Tile Over Concrete The Right Way Part 1 Handyman

Tile Over Concrete Subfloor An Easy Diy Tutorial

Can I Set Tile Directly Over A Concrete Floor

How To Lay Floor Tiles On Concrete Welcome The Rubi Tools Blog
Related Posts