How To Lay Tile Over a Concrete Slab: A Comprehensive Guide
Laying tile over a concrete slab is a common and effective way to create durable and aesthetically pleasing flooring in residential and commercial spaces. Concrete provides a stable and solid subfloor, making it an ideal base for tile installation. However, proper preparation and installation techniques are crucial to ensure a long-lasting and visually appealing finished product. This article provides a detailed, step-by-step guide on how to successfully lay tile over a concrete slab.
Before commencing any tiling project, it is imperative to thoroughly assess the concrete slab. A proper evaluation will identify potential issues that need to be addressed before moving forward. Ignoring these issues can lead to tile cracking, lifting, or other problems down the line. The following steps outline the critical aspects of concrete slab assessment.
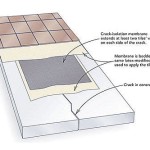
Begin by visually inspecting the surface for any cracks. Hairline cracks are generally not a major concern, but wider cracks (greater than 1/8 inch) require attention. These wider cracks indicate potential structural issues or movement in the slab that can compromise the tile installation. They may need to be addressed with crack isolation membranes or other specialized repair techniques. Document the location and extent of all cracks.
Next, check for any signs of moisture. This can be done visually by looking for discoloration, efflorescence (a white, powdery deposit), or dampness. Excessive moisture in the concrete can prevent the mortar from properly bonding to the slab, leading to tile failure. A moisture meter can provide a quantitative assessment of the slab's moisture content. Acceptable moisture levels will vary depending on the type of tile and mortar used, so it is crucial to consult the manufacturer's recommendations.
Evaluate the flatness of the concrete slab. An uneven surface will result in an uneven tile installation, which can be both unsightly and potentially hazardous. Use a long level (at least 6 feet) to check for depressions or high spots. Any significant deviations from level will need to be addressed with a self-leveling compound or by grinding down high spots.
Finally, assess the cleanliness of the concrete slab. The surface must be free of dirt, dust, grease, paint, adhesive residue, or any other contaminants that could interfere with the bonding of the mortar. Thorough cleaning is essential for proper adhesion. This might involve sweeping, vacuuming, scrubbing, or using a specialized concrete cleaner.
Preparing the Concrete Slab
Once the concrete slab has been thoroughly assessed, the next step is to prepare it for tile installation. This involves cleaning the surface, repairing any cracks or imperfections, and applying a primer to promote adhesion. Proper preparation is crucial for ensuring a strong and durable bond between the tile and the concrete.
Begin by thoroughly cleaning the concrete slab. Sweep or vacuum the surface to remove any loose debris. For stubborn dirt or grease, use a concrete cleaner and a stiff-bristled brush. Follow the manufacturer's instructions for the cleaner and ensure it is thoroughly rinsed off the surface. Allow the slab to dry completely before proceeding.
Address any cracks in the concrete slab. Hairline cracks can often be ignored, but wider cracks require repair. For cracks that are not structurally significant, a crack isolation membrane can be applied over the crack to prevent it from telegraphing through the tile. For larger or structurally significant cracks, consult with a structural engineer or concrete specialist for appropriate repair methods. These may involve filling the crack with a patching compound or injecting epoxy.
If the concrete slab is not level, use a self-leveling compound to create a smooth and even surface. Follow the manufacturer's instructions for mixing and applying the compound. This typically involves pouring the compound onto the floor and using a gauge rake or smoothing tool to spread it evenly. Allow the compound to dry completely before proceeding.
After the slab is clean, level, and repaired, apply a primer specifically designed for tile installation. The primer will help to improve the adhesion of the mortar to the concrete. Choose a primer that is compatible with the type of mortar you will be using. Apply the primer according to the manufacturer's instructions, typically with a roller or brush. Allow the primer to dry completely before proceeding. This step is crucial for preventing moisture loss from the mortar into the concrete, ensuring proper curing and bonding.
Before starting the tiling process, it is also essential to lay out the tile pattern. This will help to determine the best placement of the tiles and minimize cuts. Begin by finding the center point of the room and marking it with chalk lines. Lay out a row of tiles along each chalk line, using spacers to maintain consistent grout lines. Adjust the layout as needed to ensure that the tiles are evenly spaced and that any cut tiles are placed in less conspicuous areas. Consider the placement of full tiles versus cuts around the perimeter of the room. Aim for cuts that are at least half a tile in size, avoiding slivers of tile which can be difficult to manage and may not adhere well.
This planning stage is critical for achieving a visually appealing and professional-looking tile installation.
Installing the Tile
With the concrete slab properly prepared and the tile layout finalized, the actual tile installation can begin. This involves mixing the mortar, applying it to the slab, setting the tiles, and allowing the mortar to cure. Attention to detail and proper technique are crucial for achieving a successful and long-lasting tile installation.
Begin by mixing the mortar according to the manufacturer's instructions. Use a clean bucket and a mixing drill with a mixing paddle. Add water to the mortar powder gradually, mixing until you achieve a smooth, creamy consistency. Avoid adding too much water, as this can weaken the mortar. Let the mortar slake (sit undisturbed) for the recommended time (usually 5-10 minutes) before mixing again. This allows the chemicals in the mortar to properly activate.
Apply the mortar to the concrete slab using a notched trowel. The size of the notches will depend on the size and type of tile you are using. Consult the tile manufacturer's recommendations for the appropriate trowel size. Hold the trowel at a 45-degree angle and spread the mortar evenly over a small area, typically no more than 2-3 square feet at a time. Comb the mortar with the notched edge of the trowel to create ridges. This will ensure that the tile has adequate coverage.
Carefully place the tiles onto the mortar, pressing down firmly and twisting slightly to ensure good contact. Use tile spacers to maintain consistent grout lines. Periodically check the level of the tiles with a level and make adjustments as needed. Remove any excess mortar that squeezes up between the tiles.
Continue laying tiles, working in small sections and checking for level and alignment. Use a wet saw to cut tiles as needed to fit around edges and corners. Wear safety glasses and gloves when using a wet saw. If you do not have a wet saw, tile nippers can be used for smaller adjustments. Remember to maintain consistent grout lines throughout the installation.
After all the tiles have been laid, allow the mortar to cure for the recommended time, typically 24-72 hours. Do not walk on the tiles during this time. The curing time is crucial for the mortar to develop its full strength and bond to the concrete slab and the tiles.
Once the mortar has cured, remove the tile spacers and prepare to grout the tiles. Clean any remaining mortar residue from the tile surfaces. Ensure that the grout lines are free of debris. Select a grout color that complements the tiles and mix the grout according to the manufacturer's instructions. Apply the grout to the tile surface using a grout float, working the grout into the grout lines at a 45-degree angle. Remove excess grout from the tile surface with the grout float.
After the grout has set for the recommended time (usually 15-30 minutes), use a damp sponge to clean the tile surface. Rinse the sponge frequently in clean water. Wipe the tiles diagonally to avoid pulling grout out of the grout lines. Allow the grout to dry completely, then buff the tile surface with a clean, dry cloth to remove any remaining grout haze.
Finally, apply a grout sealer to protect the grout from stains and moisture. Follow the manufacturer's instructions for applying the sealer. This will help to keep the grout looking clean and new for years to come.
Essential Tools and Materials
A successful tile installation requires the proper tools and materials. Having everything on hand before starting the project will save time and frustration. This section outlines the essential items needed for laying tile over a concrete slab.
Tools:
- Tape Measure
- Pencil
- Level (at least 6 feet long)
- Notched Trowel (size depends on tile size)
- Rubber Mallet
- Tile Spacers
- Wet Saw (for cutting tiles)
- Grout Float
- Grout Sponge
- Mixing Drill with Mixing Paddle
- Buckets
- Safety Glasses
- Gloves
Materials:
- Tiles
- Mortar (thin-set)
- Grout
- Tile Primer
- Grout Sealer
- Self-Leveling Compound (if needed)
- Concrete Cleaner
- Crack Isolation Membrane (if needed)
- Clean Water
- Rags or Cloths
Selecting high-quality materials is just as important as using the right tools. Choose a mortar and grout that are specifically designed for tile installations over concrete slabs. Consult with a tile supplier or contractor for recommendations on the best products for your specific project.
Careful planning, meticulous preparation, and adherence to proper installation techniques are the keys to achieving a beautiful and durable tile floor over a concrete slab. Taking the time to do the job right will result in a finished product that will last for years to come.

Tiling Over A Ed Concrete Slab Fine Homebuilding

How To Install Tiles On Concrete Floors Stonesuper

How To Lay A Tile Floor On Concrete Diy Homeimprovement
:max_bytes(150000):strip_icc()/can-you-install-tile-directly-on-concrete-1822600-04-458f7bb6c78348c1835cf8054ef36553.jpg?strip=all "How To Install Tile Over Concrete")
How To Install Tile Over Concrete

How To Tile Onto Concrete Floors Porcelain Super

How To Lay Tile Over Concrete

How To Lay Tile On Concrete With Pictures Wikihow

Covering Concrete Slab Installation Dektektile Luxury Tile Decking Material

How To Lay Floor Tiles On Concrete Welcome The Rubi Tools Blog

How To Install Ceramic Tiles On Concrete Floor Tile Installation
Related Posts