Can You Tile Over Polished Concrete Floors? A Comprehensive Guide
Polished concrete floors have gained significant popularity in residential and commercial settings due to their durability, aesthetic appeal, and low maintenance requirements. However, homeowners or business owners may eventually desire a change in flooring, leading to the question: can you tile over polished concrete floors? The answer is, technically, yes, but it's not as straightforward as tiling over other subfloor materials. Successful tile installation over polished concrete necessitates careful preparation and adherence to specific techniques to ensure longevity and prevent future issues like tile cracking or detachment.
The inherent characteristics of polished concrete present challenges for tile adhesion. The polishing process creates a dense, non-porous surface that resists bonding with typical tile adhesives. This lack of porosity prevents the mortar from properly penetrating and creating a mechanical bond. Furthermore, the smoothness of the polished surface reduces the surface area available for adhesion. Without proper preparation, tiles are likely to delaminate over time, resulting in costly repairs and inconvenience.
This article will explore the key considerations and steps involved in successfully tiling over polished concrete floors. It will delve into the necessary surface preparation methods, appropriate adhesive selection, and installation techniques to achieve a durable and aesthetically pleasing tiled surface. Addressing these aspects is crucial for ensuring a long-lasting and professionally finished result.
Key Point 1: Surface Preparation is Paramount
The success of tiling over polished concrete hinges on meticulous surface preparation. The primary goal is to create a profiled surface that promotes mechanical adhesion between the concrete and the tile adhesive. Several methods can be employed to achieve this, each with its own advantages and drawbacks.
One common method is mechanical abrasion, which involves grinding or scarifying the polished concrete surface. This process roughens the surface, creating a profile that allows the adhesive to grip effectively. Various tools can be used, including diamond grinders, scarifiers, and shot blasters. The choice of tool depends on the extent of polishing and the desired profile. For lightly polished concrete, a diamond grinder with a coarse grit may suffice. For more heavily polished surfaces, a scarifier or shot blaster may be necessary to achieve the required texture.
The level of abrasion is critical. Over-grinding can weaken the concrete slab, while insufficient abrasion will not provide adequate adhesion. It is advisable to perform a test patch in an inconspicuous area to assess the effectiveness of the chosen abrasion method. After grinding, thorough cleaning is essential to remove dust and debris, which can interfere with adhesion. A HEPA-filtered vacuum cleaner is recommended to capture fine dust particles.
Another preparation method involves chemical etching. This process uses acidic solutions to dissolve a thin layer of the polished concrete surface, creating microscopic pores and increasing surface roughness. Etching is often followed by a neutralizing rinse and thorough cleaning. While chemical etching can be effective, it requires careful handling and disposal of chemicals. It is also crucial to ensure that the etching solution is fully neutralized to prevent future reactions that could compromise the adhesive bond.
Regardless of the chosen method, it is essential to test the surface for porosity and adhesion. A simple water drop test can assess porosity. If water beads up on the surface, it indicates insufficient preparation. Adhesion can be tested by applying a small patch of adhesive and allowing it to cure. Then, attempt to remove the adhesive patch. If it detaches easily, further surface preparation is required.
Key Point 2: Selecting the Appropriate Adhesive
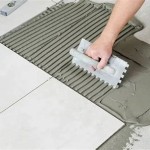
The choice of adhesive is as important as surface preparation. Traditional thin-set mortars are generally not suitable for tiling over polished concrete due to their limited bonding strength on non-porous surfaces. Instead, specialized adhesives designed for non-porous substrates should be used. These adhesives typically contain polymers and additives that enhance adhesion and flexibility.
Epoxy mortars offer excellent bond strength and chemical resistance, making them a suitable choice for tiling over polished concrete. Epoxy mortars are two-part systems that require mixing before application. They provide a strong, durable bond and are resistant to water, chemicals, and impact. However, epoxy mortars have a shorter working time compared to other adhesives and can be more challenging to apply. They also tend to be more expensive.
Polymer-modified thin-set mortars are another option. These mortars contain polymers that improve adhesion, flexibility, and water resistance. They are generally easier to apply than epoxy mortars and offer a longer working time. When selecting a polymer-modified thin-set, it is crucial to choose a product specifically formulated for non-porous substrates and to follow the manufacturer's instructions carefully. Some polymer-modified thin-sets may require the addition of a bonding agent to further enhance adhesion.
Regardless of the adhesive type, it is essential to consider the tile type and intended use of the tiled surface. Larger tiles require adhesives with higher bond strength and shear resistance. Areas subject to heavy foot traffic or moisture exposure may necessitate the use of more robust adhesives with enhanced water resistance.
Before applying the adhesive, it is advisable to conduct a bond test in an inconspicuous area. Apply the adhesive to a small section of the prepared concrete surface, install a few tiles, and allow the adhesive to cure according to the manufacturer's instructions. Then, attempt to remove the tiles. If they are difficult to remove and the adhesive remains firmly bonded to both the concrete and the tile, the chosen adhesive is likely suitable.
Key Point 3: Addressing Movement and Expansion Joints
Concrete is subject to thermal expansion and contraction, which can cause stress on the tile installation. To mitigate this stress, it is essential to incorporate movement and expansion joints into the tiled surface. These joints allow the concrete to move without transferring stress to the tiles, preventing cracking and delamination.
Existing expansion joints in the concrete slab should be honored and extended through the tile installation. If the concrete slab lacks expansion joints, it may be necessary to create them. The spacing and width of expansion joints depend on the size of the tiled area, the type of tile, and the expected temperature fluctuations. Generally, expansion joints should be placed at intervals of 8 to 12 feet in each direction.
Movement joints, also known as control joints, are typically filled with a flexible sealant, such as silicone or polyurethane caulk. These sealants allow for movement without cracking or losing their seal. The sealant should be compatible with both the tile and the adhesive. Proper installation of movement joints involves cleaning the joint thoroughly and filling it with backer rod to the correct depth before applying the sealant.
For large tiled areas, it may be necessary to incorporate isolation membranes. These membranes are applied between the concrete substrate and the tile installation. They act as a decoupling layer, absorbing stress and preventing it from transferring to the tiles. Isolation membranes are particularly beneficial in areas with significant temperature fluctuations or where the concrete slab is subject to movement.
In addition to expansion and movement joints, it is essential to consider perimeter joints. These are small gaps left between the tile installation and walls or other vertical surfaces. Perimeter joints allow for expansion and contraction of the tile and concrete without putting pressure on the surrounding structures. These joints are typically filled with a flexible sealant.
Careful planning and execution of expansion and movement joints are crucial for the long-term performance of the tile installation. Neglecting these details can lead to costly repairs and premature failure of the tiled surface. Consultation with a qualified tile installer or structural engineer is recommended for complex projects or when unsure about the appropriate joint spacing and design.
Beyond these key points, other considerations include ensuring the concrete slab is structurally sound and free of cracks or damage. Any existing cracks should be repaired before tiling. It is also important to ensure that the concrete slab is level and flat. Uneven surfaces can create stress points in the tile installation, leading to cracking. Self-leveling compounds can be used to correct minor imperfections in the concrete slab.
Proper curing of the adhesive is also essential. Following the manufacturer's instructions regarding curing time is crucial for achieving maximum bond strength. Avoid subjecting the tiled surface to heavy traffic or moisture exposure during the curing period.
Finally, regular maintenance is necessary to prolong the life of the tiled surface. This includes cleaning the tiles with appropriate cleaning products and inspecting the grout and sealant for damage. Damaged grout or sealant should be repaired promptly to prevent water penetration and potential damage to the substrate.
Tiling over polished concrete floors is a challenging but achievable task. By prioritizing thorough surface preparation, selecting the appropriate adhesive, and incorporating adequate movement joints, it is possible to create a durable and aesthetically pleasing tiled surface that will last for years to come.

Polished Concrete Overlay Why It Could Be Perfect For Your Property

Transforming Your Tiles With Cemcrete

Levelcova Concrete Resurfacing Auckland Floor Masters

Polished Concrete Overlay Why It Could Be Perfect For Your Property

How To Install Tiles On Concrete Floors Stonesuper

Polished Concrete Vs Tiles Northwest Resurfacing

Blog Polished Concrete Vs Ceramic Tile

Сost Of Polished Concrete Floors Vs Tiles Southside Polishing

Polished Overlay Helps Overcome Floor Challenges Concrete Decor

Ghosting On Concrete Polished Floors Grinders Tauranga Taupo Wellington
Related Posts