How To Lay Ceramic Tile in Kitchen Sinks and Countertops: A Singapore Perspective
Ceramic tile offers durability, versatility, and aesthetic appeal, making it a popular choice for kitchen sinks and countertops in Singaporean homes. The tropical climate necessitates materials that are resistant to moisture, stains, and heat, properties readily found in ceramic tiles. While professional installation is always recommended, understanding the process allows homeowners to make informed decisions and potentially undertake the project themselves with proper planning and execution. This article outlines the steps involved in laying ceramic tile in kitchen sinks and countertops within the context of Singaporean building standards and available materials.
Choosing the right ceramic tile is crucial. Consider factors like size, shape, color, and pattern to achieve the desired aesthetic. Smaller tiles are generally better suited for sinks and areas with curves, while larger tiles can create a more seamless look on countertops. Slip resistance is paramount, especially near the sink, to prevent accidents. In Singapore, suppliers offer a wide range of ceramic tiles suitable for both indoor and outdoor use, catering to diverse design preferences and budgetary constraints. Ensure the tiles are specifically rated for countertops and/or wet areas to guarantee long-term performance.
Beyond aesthetics, practicality plays a significant role. Darker tiles can conceal stains more effectively than lighter ones. Textured tiles offer better slip resistance, but they can be more difficult to clean. The grout color also impacts the overall look and maintenance. Epoxy grout is preferred for its superior water resistance and stain-proofing qualities, particularly important in Singapore's humid environment. Research different tile types and grout options available in Singaporean hardware stores to make an informed selection.
Preparation is Paramount: Assessing the Existing Surface
Before commencing the tiling process, careful preparation of the existing surface is essential. This involves assessing its condition, cleaning it thoroughly, and making necessary repairs. For countertops, the existing laminate or other covering needs to be removed completely. For sinks, ensure the sink basin is sturdy and structurally sound before proceeding. In Singapore, older homes may have underlying issues like water damage or termite infestations that need to be addressed before tiling.
The surface must be level, clean, and free of any loose debris, grease, or paint. Use a scraper to remove any adhesive residue left behind from the previous countertop covering. Clean the surface with a suitable degreaser and allow it to dry completely. Any cracks or imperfections must be repaired with a patching compound. Sand down the repaired areas to ensure a smooth and even surface. This meticulous preparation ensures proper adhesion of the tile adhesive and prevents future problems.
For increased stability, consider installing a cement backer board on the countertop surface. Cement backer board provides a waterproof and durable substrate for the tiles. It is particularly useful in areas prone to moisture, such as around the sink. Cut the backer board to the desired size and shape using a utility knife and score the cut line before snapping the board. Secure the backer board to the countertop using screws designed for this purpose. Ensure the screws are flush with the surface of the backer board.
The Art of Tiling: Adhesive Application and Tile Placement
The success of the tiling project hinges on the proper application of the adhesive and the precise placement of the tiles. Select a high-quality tile adhesive specifically designed for ceramic tiles and suitable for kitchen countertops and sinks. These adhesives are readily available in Singaporean hardware stores. Follow the manufacturer's instructions for mixing the adhesive, ensuring a consistent and workable consistency.
Apply the adhesive to the prepared surface using a notched trowel. The size of the notch will depend on the size of the tiles being used. Hold the trowel at a 45-degree angle and spread the adhesive evenly across the surface, creating ridges. These ridges help to create a strong bond between the tiles and the substrate. Work in small sections to prevent the adhesive from drying out before the tiles are placed.
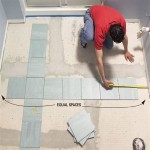
Carefully place the tiles onto the adhesive, pressing down firmly and twisting slightly to ensure good contact. Use tile spacers to maintain consistent grout lines between the tiles. These spacers are available in various sizes to achieve the desired grout line width. Check the level of the tiles using a spirit level and make any necessary adjustments before the adhesive sets. Work systematically, ensuring that the tiles are aligned correctly and the grout lines are straight and even.
For sinks, special attention needs to be paid to cutting the tiles to fit the curves and corners. Use a wet saw or tile cutter to make precise cuts. Mark the cut lines on the tile using a pencil before cutting. For curved cuts, a tile nipper can be used to gradually shape the tile. Take your time and make small cuts to avoid chipping or breaking the tiles. Dry-fit the cut tiles before applying adhesive to ensure a perfect fit.
After all the tiles have been laid, allow the adhesive to cure completely according to the manufacturer's instructions. This typically takes 24 to 48 hours. Avoid walking on or placing any heavy objects on the tiled surface during this time. Once the adhesive has cured, remove the tile spacers.
Grouting and Sealing: Finishing Touches for Longevity
Grouting is the final step in the tiling process. It fills the gaps between the tiles, providing a waterproof and aesthetically pleasing finish. Select a grout color that complements the tiles. Epoxy grout is the preferred choice for kitchen sinks and countertops in Singapore due to its superior water resistance and stain-proofing qualities.
Mix the grout according to the manufacturer's instructions. Apply the grout to the tiled surface using a grout float. Spread the grout diagonally across the tiles, forcing it into the grout lines. Remove any excess grout from the surface of the tiles using the grout float. Wipe the tiles clean with a damp sponge, rinsing the sponge frequently. Be careful not to remove too much grout from the grout lines.
Once the grout has dried slightly, use a grout sponge to smooth the grout lines. This will create a professional and consistent finish. Allow the grout to cure completely according to the manufacturer's instructions. This typically takes 24 to 72 hours.
After the grout has cured, seal the grout lines with a grout sealer. This will help to protect the grout from water damage and stains. Apply the sealer according to the manufacturer's instructions. Reapply the sealer periodically to maintain its effectiveness.
Finally, caulk the perimeter of the countertop and sink where they meet the wall or other surfaces. Use a silicone caulk that is specifically designed for kitchens and bathrooms. This will create a watertight seal and prevent water from seeping behind the tiles. Apply the caulk evenly and smoothly, and wipe away any excess caulk with a damp cloth.
Maintaining ceramic tile countertops and sinks is relatively straightforward. Regular cleaning with a mild detergent and water is usually sufficient. Avoid using abrasive cleaners or scouring pads, as these can scratch the tile surface. Clean spills promptly to prevent staining. Inspect the grout lines regularly and reapply grout sealer as needed to maintain their water resistance. By following these simple maintenance tips, the ceramic tile countertop and sink will provide years of durable and beautiful service in a Singaporean home.

Kitchen Tiling Singapore Complete Guide With 2025 Costing

Kitchen Tiling Singapore Complete Guide With 2025 Costing

Kitchen Tiling Singapore Complete Guide With 2025 Costing

Kitchen Bathroom Vanity Counter Tops Tiles Singapore Malford Ceramics Pte Ltd

Kitchen Tiling Singapore Complete Guide With 2025 Costing

2ezbuilders Kitchen Tiling Tiles Singapore

6 Styles Of Kitchen Wall Tiles For Your Home Sevens Build

Kitchen Tiling Contractor Ager Flooring

How High To Lay Tiles Complete Guide Your Project

Feast Your Eyes On These Exclusive 13 Kitchen Floor Tiles
Related Posts