How to Remove Silicone From Tiles Without Damaging Tile Adhesive
Removing silicone sealant from tiles is a common task encountered during bathroom or kitchen renovations, repairs, or even simple cleaning. Silicone, prized for its waterproof and flexible properties, is frequently used to seal gaps and joints around tiles, preventing water ingress and maintaining a hygienic environment. However, removing it can be challenging due to its adhesive nature. The key concern during silicone removal is to avoid damaging the tile adhesive underneath, which is responsible for holding the tiles securely in place. Inadvertent damage to the adhesive can lead to loose tiles, requiring more extensive and costly repairs.
The process requires patience, the right tools, and a systematic approach. Rushing or using excessive force can easily damage the tiles themselves, the grout lines, or, most importantly, the critical tile adhesive lurking beneath the silicone layer. This article provides a comprehensive guide to safely and effectively remove silicone from tiles while preserving the integrity of the underlying tile adhesive.
Before commencing any removal procedure, it is important to identify the type of tile and the nature of the silicone sealant. Certain types of tiles, such as natural stone tiles, may be more susceptible to scratching or staining and require extra caution. Similarly, different types of silicone sealants may respond differently to various removal techniques. A preliminary assessment ensures the chosen method is appropriate and minimizes the risk of damage.
Preparation: Assessing the Situation and Gathering Materials
Prior to beginning the removal process, a thorough assessment of the situation is paramount. Determine the extent of the silicone sealant that requires removal. Observe the type of tile being worked on; is it ceramic, porcelain, glass, or natural stone? Natural stone tiles are often more porous and susceptible to damage from harsh chemicals or abrasive tools. Understanding the tile material will dictate the use of specific solvents and tools.
Gather the necessary materials and tools. A sharp utility knife or a specialized silicone removal tool is essential. A plastic scraper, often made of acrylic or nylon, offers a less aggressive alternative compared to metal scrapers, minimizing the risk of scratching the tile surface. Solvents designed for silicone removal, such as mineral spirits or commercially available silicone dissolvers, are valuable for softening the sealant. Clean cloths or paper towels are necessary to wipe away residue and keep the work area clean. A heat gun or hairdryer can be used to soften the silicone, but caution must be exercised to avoid overheating the tiles or surrounding materials. Finally, safety glasses and gloves are important for protecting your eyes and hands from potential splashes or sharp edges.
Before applying any solvents, test them in an inconspicuous area. This will help determine if the solvent will discolor or damage the tile surface. Apply a small amount to a corner or an area hidden from view, wait a few minutes, and then wipe it away. If there is no adverse reaction, the solvent can be safely used on the rest of the silicone.
The Silicone Removal Process: A Step-by-Step Guide
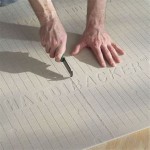
The removal process should begin with a mechanical approach, aiming to remove as much silicone as possible without resorting to harsh chemicals or excessive force. Use a sharp utility knife or a specialized silicone removal tool to carefully score along both edges of the silicone bead. This separates the silicone from the tile surface and the adjacent fixture (e.g., a bathtub or sink). Take care not to dig the blade into the tile itself, as this can cause scratches or chips. Apply consistent pressure and maintain a steady hand to achieve a clean, even cut.
Once the silicone is scored, use a plastic scraper to gently lift and peel away as much of the sealant as possible. Avoid using metal scrapers, as they are more likely to scratch the tile surface. Work slowly and methodically, applying consistent pressure to avoid tearing the silicone. If the silicone is particularly stubborn, a heat gun or hairdryer can be used to soften it. Apply heat evenly and cautiously, keeping the heat source moving to prevent overheating the tiles or adhesive. The heat will make the silicone more pliable and easier to peel away.
After removing the bulk of the silicone, a thin layer of residue often remains on the tile surface. This residue can be difficult to remove with mechanical methods alone. This is where solvents come into play. Apply a small amount of the chosen solvent (mineral spirits or a commercial silicone dissolver) to a clean cloth and gently wipe the residue. Allow the solvent to dwell for a few minutes to soften the silicone further. Avoid pouring the solvent directly onto the tile surface, as this can saturate the grout lines or potentially damage the tile adhesive. Instead, apply the solvent to a cloth and then to the affected area.
After the solvent has had time to work, use the plastic scraper to gently scrub away the remaining residue. Wipe the area clean with a damp cloth to remove any traces of the solvent. Repeat this process as needed until the tile surface is completely clean and free of silicone residue. Remember to always work in a well-ventilated area when using solvents, and wear appropriate safety gear, such as gloves and eye protection. Take breaks as needed to avoid fatigue, which can increase the risk of accidents or damage.
Protecting the Tile Adhesive: Key Considerations
The primary goal during silicone removal is to protect the integrity of the tile adhesive. Tile adhesive, typically a cement-based mortar or an epoxy-based compound, is responsible for bonding the tiles to the underlying substrate (e.g., concrete or drywall). Damage to the adhesive can compromise the bond, leading to loose or cracked tiles. Several factors can contribute to adhesive damage during silicone removal.
Excessive force is a common culprit. Forcing a scraper or other tool under the silicone can exert undue pressure on the adhesive, weakening its bond with the tile or the substrate. Similarly, using abrasive tools or harsh chemicals can erode the adhesive over time. The longer the adhesive is exposed to these factors, the greater the risk of damage.
Solvent penetration is another concern. While solvents are essential for removing silicone residue, they can also seep into the grout lines or the gap between the tile and the substrate, potentially softening or dissolving the adhesive. To minimize this risk, apply solvents sparingly and avoid prolonged exposure. Use a damp cloth to wipe away excess solvent immediately after use.
Heat can also affect the adhesive. While a heat gun or hairdryer can soften the silicone, excessive heat can weaken the bond between the adhesive and the tile or the substrate. Use heat cautiously and avoid concentrating it on one area for too long. Keep the heat source moving and monitor the tile temperature to prevent overheating.
To further protect the tile adhesive, consider the following tips: Minimize the use of solvents by focusing on mechanical removal methods first. Use a sharp utility knife or a specialized silicone removal tool to carefully score and cut the silicone. Avoid using excessive force when scraping or peeling the silicone. Work slowly and methodically, allowing the solvent to do its job. Use a plastic scraper instead of a metal scraper to minimize the risk of scratching the tile surface. Apply solvents sparingly and wipe away excess immediately. Use heat cautiously and avoid concentrating it on one area for too long. If possible, avoid removing silicone during periods of high humidity, as moisture can weaken the adhesive. If the adhesive is already damaged or compromised, consider replacing the affected tiles and re-applying the adhesive.
By following these guidelines, the risk of damaging the tile adhesive during silicone removal can be significantly reduced. Patience, careful technique, and the right tools are essential for achieving a successful outcome while preserving the integrity of the tiled surface.

How To Remove Silicone From Tiles A Step By Guide

How To Remove Silicone From Tiles A Step By Guide

How To Remove Silicone From Tiles Easy Step By Guide

How To Remove Silicone Sealant From Tile Glass Metal And Wood

How To Remove Silicone Sealant From Tiles Homey And Adhesive

How To Remove Silicone From Shower Bathroom Tiles Inspire Diy Kent Thomas

How To Remove Silicone Sealant Weber

How To Remove Silicone Sealant Daqiq Chimie Co

How To Remove Silicone Sealant The Best Way Caulk

How To Remove Silicone Sealant Daqiq Chimie Co
Related Posts