How To Remove Tile From Shower
Removing tile from a shower is a common home improvement task undertaken for various reasons, including remodeling, repairing water damage, or upgrading the aesthetic appeal of the bathroom. This process, while physically demanding, can be accomplished by individuals with a moderate level of DIY experience provided the correct tools and techniques are employed.
Prior to commencing any tile removal project, it is crucial to assess the existing shower structure and identify potential hazards. Understanding the substrate beneath the tile and the type of adhesive used will significantly influence the removal strategy. Furthermore, safety precautions are paramount to prevent injury and minimize dust exposure.
This article details a systematic approach to removing shower tile, encompassing preparation, tool selection, removal techniques, and surface preparation for re-tiling. By following these guidelines, individuals can effectively and safely remove tile from their shower and prepare the area for future renovations.
Preparing for Tile Removal
The initial stage of shower tile removal involves meticulous preparation. This includes safeguarding the surrounding area, gathering necessary tools, and understanding the existing tile installation. The primary objective is to minimize damage to adjacent surfaces and ensure a safe working environment.
Firstly, the bathroom should be thoroughly ventilated. Opening windows and doors is necessary to dissipate dust and fumes generated during the demolition process. Ideally, a fan should be positioned to exhaust air outwards, preventing the spread of airborne particles throughout the house.
Secondly, protect all fixtures and surfaces not being altered during the renovation. Cover the shower floor and surrounding bathroom floor with heavy-duty drop cloths or plastic sheeting. Secure the coverings with painter's tape to prevent them from shifting during the work. Protect the shower drain by plugging it with a rag or installing a temporary drain cover to prevent debris from entering the plumbing system.
Thirdly, personal protective equipment (PPE) is essential. Safety glasses are necessary to protect the eyes from flying debris. Gloves, preferably heavy-duty work gloves, will shield the hands from cuts and abrasions. A dust mask or respirator is critical to prevent inhaling dust and mold spores. Long sleeves and pants should be worn to minimize skin exposure.
Finally, gather the necessary tools. These tools will vary based on the specific tile and adhesive used, but typically include a hammer, chisel (or several chisels of varying sizes), a pry bar, a grout saw or scoring tool, a wide putty knife or scraper, a drill with various bits (including a masonry bit), and a utility knife. Power tools, such as an oscillating multi-tool with a grout removal blade or a demolition hammer with a chisel attachment, can significantly expedite the process, but require caution and experience to operate safely and effectively.
Tile Removal Techniques
The core of the tile removal process lies in the specific techniques employed to dislodge the tiles from the substrate. A thoughtful approach is crucial to minimize damage to the underlying wall or floor and prevent potential plumbing or structural issues.
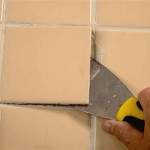
The initial step is to remove the grout surrounding the tiles. A grout saw or scoring tool is used to carefully cut along the grout lines. Apply even pressure and avoid gouging the adjacent tiles. An oscillating multi-tool with a grout removal blade can be used for this purpose, offering greater speed and precision, but requires a steady hand. Completely removing the grout will significantly ease the subsequent tile removal process.
Once the grout is removed, begin prying the tiles loose. Start with a corner tile or a tile that appears to be already loose. Position the chisel at an angle between the tile and the substrate. Gently tap the chisel with a hammer to work it behind the tile. Apply consistent, controlled pressure to avoid breaking the tile or damaging the wall. If the tile is firmly adhered, try another location or use a different size chisel. A wider chisel may distribute force more evenly across the tile's surface.
For particularly stubborn tiles, consider heating the tile with a heat gun. The heat can soften the adhesive, making it easier to remove. Be cautious when using a heat gun, as excessive heat can damage certain substrates or even cause a fire. Apply heat in short bursts and continuously monitor the surface temperature.
If the tiles are extremely difficult to remove using manual methods, a demolition hammer with a chisel attachment may be necessary. This tool provides significant power, but requires extreme caution. Start with a low setting and gradually increase the power as needed. Focus the chisel on the grout lines rather than directly on the tiles to minimize damage to the substrate. Wear appropriate ear protection when using a demolition hammer.
As tiles are removed, immediately place them in a sturdy container for disposal. Avoid stacking tiles too high to prevent the container from becoming too heavy and difficult to handle. Dispose of the debris properly according to local regulations.
Surface Preparation After Tile Removal
Once all the tiles have been removed, the substrate will likely be uneven and covered with residual adhesive. Proper surface preparation is critical to ensure a smooth and stable base for the new tile installation. This stage involves removing adhesive residue, repairing any damage to the substrate, and applying a sealant or primer if necessary.
Firstly, remove any remaining adhesive. A wide putty knife or scraper can be used to scrape off loose adhesive residue. For stubborn adhesive, chemical adhesive removers may be necessary. Apply the remover according to the manufacturer's instructions, ensuring adequate ventilation. Allow the remover to dwell for the recommended time, then scrape away the softened adhesive. For very persistent adhesive, a heat gun can be used in conjunction with the adhesive remover.
Secondly, inspect the substrate for damage. Look for cracks, holes, or soft spots. If the substrate is drywall, repair any damaged areas with drywall compound. Apply the compound in thin layers, allowing each layer to dry completely before applying the next. Sand the repaired areas smooth to blend them with the surrounding surface. If the substrate is cement board, repair cracks with a cement-based patching compound. For significant damage, it may be necessary to replace entire sections of the substrate.
Thirdly, address any mold or mildew issues. Thoroughly clean the substrate with a bleach solution (one part bleach to ten parts water). Allow the solution to dwell for several minutes, then scrub the surface with a stiff brush. Rinse thoroughly with clean water and allow the substrate to dry completely. If mold growth is extensive, consider hiring a professional mold remediation service.
Finally, apply a sealant or primer. A moisture-resistant sealant is essential for shower walls to protect the substrate from water damage. Apply the sealant according to the manufacturer's instructions, ensuring complete coverage. Allow the sealant to dry completely before installing the new tile. A primer can also be applied to improve adhesion between the substrate and the new tile mortar. Choose a primer specifically designed for tile installation and follow the manufacturer's recommendations.
Preparing the surface correctly is essential for a long-lasting and waterproof tile installation. Taking the time to properly clean, repair, and seal the substrate will prevent future problems such as water damage, mold growth, and tile delamination.

How To Remove Bathtub Shower Wall Tiles

The Best Way To Remove Old Shower Tile

Tips On How To Remove Old Shower Tile Ugly Duckling House

Tips On How To Remove Old Shower Tile Ugly Duckling House

Easy Diy Guide On Removing Tiles From Walls Fantastic Handyman Au

How To Remove Tiles From The Wall Using A Multi Tool Carefully Without Damage

How To Remove Tiled Shower Walls The Floor Elf

How To Remove A Bathroom Wall Tile Today S Homeowner

How To Remove Bathroom Tile 11 Steps With Pictures Wikihow

Repair Fallen Tile Reinstall Shower With Simple Fix Re Install Bath No Grout
Related Posts