How To Remove Wall Tiles Without Breaking Them
Removing wall tiles without damaging them is a delicate process that requires patience, the right tools, and a methodical approach. This article provides a comprehensive guide to successfully detaching tiles from walls while preserving their integrity for potential reuse. The techniques described herein focus on minimizing breakage and ensuring a clean removal, applicable in scenarios ranging from minor renovations to complete tile replacements.
The main challenge in tile removal lies in the strong bond between the tile and the substrate, typically cement board, plaster, or drywall. This bond, created by the adhesive (mortar or mastic), is designed to be durable and long-lasting. Breaking this bond without damaging the tile requires careful manipulation and the strategic use of solvents and leverage.
Preparing for Tile Removal
Before commencing the removal process, it is crucial to prepare the work area. This involves safeguarding surrounding surfaces and gathering the necessary tools. Comprehensive preparation significantly increases the chances of a successful and damage-free tile removal.
Firstly, protect the flooring and any adjacent fixtures with drop cloths or plastic sheeting. This prevents damage from falling debris and simplifies cleanup. Securing these coverings with tape is recommended to prevent slippage and ensure comprehensive protection.
Next, assemble the required tools. Essential items include:
* Grout Removal Tool: A grout saw, oscillating multi-tool with a grout removal blade, or a utility knife for removing grout. * Putty Knife or Scraper: A thin, flexible putty knife or scraper is crucial for prying the tiles loose. A variety of sizes may be necessary. * Heat Gun or Hair Dryer: Applying heat can soften the adhesive, making removal easier, especially with mastic-based adhesives. * Solvent Solutions: Depending on the type of adhesive used, solvent solutions like mineral spirits or specific mastic removers can aid in dissolving the bond. Always test the solvent in an inconspicuous area first to ensure it does not damage the tile's surface. * Safety Glasses and Gloves: Protecting eyes and hands is paramount when working with tools and potentially hazardous materials. * Hammer: Used sparingly and carefully, a hammer can help tap the putty knife or scraper behind the tile. * Pry Bar (Small): A small pry bar can provide extra leverage for stubborn tiles, but must be used with caution to avoid cracking the tiles. * Spray Bottle: For applying solvent solutions. * Clean Cloths: For wiping surfaces and cleaning up spills.Identifying the type of adhesive used is also crucial. Mastic, an older type of adhesive, is often more flexible and responsive to heat and solvents. Mortar, typically used with ceramic and porcelain tiles in wet areas, is more rigid and may require a more forceful approach. If unsure, consulting with a tile professional can provide valuable insights.
Removing the Grout
The initial step in removing wall tiles without breaking them is to completely remove the grout surrounding each tile. This eliminates any mechanical interlocking that would prevent the tile from detaching cleanly. Neglecting this step significantly increases the risk of tile breakage.
Employ a grout saw, oscillating multi-tool with a grout removal blade, or a utility knife to carefully remove the grout. A grout saw is a manual tool that requires patience and precision, while an oscillating multi-tool offers faster and more efficient grout removal. A utility knife can be used for small areas or intricate grout lines, but requires careful handling to avoid cutting yourself.
When using a grout saw or utility knife, apply consistent pressure and follow the grout lines meticulously. Avoid applying excessive force, which could damage the adjacent tiles. The goal is to remove the grout entirely, creating a clear separation between the tiles.
If using an oscillating multi-tool, select a grout removal blade that is appropriate for the type of grout. Start slowly and gradually increase the speed as you become more comfortable with the tool. Keep the blade flush with the grout line and avoid tilting it, which could scratch the tiles.
Once the majority of the grout has been removed, use a small brush or vacuum cleaner to remove any remaining grout debris. This will ensure that the tiles can be accessed more easily for the next step.
Detaching the Tiles
After the grout has been completely removed, the next step is to detach the tiles from the wall. This requires a combination of heat, solvent application, and careful prying. The specific technique will vary depending on the type of adhesive used and the condition of the wall surface.
Begin by applying heat to the tile using a heat gun or hair dryer. Focus the heat on the grout lines and the edges of the tile, as this will help to soften the adhesive. Move the heat source slowly and evenly to avoid overheating the tile or the surrounding wall surface. Avoid prolonged heating in one spot to prevent scorching or damage.
Next, apply a solvent solution to the grout lines and the edges of the tile. Mineral spirits or a specific mastic remover can be effective at dissolving the adhesive. Use a spray bottle or a small brush to apply the solvent evenly, allowing it to penetrate the adhesive. Let the solvent sit for several minutes to allow it to work.
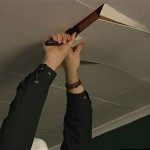
Once the adhesive has been softened by the heat and solvent, use a thin, flexible putty knife or scraper to gently pry the tile away from the wall. Start at the edges of the tile and work your way towards the center. Apply gentle pressure and avoid forcing the tile, which could cause it to crack.
If the tile is particularly stubborn, use a hammer to gently tap the putty knife or scraper behind the tile. This will help to break the bond between the tile and the adhesive. Be careful not to hit the tile directly, as this could cause it to break.
For larger tiles, a small pry bar may be necessary to provide extra leverage. Insert the pry bar between the tile and the wall, and gently pry the tile away. Be extremely careful when using a pry bar, as it can easily damage the tile or the surrounding wall surface. Use a thin piece of wood or plastic as a buffer between the pry bar and the wall to minimize damage.
As the tile begins to detach, continue to apply heat and solvent as needed. Work slowly and patiently, taking your time to avoid damaging the tile. Once the tile has been completely detached, carefully remove it from the wall and set it aside.
Repeat this process for each tile, working systematically across the wall. Keep a close eye on the condition of the tiles and the wall surface, and adjust your technique as needed. If you encounter any particularly stubborn tiles, don't hesitate to stop and reassess your approach.
Following the removal of each tile, inspect the back of the tile and the wall surface for any remaining adhesive. Remove any excess adhesive with a scraper or solvent, and clean the surfaces thoroughly. This will prepare the tiles for reuse and ensure that the wall surface is ready for any necessary repairs or modifications.
Addressing Potential Issues and Considerations
During the tile removal process, several issues may arise that require specific attention. Understanding these potential problems and having strategies to address them will contribute to a more successful outcome.
One common issue is adhesive that refuses to soften, despite the application of heat and solvent. In such cases, consider employing a stronger solvent or increasing the heat application time. However, exercise caution to avoid damaging the tile or the wall. If possible, test the stronger solvent in an inconspicuous area first.
Another potential problem is damage to the wall surface during tile removal. This is more likely to occur with weaker wall materials like drywall or plaster. When removing tiles from these surfaces, take extra care to avoid tearing or gouging the wall. Use a wider putty knife or scraper to distribute the pressure more evenly, and avoid using excessive force. If the wall surface is damaged, it can be repaired with patching compound before installing new tiles.
Tiles that have been installed for a long time may be more difficult to remove due to the adhesive becoming brittle and hardened over time. In these cases, patience and persistence are key. Apply heat and solvent repeatedly, and use a combination of prying and tapping to gradually break the bond between the tile and the wall.
If, despite all efforts, a tile cracks or breaks during removal, focus on preventing further damage. Carefully remove the broken pieces and clean up any debris. The broken tile can be replaced with a new one, or the area can be patched and repaired.
Finally, remember to prioritize safety throughout the tile removal process. Wear safety glasses and gloves to protect your eyes and hands from debris and chemicals. Work in a well-ventilated area to avoid inhaling fumes from solvents. Dispose of used adhesive and solvent-soaked rags properly, following local regulations.

How To Remove Floor And Wall Tiles Without Breaking Them

Easy Diy Guide On Removing Tiles From Walls Fantastic Handyman Au

How To Remove Tile Without Breaking

How To Remove Wall Tiles

How To Remove A Tile Backsplash Homeserve Usa

How To Remove A Bathroom Wall Tile Today S Homeowner

How To Remove Wall Tiles 11 Steps With Pictures Wikihow

How To Remove Wall Tiles Without Breaking Them Wonkee Donkee Tools

How To Remove Wall Tiles 11 Steps With Pictures Wikihow

How To Remove Tiles Without Breaking Them
Related Posts