How to Fix Broken Tile in a Shower Wall
The shower is a frequently used area of the home, and consequently, the tiles in a shower wall are susceptible to damage. Cracks, chips, or even complete tile displacement can occur due to various reasons, including impacts, water damage, or improper installation. Addressing these issues promptly is crucial to prevent further damage, such as water seepage behind the tiles, which can lead to mold growth and structural problems. This article provides a comprehensive guide on how to fix broken tiles in a shower wall, covering the necessary tools, materials, and step-by-step instructions.
Assessing the Damage and Gathering Materials
Before commencing any repair work, it is essential to thoroughly assess the extent of the damage. This involves identifying the type and size of the broken tile, the condition of the surrounding tiles, and any underlying issues, such as water damage or loose grout. Based on this assessment, the necessary materials and tools can be gathered. These generally include:
*Replacement Tile:
Sourcing an exact match for the broken tile is ideal. If the original tile is unavailable, a similar tile in terms of size, color, and texture should be selected. If the color cannot be precisely matched, replacing several tiles in a pattern can be a viable option for aesthetic consistency. *Grout:
The grout surrounding the broken tile will likely need to be removed and replaced. Ensure the new grout matches the existing grout in color and type (sanded or unsanded). Utilizing epoxy grout is recommended for its superior water resistance and durability in shower environments. *Thin-Set Mortar:
Thin-set mortar is the adhesive used to bond the tile to the substrate. A high-quality, waterproof thin-set mortar specifically designed for shower applications should be used. *Caulk:
Caulk is typically used to seal the edges of the tile where it meets the shower surround or other surfaces. A mildew-resistant caulk formulated for wet environments is essential. *Grout Removal Tool:
A grout saw or a rotary tool with a grout removal attachment will be required to carefully remove the grout surrounding the damaged tile. *Putty Knife or Chisel:
These tools, along with a hammer, are used to carefully remove the broken tile from the wall. *Trowel:
A small notched trowel is used to apply the thin-set mortar to the back of the tile and the substrate. *Sponge:
A clean, damp sponge is used for cleaning excess grout from the tile surface. *Bucket:
A bucket is needed for mixing the thin-set mortar and cleaning tools. *Safety Glasses and Gloves:
Safety glasses and gloves are essential for protecting eyes and hands during the repair process. *Utility Knife:
Useful for scoring caulk and other small tasks. *Measuring Tape:
To accurately measure the tile and surrounding area. *Level:
To ensure the new tile is installed level with the existing tilesRemoving the Broken Tile and Preparing the Surface
The next step involves carefully removing the broken tile without damaging the surrounding tiles. This requires patience and precision. The following steps should be followed:
-
Remove the Grout:
Using the grout removal tool, carefully remove the grout surrounding the broken tile. Work slowly and deliberately to avoid chipping or cracking the adjacent tiles. The objective is to completely remove the grout from all sides of the broken tile, creating a clear separation. -
Remove the Tile:
Once the grout is removed, carefully insert a putty knife or chisel between the broken tile and the substrate. Gently tap the putty knife or chisel with a hammer to loosen the tile. Work around the edges of the tile, gradually loosening it until it can be removed. Exercise caution to avoid excessive force, which could damage the surrounding tiles or the substrate. If the tile is particularly stubborn, a heat gun can be used to soften the adhesive. -
Clean the Surface:
After removing the broken tile, thoroughly clean the exposed substrate. Remove any remaining thin-set mortar, grout, or debris. A scraper or wire brush can be used to remove stubborn residue. Ensure the surface is clean, dry, and free of any loose particles. -
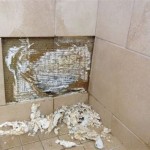
Assess and Repair Substrate Damage:
Inspect the exposed substrate for any signs of damage, such as water damage, mold growth, or crumbling material. Repair any damage before proceeding. If the substrate is significantly damaged, it may need to be replaced. Small cracks and holes can be filled with a patching compound designed for wet environments. Allow the patching compound to dry completely before proceeding to the next step.
Installing the Replacement Tile
With the surface prepared, the replacement tile can be installed. This involves applying thin-set mortar, setting the tile in place, and ensuring it is level with the surrounding tiles.
-
Mix the Thin-Set Mortar:
Following the manufacturer's instructions, mix the thin-set mortar in a bucket. Add water gradually while stirring until the mixture reaches a smooth, toothpaste-like consistency. Avoid adding too much water, as this can weaken the mortar. -
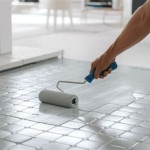
Apply the Thin-Set Mortar:
Using the notched trowel, apply a thin, even layer of thin-set mortar to the back of the replacement tile. Ensure the entire surface of the tile is covered with mortar. Then, apply a thin layer of thin-set mortar to the prepared substrate. -
Set the Tile:
Carefully position the replacement tile in the opening, aligning it with the surrounding tiles. Press the tile firmly into the thin-set mortar, ensuring it is securely bonded to the substrate. -
Level the Tile:
Use a level to ensure the replacement tile is level with the surrounding tiles. If necessary, gently tap the tile with a rubber mallet to adjust its position. If the tile is too high, remove some of the thin-set mortar. If the tile is too low, add more thin-set mortar. -
Allow to Cure:
Allow the thin-set mortar to cure according to the manufacturer's instructions. This typically takes 24 to 48 hours. Avoid disturbing the tile during this time.
Grouting and Caulking
After the thin-set mortar has cured, the final steps involve grouting and caulking the tile. This will seal the tile and protect it from water damage.
-
Mix the Grout:
Following the manufacturer's instructions, mix the grout in a bucket. Add water gradually while stirring until the mixture reaches a smooth, paste-like consistency. -
Apply the Grout:
Using a grout float or your finger, apply the grout to the joints surrounding the replacement tile. Ensure the grout fills all the joints completely. -
Remove Excess Grout:
After the grout has partially set (typically after 15-30 minutes), use a damp sponge to remove excess grout from the tile surface. Rinse the sponge frequently to avoid smearing the grout. -
Cure the Grout:
Allow the grout to cure according to the manufacturer's instructions. This typically takes 24 to 72 hours. -
Apply Caulk:
Apply a bead of mildew-resistant caulk to the edges of the tile where it meets the shower surround or other surfaces. Smooth the caulk with your finger or a caulk smoothing tool. This will create a watertight seal and prevent water from seeping behind the tile.
By following these steps carefully, homeowners can effectively repair broken tiles in a shower wall, preventing further damage and maintaining the aesthetic appeal of the bathroom. Remember to exercise caution and wear appropriate safety gear throughout the process.

Repair Fallen Tile Reinstall Shower With Simple Fix Re Install Bath No Grout

How To Fix Shower Tiles Falling Off Wall Diy

How To Repair Broken Tile Part One

How To Replace A Broken Tile Soap Dish In Shower

How To Replace Shower Wall Tiles Art Tile Renovation

How To Replace A Broken Tile Shower Wall Repair

How To Fix Ed Tile From Hairline Fractures Major Fissures

Why Ed Tiles In Your Bathroom Are A Problem Shower Sealed

How To Fix Ed Tile From Hairline Fractures Major Fissures

How To Repair Water Damaged Shower Walls
Related Posts