How To Fix Broken Tile In Shower
A broken tile in a shower not only detracts from the aesthetic appearance of the bathroom, but it can also lead to significant water damage affecting the surrounding walls and floor. Water seeping behind damaged tiles can cause mold growth, wood rot, and structural issues. Addressing broken tiles promptly is crucial to prevent these problems and maintain the integrity of the shower enclosure. This article provides a comprehensive guide on how to fix broken tiles in a shower, covering the necessary tools, materials, and step-by-step instructions for a successful repair.
Before embarking on the repair process, it is essential to assess the damage and determine the extent of the problem. Small chips or cracks may only require minor patching, while completely broken or missing tiles necessitate a full replacement. Consider the age and condition of the surrounding tiles to ensure a cohesive and visually appealing repair. Discontinued tiles might require sourcing from specialized suppliers or opting for a complementary design that blends seamlessly with the existing aesthetic. Careful planning and preparation are key to achieving a professional and long-lasting result.
Gathering Necessary Tools and Materials
The success of any tile repair project hinges on having the right tools and materials readily available. This will streamline the process and minimize potential delays. The following is a list of essential items:
- Replacement Tiles: Source tiles that match the existing ones in terms of size, color, and texture. It's always wise to purchase a few extra tiles for future repairs.
- Grout Removal Tool: A grout saw, utility knife with a grout removal blade, or a rotary tool with a grout removal attachment will be needed to remove the grout surrounding the damaged tile.
- Hammer and Chisel: These tools are used to carefully break up and remove the broken tile. A small, pointed chisel is ideal for precise work.
- Putty Knife or Scraper: A putty knife or scraper is essential for cleaning the substrate beneath the old tile, removing adhesive residue, and applying thin-set mortar.
- Thin-Set Mortar: This adhesive is used to bond the new tile to the substrate. Choose a type suitable for wet environments and follow the manufacturer's instructions for mixing.
- Trowel (Notched): A notched trowel is used to apply the thin-set mortar evenly, creating ridges that help the tile adhere properly. Select a notch size appropriate for the tile size.
- Grout: Choose a grout color that matches the existing grout. Consider using epoxy grout for its superior water resistance and durability.
- Grout Float: A grout float is used to press the grout into the spaces between the tiles and remove excess grout.
- Grout Sponge: A grout sponge is essential for cleaning the tiles after grouting and removing any remaining grout haze.
- Safety Glasses and Gloves: Protecting your eyes and hands during the repair process is crucial.
- Utility Knife: A sharp utility knife is needed for scoring tiles or cutting shims.
- Measuring Tape: Accurate measurements are important for ensuring the replacement tile fits correctly.
- Level: A level is used to ensure the replacement tile is flush with the surrounding tiles.
- Shims or Spacers: Shims or tile spacers help maintain consistent spacing between the tiles during installation.
- Bucket and Mixing Tools: For mixing thin-set mortar and grout.
- Shop Vacuum: To clean up dust and debris throughout the process.
Removing the Damaged Tile and Preparing the Surface
The process of removing the damaged tile requires patience and care to avoid damaging the surrounding tiles. Start by carefully removing the grout around the broken tile using a grout removal tool. Apply consistent pressure and avoid pressing too hard, which can scratch or chip the adjacent tiles. Work slowly and methodically, ensuring all the grout is removed from the seams.
Once the grout is removed, use a hammer and chisel to carefully break up the broken tile. Start by tapping the center of the tile with the chisel, gradually working your way outwards. Apply moderate force and avoid striking the tile too hard, which can cause it to shatter into small pieces. Wear safety glasses to protect your eyes from flying debris.
After breaking up the tile, use a putty knife or scraper to remove the pieces from the substrate. Be careful not to damage the underlying surface. If the tile is strongly adhered, you may need to use a heat gun to soften the adhesive. Once all the pieces are removed, thoroughly clean the substrate with a putty knife or scraper to remove any remaining adhesive residue, mortar, or debris. A clean and smooth surface is essential for proper adhesion of the new tile.
Inspect the substrate for any damage, such as cracks or crumbling areas. If necessary, repair the substrate with a suitable patching compound before proceeding. Ensure the patching compound is fully cured and dry before applying the thin-set mortar. Use a shop vacuum to remove any remaining dust or debris from the substrate. A clean and dry surface will ensure a strong bond between the new tile and the substrate.
Installing the Replacement Tile
With the surface prepared, the next step is to install the replacement tile. Begin by mixing the thin-set mortar according to the manufacturer's instructions. Use a bucket and mixing tools to achieve a smooth and consistent consistency. Avoid adding too much water, which can weaken the mortar. The consistency should be similar to peanut butter.
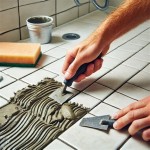
Apply a layer of thin-set mortar to the substrate using a notched trowel. Hold the trowel at a 45-degree angle and apply even pressure to create uniform ridges in the mortar. The notch size should be appropriate for the size of the tile. For smaller tiles, a smaller notch size is sufficient, while larger tiles require a larger notch size.
Carefully place the replacement tile onto the mortar bed. Press down firmly and gently twist the tile to ensure proper adhesion. Use a level to check that the tile is flush with the surrounding tiles. If necessary, add or remove thin-set mortar to adjust the height of the tile. Use shims or tile spacers to maintain consistent spacing between the replacement tile and the adjacent tiles.
Allow the thin-set mortar to cure for the time recommended by the manufacturer, typically 24 to 48 hours. Avoid disturbing the tile during this time. Once the mortar is fully cured, remove the shims or tile spacers.
Grouting and Finishing
After the thin-set mortar has cured, it is time to grout the tile. Mix the grout according to the manufacturer's instructions. Choose a grout color that matches the existing grout in the shower. Consider using epoxy grout for superior water resistance and durability, especially in wet environments.
Apply the grout to the tile surface using a grout float. Hold the float at a 45-degree angle and press the grout firmly into the spaces between the tiles. Work in small sections, ensuring all the grout lines are completely filled. Remove excess grout from the tile surface with the grout float.
After allowing the grout to set for the time recommended by the manufacturer, typically 15 to 30 minutes, use a damp grout sponge to clean the tile surface. Wring out the sponge frequently to avoid over-wetting the grout. Rinse the sponge in clean water and continue wiping the tile surface until all the grout haze is removed.
Allow the grout to cure fully, typically 24 to 72 hours, before using the shower. After the grout has cured, apply a grout sealer to protect the grout from water damage and staining. Follow the manufacturer's instructions for applying the grout sealer. Reapply grout sealer periodically to maintain its effectiveness.
Inspect the finished repair for any imperfections. If necessary, touch up any areas with additional grout or caulk. Clean the tile surface with a mild detergent and water. The repaired tile should blend seamlessly with the surrounding tiles, creating a visually appealing and watertight seal.
Regular maintenance and inspection of the shower tiles can help prevent future problems. Check the grout lines for cracks or damage and repair them promptly. Avoid using abrasive cleaners on the tiles, which can damage the surface. With proper care and maintenance, the repaired tile will provide years of reliable service.

How To Repair Broken Tile Part One

How To Replace A Broken Tile Soap Dish In Shower

Repair Fallen Tile Reinstall Shower With Simple Fix Re Install Bath No Grout

Repairing Ed Shower Floor Tiles Using Fillers Leaky Showers

How To Fix Ed Tile From Hairline Fractures Major Fissures

How To Replace Damaged Shower Surround Tile

How To Fix Shower Tiles Falling Off Wall Diy

How To Prevent Expensive Bathroom Shower Tile And Grout Repair Promaster Home Handyman

How To Fix Ed Tile From Hairline Fractures Major Fissures

Why Ed Tiles In Your Shower Are A Bad Sign Leaky Showers
Related Posts