Transitioning From Tile to Laminate Flooring: A Comprehensive Guide
The decision to transition from tile to laminate flooring within a home represents a significant undertaking with aesthetic, practical, and economic considerations. Tile, renowned for its durability and water resistance, has long been a staple in kitchens, bathrooms, and entryways. Laminate flooring, on the other hand, offers a cost-effective alternative with a wider range of styles and a softer feel underfoot. This transition necessitates careful planning, preparation, and execution to ensure a seamless and satisfactory outcome.
Before embarking on this project, it is crucial to understand the specific advantages and disadvantages of each flooring type. Tile boasts exceptional resistance to moisture, scratches, and stains, making it ideal for high-traffic areas and spaces prone to spills. However, tile can be cold and hard underfoot, potentially requiring the installation of radiant heating for added comfort. Installation of tile also tends to be a more labor-intensive and expensive process compared to laminate.
Laminate flooring mimics the look of hardwood, stone, or tile at a fraction of the cost. It is generally easier and faster to install, making it a popular choice for DIY enthusiasts. Modern laminate flooring options offer improved water resistance and durability, though they typically do not match the robustness of tile. The choice between tile and laminate often depends on the specific needs and priorities of the homeowner, as well as the intended use of the room.
Assessing the Subfloor and Existing Tile Condition
The condition of the subfloor beneath the existing tile is paramount to a successful laminate flooring installation. A level, stable, and clean subfloor is essential for preventing unevenness, squeaking, and premature wear of the laminate. If the tile is installed directly on a concrete slab, the slab itself must be inspected for cracks, moisture, and structural integrity. Any existing cracks or imperfections must be addressed before proceeding.
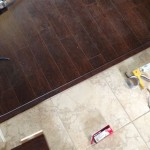
If the tile is installed on a wood subfloor, it is important to check for signs of rot, water damage, or insect infestation. Weak or damaged sections of the subfloor must be replaced or reinforced to provide a solid foundation for the laminate. It is also crucial to ensure that the subfloor is properly fastened to the floor joists to prevent movement and noise. Removing the existing tile and thoroughly cleaning the exposed subfloor is a necessary step to ensure proper adhesion of the underlayment and laminate.
In some cases, the existing tile can be left in place and used as a subfloor for the laminate. This method is only viable if the tile is firmly adhered to the subfloor and is relatively level. Any loose or cracked tiles must be removed and the resulting voids filled with a leveling compound. A self-leveling compound can also be applied over the entire tile surface to create a smooth and even base for the laminate. This approach can save time and effort, but it is crucial to ensure that the tile is structurally sound and provides an adequate foundation.
Regardless of whether the tile is removed or left in place, it is essential to thoroughly clean the subfloor. Remove any debris, dust, and adhesive residue using a scraper, vacuum, and appropriate cleaning solutions. A clean and smooth surface will promote better adhesion and prevent imperfections from telegraphing through the laminate flooring.
Preparing the Surface for Laminate Installation
Following the subfloor assessment and preparation, the next step involves preparing the surface for the laminate installation. This typically involves installing an underlayment, which serves several important functions. An underlayment provides a cushion between the subfloor and the laminate, reducing noise and improving comfort underfoot. It also acts as a moisture barrier, preventing moisture from the subfloor from damaging the laminate. Additionally, an underlayment can help to even out minor imperfections in the subfloor, creating a smoother and more uniform surface.
The choice of underlayment depends on several factors, including the type of laminate flooring, the subfloor material, and the desired level of noise reduction and moisture protection. Foam underlayments are a common and cost-effective choice, offering good cushioning and moisture resistance. Cork underlayments provide excellent sound absorption and are a sustainable option. Rubber underlayments offer superior cushioning and are often used in high-traffic areas. It is important to consult the laminate flooring manufacturer's recommendations to ensure that the chosen underlayment is compatible with the flooring.
The underlayment should be installed according to the manufacturer's instructions. Typically, it is rolled out and cut to fit the room, with seams taped together to prevent moisture from penetrating. Ensure that the underlayment is properly aligned and free of wrinkles or bubbles. This will help to create a smooth and even surface for the laminate flooring.
Acclimation of the laminate flooring is a crucial step that should not be overlooked. Laminate flooring needs to acclimate to the room's temperature and humidity levels before installation. This process allows the laminate to expand or contract, preventing warping or buckling after installation. The laminate should be stored in the room where it will be installed for at least 48 to 72 hours prior to installation. This acclimation period will help to ensure a stable and long-lasting flooring installation.
Proper Laminate Flooring Installation Techniques
The installation of laminate flooring requires careful attention to detail and adherence to best practices. Start by measuring the room and planning the layout of the laminate planks. Consider the direction of the light and the length of the room to determine the optimal direction for the planks. It is generally recommended to install the planks parallel to the longest wall or the main source of light.
Begin the installation along a straight wall, leaving an expansion gap of approximately ¼ inch between the laminate and the wall. This expansion gap allows for the natural expansion and contraction of the laminate due to changes in temperature and humidity. Use spacers to maintain a consistent expansion gap along the perimeter of the room.
Most laminate flooring utilizes a click-lock system, which allows the planks to be easily connected without the need for glue or nails. Angle the plank and insert it into the previous plank, then press down until it clicks into place. Work row by row, ensuring that each plank is securely connected and the seams are tight. Use a tapping block and a hammer to gently tap the planks together if necessary.
When cutting laminate planks to fit around obstacles or along the edges of the room, use a saw designed for laminate flooring. A circular saw with a fine-tooth blade or a jigsaw with a laminate blade will provide clean and accurate cuts. Measure carefully and mark the cutting lines on the plank before cutting. It is often helpful to use a square or a straight edge to ensure accurate cuts.
Stagger the seams between rows of laminate planks to create a more natural and visually appealing look. A random pattern is generally preferred, but ensure that no two adjacent seams align. This will also help to distribute the weight and stress on the flooring, preventing weak spots and potential issues.
After completing the installation, remove the spacers and install baseboards or quarter-round molding to cover the expansion gap along the perimeter of the room. This will provide a finished and professional look. Ensure that the baseboards or molding are not nailed or glued to the laminate flooring, as this will restrict its ability to expand and contract.
Finally, clean the laminate flooring with a damp mop and a mild detergent. Avoid using excessive water, as this can damage the laminate. Regular cleaning and maintenance will help to keep the laminate looking its best for years to come.
The transition from tile to laminate flooring involves several key steps, from assessing the subfloor to proper installation techniques. Careful planning, preparation, and execution are essential for achieving a successful and long-lasting flooring upgrade. By following these guidelines and consulting the manufacturer's instructions, homeowners can transform their spaces with the beauty and practicality of laminate flooring.

Transition From Tile To Laminate Howtospecialist How Build Step By Diy Plans

Guide To Flooring Transition Strips Nufloors

How To Install Transition Strip Up 1 Inch Tall On Tile Vinyl Lvp Laminate And Wood Flooring

Tile Transition Strips To Hardwood Lvp Floor Strip

Your Complete Guide To Flooring Transition Strips Builddirect

How To Install A Transition Strip

How To Transition Between 2 Diffe Types Of Flooring Direct

110 Stylish And Cool Floor Transition Ideas Digsdigs

Transition From Tile To Laminate Howtospecialist How Build Step By Diy Plans

M D Building S 36 Quot Unfinished Hardwood Trans Tile Laminate W Anchors 48901 The Home Depot
Related Posts