What Do I Need to Put Tile on a Wall?
Installing tile on a wall can significantly enhance the aesthetic appeal and functionality of a space. Whether it is a backsplash in a kitchen, a decorative feature in a bathroom, or a durable surface in a utility area, properly installed tile offers long-lasting beauty and protection. However, achieving a professional-looking result necessitates careful planning and the use of the right tools and materials. This article details the essential components required for a successful wall tiling project.
Before commencing any tiling project, thoroughly assess the existing wall surface. The wall must be structurally sound, clean, and level. Any imperfections, such as cracks, holes, or loose paint, must be addressed before tiling can begin. Failure to prepare the wall adequately can lead to tile adhesion issues, cracking grout, and ultimately, a compromised finished product.
Key Point 1: Essential Materials for Wall Tiling
The selection of appropriate materials is paramount to the success of a tiling project. These materials not only determine the aesthetic outcome but also influence the durability and longevity of the tiled surface. The following is a comprehensive list of essential materials:
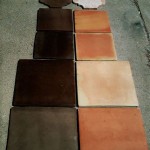
Tiles: The type of tile chosen dictates the overall appearance and performance characteristics of the wall. Common options include ceramic, porcelain, glass, and natural stone. Ceramic tiles are a cost-effective and versatile option, suitable for many applications. Porcelain tiles are denser and more durable, making them ideal for high-moisture areas like bathrooms. Glass tiles offer a unique aesthetic and are often used for decorative accents. Natural stone tiles, such as marble or granite, provide a luxurious look but require specific maintenance considerations.
The quantity of tiles needed should be calculated with precision. Begin by measuring the area to be tiled and add a waste factor of approximately 10-15% to account for cuts and potential breakage. It is always better to have a slight surplus than to run short during the installation process.
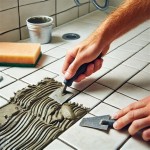
Tile Adhesive (Thin-Set Mortar): Tile adhesive, commonly referred to as thin-set mortar, is the bonding agent that secures the tiles to the wall surface. The type of thin-set mortar must be carefully chosen based on the type of tile being used and the specific environmental conditions. Modified thin-set mortars contain polymers that enhance adhesion and flexibility, making them suitable for large format tiles, natural stone, and areas subject to movement or temperature fluctuations. Unmodified thin-set mortars are typically used with certain types of porous tiles. Always consult the tile manufacturer's recommendations for the appropriate thin-set mortar.
Grout: Grout fills the spaces between the tiles, providing a finished look and preventing water penetration. There are two primary types of grout: sanded and unsanded. Sanded grout is used for wider grout lines (typically 1/8 inch or greater) and contains fine sand particles that provide strength and prevent cracking. Unsanded grout is used for narrow grout lines and is smoother in texture. Epoxy grout is a more expensive option known for its superior stain resistance and durability, making it ideal for high-traffic areas and areas prone to moisture exposure.
The color of the grout should be selected to complement or contrast with the tiles, depending on the desired aesthetic effect. Lighter grout colors can brighten a space, while darker grout colors can accentuate the tile pattern. Consider sealing the grout after installation to protect it from staining and discoloration.
Grout Sealer: Grout is porous and susceptible to staining. Applying a grout sealer creates a protective barrier that repels water, dirt, and grease. Grout sealers are available in various formulations, including penetrating sealers and surface sealers. Penetrating sealers soak into the grout pores, providing long-lasting protection. Surface sealers form a protective film on the grout surface, making it easier to clean. Regular application of grout sealer is crucial for maintaining the appearance and integrity of the grout lines.
Tile Spacers: Tile spacers ensure consistent spacing between the tiles, creating a uniform and professional look. They are available in various sizes to accommodate different tile sizes and grout line widths. Using tile spacers is particularly important when working with rectified tiles, which have precisely cut edges and require consistent spacing for a seamless appearance.
Backer Board (Cement Board): In wet areas, such as bathrooms and showers, it is essential to install a waterproof backer board, such as cement board, beneath the tile. Cement board provides a stable and moisture-resistant substrate for the tile, preventing water damage to the wall structure. It is typically screwed to the studs behind the drywall. Certain installations may require the application of a waterproofing membrane over the cement board for added protection.
Caulk: Caulk is used to seal gaps and joints where the tile meets other surfaces, such as bathtubs, countertops, and corners. It provides a flexible and waterproof seal that prevents water from seeping behind the tile. Silicone caulk is a popular choice for wet areas due to its excellent water resistance and flexibility. Acrylic caulk is suitable for dry areas and can be painted to match the wall color.
Key Point 2: Essential Tools for Wall Tiling
Having the right tools is just as crucial as having the right materials. The following tools will facilitate a smooth and efficient tiling process:
Tile Cutter (Manual or Wet Saw): A tile cutter is used to make clean and precise cuts in the tiles. Manual tile cutters are suitable for straight cuts on smaller tiles. For larger tiles or intricate cuts, a wet saw is recommended. Wet saws use a diamond blade and water to minimize dust and prevent chipping during the cutting process.
Notched Trowel: A notched trowel is used to apply the thin-set mortar to the wall surface. The size and shape of the notches determine the thickness and coverage of the mortar. Different types of tiles require different trowel sizes. Consult the tile manufacturer's recommendations for the appropriate trowel size.
Rubber Grout Float: A rubber grout float is used to apply grout into the spaces between the tiles. It is designed with a flat, rubber surface that allows for even distribution of the grout without scratching the tile surface. The float should be held at an angle to the tile surface and moved diagonally across the grout lines.
Grout Sponge: A grout sponge is used to clean excess grout from the tile surface after the grout has partially dried. The sponge should be dampened with clean water and wrung out thoroughly to avoid saturating the grout lines. Regularly rinse the sponge to remove excess grout.
Level: A level is essential for ensuring that the tiles are installed in a straight and even line. Use a level to check the horizontal and vertical alignment of the tiles throughout the installation process. A laser level can be particularly useful for larger tiling projects.
Measuring Tape: A measuring tape is used to measure the area to be tiled and to mark the locations for cuts and tile placement. Accurate measurements are crucial for ensuring a professional-looking result.
Pencil: A pencil is used to mark the tiles for cutting and to transfer measurements from the wall to the tile. Use a wax pencil or a tile marker for dark-colored tiles.
Bucket: A bucket is used to mix the thin-set mortar and grout. Choose a bucket that is clean and free of debris.
Drill with Mixing Paddle: A drill with a mixing paddle is used to thoroughly mix the thin-set mortar and grout. This ensures a consistent and workable mixture.
Safety Glasses and Gloves: Safety glasses and gloves are essential for protecting your eyes and hands from dust, debris, and chemicals. Wear safety glasses when cutting tiles and gloves when handling thin-set mortar and grout.
Key Point 3: Preparing the Wall Surface for Tiling
Proper wall preparation is a critical step that directly impacts the adhesion and longevity of the tile installation. Neglecting this step can lead to costly repairs and premature failure of the tiled surface. The following steps outline the essential aspects of wall preparation:
Cleaning the Surface: The wall surface must be thoroughly cleaned to remove any dirt, dust, grease, or loose paint. Use a scrub brush and a mild detergent solution to clean the wall. Rinse the wall with clean water and allow it to dry completely before proceeding.
Repairing Imperfections: Any cracks, holes, or unevenness in the wall must be repaired before tiling. Fill small holes with spackle or patching compound. For larger cracks, use a crack filler designed for concrete or masonry walls. If the wall is significantly uneven, apply a skim coat of drywall compound to create a smooth and level surface.
Priming the Surface: Applying a primer to the wall surface improves the adhesion of the thin-set mortar. Choose a primer that is specifically designed for use with tile and follow the manufacturer's instructions for application. Allow the primer to dry completely before tiling.
Determining Layout: Planning the layout of the tiles is crucial for achieving a visually appealing and balanced result. Start by determining the focal point of the wall and centering the tile pattern around it. Consider the placement of full tiles and cut tiles to minimize the appearance of small or awkward cuts. Use a level and a measuring tape to draw layout lines on the wall.
Installing Backer Board (If Necessary): In wet areas, install cement board over the existing wall surface to provide a waterproof substrate for the tile. Cut the cement board to size using a utility knife or a circular saw. Secure the cement board to the studs using cement board screws. Tape the seams between the cement board panels with fiberglass mesh tape and apply a thin coat of thin-set mortar to create a smooth and waterproof surface.
By carefully selecting the appropriate materials, utilizing the necessary tools, and meticulously preparing the wall surface, a successful and long-lasting tile installation can be achieved. Attention to detail and adherence to best practices are the cornerstones of a professional-looking tiling project.

How To Install Wall Tiles Important Tips Ultratech Cement

Wall Tile Installation Methods Doctor

Installing Large Format Wall Tile Rogue Engineer

Tips For Installing Large Format And Thin Tiles Mapei

Wall Tile Tips From A Pro Extreme How To

How To Tile Over Sheetrock Doityourself Com

Shower Tile Installation Step By Four Generations One Roof

How To Use Tile Spacers Guides Tiling Advice

How To Prepare Uneven Walls And Floors Tile

How To Tile A Bathroom Shower Walls Floor Materials 100 Pics Pro Tips
Related Posts