How to Lay Ceramic Tile on a Concrete Floor: A Comprehensive Guide
Laying ceramic tile on a concrete floor is a durable and aesthetically pleasing flooring option suitable for various spaces, from kitchens and bathrooms to living rooms and basements. Successful tile installation depends on proper preparation, appropriate material selection, and meticulous execution. This article provides a detailed guide on how to lay ceramic tile on a concrete floor, outlining each step from initial assessment to final grouting.
Before commencing the tiling project, understanding the existing concrete floor is crucial. A thorough inspection is necessary to identify any potential issues that could compromise the tile installation. This includes checking for cracks, unevenness, moisture problems, and surface contaminants. Addressing these issues proactively will ensure a long-lasting and visually appealing tiled surface.
I. Preparation is Paramount: Assessing and Preparing the Concrete Substrate
The foundation of any successful tiling project is a well-prepared substrate. The concrete floor must be structurally sound, clean, and level. This section details the steps required to properly assess and prepare the concrete surface before tile installation begins.
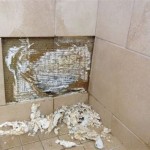
A. Inspecting the Concrete Floor: The initial step involves a visual inspection of the concrete floor. Look for cracks, both hairline and larger, as well as any signs of uneven settlement. Note the presence of any stains, grease, or other contaminants that could interfere with adhesion. Use a straightedge and level to check for any significant dips or high spots across the floor’s surface. Any existing coatings, such as paint or epoxy, must be removed completely, as they will prevent the proper bonding of the tile mortar.
B. Addressing Cracks and Damage: Minor hairline cracks can often be addressed with a crack isolation membrane, which is applied directly to the concrete surface. Larger cracks, however, may indicate a more significant structural problem and require professional evaluation and repair. Depending on the severity, this may involve patching with a concrete repair compound or, in extreme cases, reinforcing the underlying concrete slab. Proper repair of the concrete before tiling is essential to prevent the cracks from propagating through the tile and grout lines.
C. Leveling the Floor: Unevenness in the concrete floor must be corrected before tile installation. Self-leveling concrete is a common solution for achieving a flat and even surface. This material is poured onto the concrete floor and allowed to spread and level itself, creating a suitable base for tiling. Before pouring self-leveling concrete, it is important to prime the existing concrete floor according to the manufacturer's instructions. This ensures proper adhesion and prevents moisture from being drawn out of the self-leveling compound prematurely. Small depressions can sometimes be handled with a thick-bed mortar, but this is dependent on the depth of the depression and the size of the tile being used.
D. Cleaning the Concrete Surface: Thoroughly cleaning the concrete floor is essential to remove any dirt, dust, grease, or other contaminants that could interfere with the adhesion of the tile mortar. Begin by sweeping or vacuuming the floor to remove loose debris. Then, scrub the floor with a degreasing cleaner specifically designed for concrete. Rinse the floor thoroughly with clean water and allow it to dry completely before proceeding with tile installation. A pressure washer can be helpful for removing stubborn stains or residues.
E. Moisture Testing: Excess moisture in the concrete floor can prevent proper adhesion and lead to mold growth under the tile. A calcium chloride test (also known as a moisture vapor emission rate or MVER test) is a reliable method for determining the moisture content of the concrete. This test involves placing a sealed container of calcium chloride on the concrete floor for a specific period and then weighing the amount of moisture absorbed by the calcium chloride. The results are then compared to the tile manufacturer's recommendations for acceptable moisture levels. If the moisture content exceeds the recommended limits, a moisture barrier must be applied to the concrete floor before tiling.
II. Selecting Materials and Tools: Preparing for the Tile Installation
Choosing the correct materials and gathering the necessary tools are critical steps in ensuring a smooth and professional tile installation. This section details the essential materials, adhesives, and tools required for laying ceramic tile on a concrete floor.
A. Choosing the Right Tile: Ceramic tile is available in a wide variety of sizes, shapes, colors, and finishes. The choice of tile will depend on the aesthetic preferences of the homeowner as well as the intended use of the space. For high-traffic areas, a durable and slip-resistant tile is recommended. Porosity is also a factor; unglazed tiles are more porous than glazed tiles and may require sealing. For floors, a tile rated for flooring is essential. Wall tiles are not designed to withstand foot traffic.
B. Selecting the Appropriate Mortar: The type of mortar used to adhere the tile to the concrete floor is crucial for long-term durability. Modified thin-set mortar is generally recommended for ceramic tile installations over concrete. This type of mortar contains polymers that enhance its bonding strength and flexibility. It is important to choose a mortar that is specifically designed for use with ceramic tile and concrete. Always follow the manufacturer's instructions for mixing and application.
C. Grout Selection: Grout fills the spaces between the tiles and provides a waterproof seal. Cement-based grout is the most common type of grout used for ceramic tile installations. Epoxy grout is a more durable and stain-resistant option, but it is also more expensive and difficult to work with. The choice of grout color will depend on the desired aesthetic and the color of the tile. Consider using a darker grout color for high-traffic areas to minimize the appearance of dirt and stains.
D. Essential Tools: To successfully lay ceramic tile on a concrete floor, the following tools are essential:
- Tile Saw: A wet saw is necessary for cutting tiles to fit around corners and obstacles.
- Trowel: A notched trowel is used to apply the mortar to the concrete floor. The size of the notch will depend on the size of the tile.
- Spacers: Tile spacers ensure consistent grout lines.
- Rubber Mallet: A rubber mallet is used to gently tap the tiles into place.
- Grout Float: A grout float is used to apply and smooth the grout.
- Grout Sponge: A grout sponge is used to clean excess grout from the tile surface.
- Level: A level is used to ensure that the tiles are installed evenly.
- Measuring Tape and Pencil: These are used for measuring and marking the floor.
- Safety Glasses and Gloves: These are essential for personal protection.
E. Other Important Materials: In addition to the tile, mortar, and grout, other important materials include:
- Primer: A primer is applied to the concrete floor to improve the adhesion of the mortar.
- Crack Isolation Membrane: A crack isolation membrane is used to prevent cracks in the concrete floor from propagating through the tile.
- Sealer: A sealer is applied to the grout to protect it from stains and moisture.
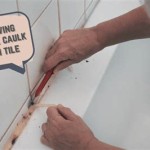
- Caulk: Caulk is used to seal the perimeter of the tiled area and any transitions to other flooring materials.
III. The Tile Laying Process: From Dry Layout to Final Grouting
With the substrate prepared and all necessary materials and tools gathered, the actual tile laying process can begin. This section details each step of the tile installation, from the initial dry layout to the final grouting and cleaning.
A. Dry Layout: Before applying any mortar, perform a dry layout of the tiles. This involves placing the tiles on the floor without mortar to determine the best tile arrangement and identify any potential cutting needs. Start by finding the center of the room and laying out the tiles along the center lines. This will help ensure that the tile pattern is symmetrical and balanced. Use tile spacers to maintain consistent grout lines. Adjust the layout as needed to minimize the number of small cuts required along the edges of the room. This step is crucial for planning and achieving the desired aesthetic outcome.
B. Applying the Mortar: Once the dry layout is complete, begin applying the mortar to the concrete floor. Use a notched trowel to apply a thin, even layer of mortar to a small area, typically 2-3 square feet at a time. The size of the notch on the trowel will depend on the size of the tile. Follow the mortar manufacturer's recommendations for the appropriate notch size. Hold the trowel at a 45-degree angle and spread the mortar in a consistent direction. Avoid applying too much mortar, as this can make it difficult to set the tiles properly and can lead to uneven grout lines.
C. Setting the Tiles: Carefully place the tiles onto the mortar, pressing them firmly into place. Use tile spacers to maintain consistent grout lines. Gently tap each tile with a rubber mallet to ensure that it is fully embedded in the mortar and level with the surrounding tiles. Check the level of the tiles periodically using a level. If necessary, adjust the tile position by adding or removing small amounts of mortar. Work in small sections, applying mortar and setting tiles until the entire floor is covered.
D. Cutting Tiles: As you approach the edges of the room and any obstacles, you will need to cut the tiles to fit. Use a wet saw to make precise cuts. Measure the required cut carefully and mark the tile with a pencil. When using a wet saw, always wear safety glasses to protect your eyes. Feed the tile slowly into the blade, following the marked line. For complex cuts, it may be necessary to make multiple passes with the saw. Smooth the cut edges with a tile file or honing stone to remove any sharp edges.
E. Curing Time: After all the tiles have been laid, allow the mortar to cure completely before proceeding with grouting. The curing time will vary depending on the type of mortar used and the ambient temperature and humidity. Consult the mortar manufacturer's instructions for the recommended curing time. Typically, it will take at least 24-48 hours for the mortar to cure sufficiently.
F. Grouting: Once the mortar has cured, remove the tile spacers and begin the grouting process. Mix the grout according to the manufacturer's instructions. Apply the grout to the tile surface using a grout float, pressing it firmly into the grout lines. Work in small sections, applying grout diagonally across the tile surface to ensure that the grout lines are completely filled. Remove excess grout from the tile surface using a damp grout sponge. Rinse the sponge frequently and wring it out thoroughly to avoid leaving a film of grout on the tile surface. Multiple passes may be necessary to remove all excess grout.
G. Cleaning and Sealing: After the grout has dried for the recommended time (typically 24-48 hours), clean the tile surface with a mild detergent and water. Allow the floor to dry completely before applying a grout sealer. The sealer will protect the grout from stains and moisture. Apply the sealer according to the manufacturer's instructions. Reapply the sealer periodically, as needed, to maintain its effectiveness. Caulk the perimeter of the tiled area and any transitions to other flooring materials to create a waterproof seal.

Tiling Over A Ed Concrete Slab Fine Homebuilding
:max_bytes(150000):strip_icc()/can-you-install-tile-directly-on-concrete-1822600-04-458f7bb6c78348c1835cf8054ef36553.jpg?strip=all "How To Install Tile Over Concrete")
How To Install Tile Over Concrete

How To Install Ceramic Tiles On Concrete Floor Tile Installation

How To Lay Tile On Concrete With Pictures Wikihow

How To Lay Floor Tiles On Concrete Welcome The Rubi Tools Blog

How To Tile Onto Concrete Floors Porcelain Super

How To Install Ceramic Tiles On Concrete Floor Tile Installation

How To Install Ceramic Tiles On Concrete Floor Tile Installation

How To Tile A Concrete Floor Howtospecialist Build Step By Diy Plans

Sound Dampening Ceramic Tile Over A Concrete Floor Fine Homebuilding
Related Posts