How to Repair Grout in Shower Tiles
Shower grout, the material filling the spaces between tiles, is crucial for preventing water damage and maintaining the aesthetic appeal of a shower. Over time, grout deteriorates due to constant exposure to moisture, temperature fluctuations, and harsh cleaning chemicals. Cracking, crumbling, discoloration, and mold growth are common indicators of grout damage. Timely repair of damaged grout is essential to prevent water penetration behind the tiles, which can lead to costly structural damage and mold infestations. This article provides a comprehensive guide on how to repair grout in shower tiles, encompassing preparation, removal, and replacement techniques.
Assessing the Damage and Gathering Materials
Before commencing the repair process, a thorough assessment of the damaged grout is necessary. Examine the extent of the cracking, crumbling, or discoloration. Note areas where the grout is missing entirely or separating from the tiles. Identifying the specific type of grout used originally is also beneficial, although often difficult. If possible, consult records from the original installation or seek advice from a tiling professional. This information can help ensure compatibility between the old and new grout, although this is not always critical when replacing grout entirely.
Once the extent of the damage is assessed, gather the necessary materials and tools. Essential items include:
*Grout Removal Tool:
A grout saw, oscillating multi-tool with a grout removal blade, or a utility knife can be used to remove the old grout. Grout saws are inexpensive and effective for smaller areas. Oscillating multi-tools offer greater speed and precision, particularly for larger projects. Utility knives can be used for minor repairs, but require caution to avoid damaging the tiles. *New Grout:
Select a suitable grout type based on the shower's conditions and personal preferences. Cement-based grout is a common and cost-effective option, available in sanded and unsanded varieties. Sanded grout is typically used for grout lines wider than 1/8 inch, providing added strength and preventing cracking. Unsanded grout is suitable for narrower grout lines and is less likely to scratch delicate tile surfaces. Epoxy grout offers superior water resistance, stain resistance, and durability, but it is more expensive and can be more challenging to install. *Grout Float:
A grout float is a rectangular tool with a rubber or foam pad used to apply grout into the grout lines and remove excess grout. *Grout Sponge:
A clean, damp grout sponge is essential for cleaning the tiles after grout application. *Buckets:
Two buckets are needed: one for mixing the grout and another for rinsing the sponge. *Mixing Tools:
A mixing stick or drill with a mixing attachment is required to properly mix the grout. *Safety Glasses:
Protects the eyes from debris during grout removal. *Dust Mask or Respirator:
Prevents inhalation of grout dust, which can irritate the respiratory system. *Gloves:
Protects hands from grout and cleaning solutions. *Painter's Tape (Optional):
Can be used to protect adjacent surfaces and tiles from grout splatter. *Vacuum Cleaner:
To remove dust and debris after grout removal. *Small Brush:
For cleaning out debris from grout lines. *Grout Sealer (Optional):
To protect the new grout from water damage and staining, especially if using a cement-based grout.Careful selection of materials and tools is critical for a successful grout repair project. Investing in quality tools and appropriate grout types can save time and effort in the long run, resulting in a more durable and aesthetically pleasing repair.
Removing the Old Grout
The next step is to carefully remove the deteriorated grout without damaging the surrounding tiles. This process requires patience and precision to achieve a clean and even surface for the new grout to adhere to.
Begin by preparing the work area. Protect surrounding surfaces with drop cloths or plastic sheeting. Ensure adequate ventilation by opening windows or using a fan. Put on safety glasses, a dust mask, and gloves to protect yourself from dust and debris.
Using the chosen grout removal tool, carefully begin removing the old grout. If using a grout saw, hold it at a slight angle and apply gentle pressure to avoid damaging the tile edges. Work in sections, moving the saw back and forth along the grout line. For wider grout lines, multiple passes may be necessary. Avoid excessive force, which can chip or crack the tiles.
If using an oscillating multi-tool with a grout removal blade, hold the tool at a similar angle and allow the blade to do the work. Move the tool slowly and steadily along the grout line. Be careful not to press too hard, as the blade can easily damage the tiles. This method is generally faster and more efficient than using a grout saw, especially for larger areas.
For minor repairs or small areas, a utility knife can be used to carefully scrape away the loose grout. However, this method requires extreme caution to prevent scratching or gouging the tiles. Only use a sharp blade and apply gentle pressure.
As the old grout is removed, frequently vacuum the area to remove dust and debris. This will improve visibility and prevent the dust from spreading. After removing the bulk of the grout, use a small brush to clean out any remaining debris from the grout lines. Ensure that the grout lines are clean and free of any loose particles before proceeding to the next step. Inspect the exposed edges of the tiles for any signs of damage. If any tiles are loose or cracked, they should be repaired or replaced before applying the new grout.
Proper grout removal is essential for a successful repair. A clean and even surface allows the new grout to bond properly, creating a watertight seal and preventing future problems.
Applying and Finishing the New Grout
With the old grout removed and the grout lines cleaned, the next step is to apply the new grout. This process requires careful mixing and application to ensure a smooth, even, and durable finish.
Prepare the new grout according to the manufacturer's instructions. Add the grout powder to the water in the recommended proportions. Use a mixing stick or drill with a mixing attachment to thoroughly combine the ingredients. Mix until the grout reaches a smooth, consistent consistency, similar to that of peanut butter. Avoid adding too much water, which can weaken the grout. Allow the grout to slake (rest) for the recommended time, typically 5 to 10 minutes. This allows the grout to fully hydrate and improves its workability. After slaking, briefly re-mix the grout before applying it.
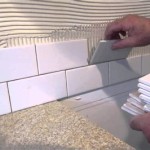
Using a grout float, apply the grout to the grout lines. Hold the float at a 45-degree angle and press firmly to force the grout into the spaces. Work in sections, covering a small area at a time. Make sure to completely fill the grout lines, leaving no voids or gaps. Move the float diagonally across the grout lines to remove excess grout. Hold the float almost perpendicular to the tiles to scrape off the excess without removing grout from the lines.
After applying the grout, allow it to set for the recommended time, typically 15 to 30 minutes. This allows the grout to partially harden before cleaning. The exact setting time will vary depending on the type of grout and the ambient temperature and humidity. Follow the manufacturer’s instructions for the specific grout being used.
Once the grout has set, use a damp grout sponge to carefully clean the tiles. Wring out the sponge frequently to avoid over-wetting the grout. Wipe the tiles in a circular motion, removing the excess grout. Rinse the sponge in a separate bucket of clean water. Repeat this process several times, until the tiles are clean and free of grout haze. Be careful not to remove too much grout from the grout lines, as this can weaken the seal.
After the initial cleaning, allow the grout to dry completely, typically 24 to 72 hours. During this time, avoid using the shower to allow the grout to fully cure. Once the grout is dry, inspect it for any imperfections or voids. If necessary, apply a second coat of grout to fill any gaps or cracks. Repeat the cleaning process after the second coat has dried.
After the grout has fully cured, consider applying a grout sealer. Grout sealer helps to protect the grout from water damage, staining, and mildew growth. Apply the sealer according to the manufacturer's instructions, typically using a brush or applicator pad. Allow the sealer to dry completely before using the shower.
Proper application and finishing of the new grout are crucial for a long-lasting and aesthetically pleasing repair. Following these steps will ensure a watertight seal and prevent future problems with the shower tiles.

How To Prevent Expensive Bathroom Shower Tile And Grout Repair Promaster Home Handyman

Is Ed Grout A Problem Repair Easy The Medic

Quick Fix Repair Ed Bathroom Grout

How To Regrout Bathroom Tile In 5 Easy Steps True Value

How Do I Repair Ed Grout On Shower Walls Hometalk

How Do I Know If Need To Regrout My Shower The Grout Medic

The Definitive Grout Repair Guide 5 Steps True Value

Quick Fix Repair Ed Bathroom Grout

How Do I Repair Ed Grout On Shower Walls Hometalk

How To Prevent Expensive Bathroom Shower Tile And Grout Repair Promaster Home Handyman
Related Posts