How to Lay Tile Flooring On Concrete
Laying tile flooring on concrete is a common and durable flooring solution. Concrete provides a solid, stable subfloor that, when properly prepared, offers an excellent surface for tile adhesion. The success of a tile installation on concrete depends largely on meticulous preparation, the selection of appropriate materials, and a systematic approach to the installation process.
This article provides a comprehensive guide to laying tile flooring on concrete, outlining the necessary steps, tools, and materials required to achieve a professional-looking and long-lasting result. It emphasizes best practices for each stage, from initial surface assessment to grouting and sealing.
Assessing and Preparing the Concrete Subfloor
The initial step in laying tile on concrete is a thorough assessment of the existing subfloor. The condition of the concrete will dictate the subsequent preparation steps and the overall success of the installation. A properly prepared concrete surface is clean, level, and free of any contaminants that could impede tile adhesion.
The first aspect to evaluate is the levelness of the concrete. Significant deviations in levelness can lead to uneven tile surfaces, lippage (where one tile edge sits higher than an adjacent tile), and potential structural issues. A long, straight edge or a level can reveal any high or low spots. For minor imperfections (less than ¼ inch over a 10-foot span), self-leveling compound can be used to create a smooth, even surface. More significant imperfections may require grinding or the application of multiple layers of leveling compound.
Next, the concrete must be inspected for cracks. Hairline cracks are generally not a major concern, but wider cracks (greater than 1/8 inch) indicate potential structural problems that need to be addressed. These cracks can be filled with a concrete crack filler or epoxy repair system designed for concrete floors. Ignoring significant cracks can lead to tile cracking and failure as the underlying concrete continues to shift.
Another critical aspect of subfloor preparation is removing any existing coatings, adhesives, or contaminants. These materials can interfere with the bond between the tile mortar and the concrete. Mechanical methods, such as scraping, grinding, or shot blasting, are often necessary to remove these substances. Chemical strippers can also be employed, but it is crucial to choose a stripper compatible with concrete and to thoroughly rinse the surface afterward to remove any chemical residue.
Cleaning the concrete is paramount. After removing loose debris and coatings, the concrete should be thoroughly scrubbed with a solution of water and a suitable concrete cleaner or degreaser. This helps to remove any remaining dirt, oil, or grease that could hinder adhesion. After scrubbing, the concrete must be rinsed thoroughly with clean water and allowed to dry completely before proceeding.
Once the concrete is clean and dry, a primer may be applied. Primers enhance the bond between the concrete and the tile mortar. Choose a primer specifically designed for use with tile adhesives on concrete. Follow the manufacturer's instructions for application, ensuring a uniform coating over the entire surface. Allow the primer to dry completely before proceeding to the next step.
Selecting the Appropriate Materials and Tools
Choosing the right materials and tools is crucial for a successful tile installation. This includes selecting the appropriate type of tile, mortar, grout, and sealant, as well as ensuring access to the necessary tools for cutting, setting, and finishing the tile.
The type of tile selected should be appropriate for the intended use of the space and the expected level of traffic. Porcelain tile is a popular choice for concrete subfloors due to its durability, water resistance, and wide range of styles. Ceramic tile is another option, although it is generally less durable than porcelain. Natural stone tile, such as granite or slate, can also be used, but it often requires specialized installation techniques and sealing.
Selecting the correct mortar is equally important. Modified thin-set mortar is generally recommended for installing tile on concrete. This type of mortar contains polymers that enhance its adhesion, flexibility, and water resistance. Choose a mortar specifically designed for the type of tile being used and the intended application (e.g., interior, exterior, wet areas). Read the mortar manufacturer's instructions carefully regarding mixing ratios, open time, and curing time.
Grout fills the joints between the tiles and provides a watertight seal. There are two main types of grout: sanded grout and unsanded grout. Sanded grout is used for wider grout lines (typically 1/8 inch or greater), while unsanded grout is used for narrow grout lines. Epoxy grout is a more expensive option that offers superior stain resistance and durability, making it a good choice for high-traffic areas or areas prone to spills. The grout color should complement the tile and the overall aesthetic of the space.
A sealant is applied to the grout lines to further protect them from water and stains. Penetrating sealants are typically used, as they penetrate the grout pores and create a water-repellent barrier. Seal the grout after it has fully cured, following the sealant manufacturer's instructions.
The following tools are essential for laying tile on concrete:
- Tile saw (wet saw) for cutting tiles
- Notched trowel (size determined by tile size and mortar type)
- Rubber mallet
- Grout float
- Grout sponge
- Level
- Measuring tape
- Pencil or marker
- Tile spacers
- Buckets for mixing mortar and grout
- Safety glasses and gloves
Having all the necessary materials and tools readily available will streamline the installation process and minimize delays.
Installing the Tile and Applying Grout
Once the concrete subfloor is properly prepared and the necessary materials and tools are gathered, the tile installation can begin. This involves carefully applying the mortar, setting the tiles, and allowing the mortar to cure before applying grout.
The first step is to dry-lay the tiles. This involves arranging the tiles on the floor without mortar to visualize the layout and ensure that the tile pattern is aesthetically pleasing. Start at the center of the room and work outwards, using tile spacers to maintain consistent grout lines. Adjust the layout as needed to minimize the number of small cuts required along the edges of the room. Mark the locations of any necessary cuts with a pencil or marker.
After the dry-lay is complete, mix the mortar according to the manufacturer's instructions. Use a drill with a mixing paddle to ensure a smooth, consistent consistency. Avoid adding too much water, as this can weaken the mortar. Allow the mortar to slake (rest) for the recommended time before using it.
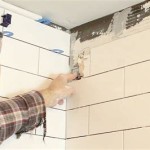
Apply the mortar to the concrete subfloor using a notched trowel. The size of the notches on the trowel will determine the thickness of the mortar bed. Hold the trowel at a 45-degree angle and spread the mortar in a consistent direction, creating ridges. Only apply enough mortar to cover a small area (typically 2-3 square feet) at a time, as the mortar will begin to skin over if left exposed for too long. Back-buttering each tile with a thin layer of mortar can improve adhesion, especially for larger tiles.
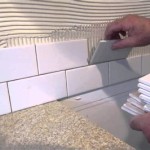
Carefully place the tiles onto the mortar bed, pressing them firmly into place. Use tile spacers to maintain consistent grout lines. Gently tap each tile with a rubber mallet to ensure that it is fully seated in the mortar. Periodically check the level of the tiles with a level to ensure that they are flush with each other. Adjust the tiles as needed before the mortar begins to set.
Continue laying the tiles in sections, following the dry-lay layout. Cut the tiles as needed to fit around obstacles or along the edges of the room. Use a wet saw for clean, precise cuts. Allow the mortar to cure for the manufacturer's recommended time (typically 24-48 hours) before proceeding to the next step.
Once the mortar has fully cured, remove the tile spacers. Prepare the grout according to the manufacturer's instructions.
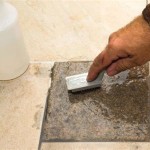
Apply the grout to the tile surface using a grout float. Hold the float at a 45-degree angle and spread the grout diagonally across the tile surface, forcing it into the grout lines. Remove any excess grout from the tile surface with the float.
Wait for the grout to set up slightly (typically 15-30 minutes), then use a damp grout sponge to clean the tile surface. Rinse the sponge frequently in clean water. Avoid using too much water, as this can weaken the grout. Repeat the cleaning process as needed to remove all grout residue from the tile surface.
Allow the grout to cure for the manufacturer's recommended time (typically 24-72 hours). Once the grout has fully cured, apply a grout sealant to protect the grout lines from water and stains. Follow the sealant manufacturer's instructions for application.
Following these steps carefully will result in a durable and aesthetically pleasing tile floor that will provide years of service. Proper planning, material selection, and attention to detail are essential for a successful tile installation on concrete.
:max_bytes(150000):strip_icc()/can-you-install-tile-directly-on-concrete-1822600-04-458f7bb6c78348c1835cf8054ef36553.jpg?strip=all "How To Install Tile Over Concrete")
How To Install Tile Over Concrete

How To Lay Floor Tiles On Concrete Stonesuper

Tiling Over A Ed Concrete Slab Fine Homebuilding

How To Lay Floor Tiles On Concrete Welcome The Rubi Tools Blog

How To Lay A Tile Floor On Concrete Diy Homeimprovement

How To Tile A Concrete Floor Howtospecialist Build Step By Diy Plans Floors Flooring

How To Install Ceramic Tiles On Concrete Floor Tile Installation

How To Lay Tile On Concrete With Pictures Wikihow

How To Tile A Concrete Floor Howtospecialist Build Step By Diy Plans

How To Lay Tile On Concrete With Pictures Wikihow
Related Posts