How To Install Ceramic Floor Tiles In Your Kitchen
Installing ceramic floor tiles in your kitchen can be a rewarding DIY project that significantly enhances the look and functionality of the space. Ceramic tiles are durable, water-resistant, and easy to clean, making them an ideal choice for high-traffic areas like kitchens. This guide will walk you through the essential steps involved in installing ceramic floor tiles, providing you with the knowledge to complete the project successfully.
Preparing the Subfloor
A stable and even subfloor is crucial for a successful tile installation. If the existing subfloor is uneven, cracked, or damaged, it needs to be repaired before proceeding. This process involves leveling the subfloor with self-leveling compound or plywood, ensuring a smooth and even surface for the tiles.
Once the subfloor is prepared, you need to install a moisture barrier, especially in kitchens, where spills and splashes are common. A moisture barrier prevents water from seeping through the tiles and damaging the subfloor. Common materials for moisture barriers include polyethylene sheets or liquid membrane. The moisture barrier should be laid out and secured to the subfloor using a suitable adhesive.
Laying Out the Tiles
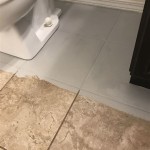
Before applying any adhesive, it is essential to lay out the tiles on the subfloor to determine the best arrangement and ensure a visually appealing result. This step involves considering the tile size, the layout pattern (such as straight, diagonal, or herringbone), and the location of any fixtures or appliances.
Start by laying out the tiles in the center of the room and work your way outwards. Mark the center point on the subfloor and then use a measuring tape and chalk line to create straight lines for the tile layout. Leave a gap of around 1/8 inch between each tile to allow for expansion and contraction due to temperature changes. This gap, known as a grout joint, will be filled with grout later in the installation process.
Applying Adhesive and Installing the Tiles
Once the layout is determined, it is time to start applying adhesive to the subfloor. The type of adhesive you choose will depend on the type of tile and subfloor. For ceramic tiles, thin-set mortar is a common choice. Use a trowel to spread a thin layer of adhesive onto the subfloor, covering an area that can be tiled within the recommended working time of the adhesive.
Carefully place the tiles onto the adhesive, aligning them with the layout lines and pressing them firmly down. Use a rubber mallet or tile tap to ensure even contact between the tile and the adhesive. As you proceed, make sure to maintain the grout joint spacing by inserting tile spacers between the tiles.
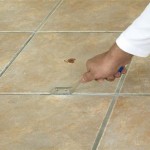
Grouting and Sealing
After the adhesive has cured, it is time to grout the tile joints. Grout is a paste-like material that fills the gaps between the tiles, providing a finished look and preventing water from penetrating the subfloor.
Choose a grout color that complements the tile color and apply it to the joints using a grout float. Work the grout into the joints and remove any excess grout with a damp sponge. Allow the grout to cure for the recommended time before cleaning it thoroughly.
After the grout has cured, apply a sealant to the tiles and grout to prevent staining and make cleaning easier. Grout sealants are available in different finishes, such as matte or gloss, depending on your preference. Apply the sealant according to the manufacturer's instructions.
Final Touches
Once the sealant has cured, your ceramic tile floor is ready for use. You can install trim pieces around the edges of the floor to create a polished look and protect the tiles from damage. These trim pieces come in various styles and materials to match your kitchen decor.
After installing the trim pieces, you can add any final touches, such as installing baseboards, replacing the kitchen cabinets, or adding decorative rugs. With careful planning and execution, installing ceramic floor tiles in your kitchen can be a rewarding and cost-effective way to enhance your kitchen's aesthetics and functionality.

How To Tile A Floor Part 1 Preparation

Tips For Installing A Kitchen Vinyl Tile Floor Merrypad

How To Tile A Kitchen Floor Step By Guide For Beginners

Complete Guide On How To Install Ceramic Floor Tiles Rubi Blog Usa

6 Tips For Laying Floor Tile With No Experience

Complete Guide On How To Install Ceramic Floor Tiles Rubi Blog Usa

How To Install Floor Tile Around A Kitchen Island With Wood Look Plank

Installing Tile Floor For The First Time How To Lay

Complete Guide On How To Install Ceramic Floor Tiles Rubi Blog Usa

Complete Guide On How To Install Ceramic Floor Tiles Rubi Blog Usa
Related Posts