How to Install Ceramic Tile in a Bathroom Shower
Installing ceramic tile in a bathroom shower is a challenging but rewarding project that can significantly enhance the aesthetic appeal and functionality of your bathroom. This comprehensive guide outlines the essential steps involved in the process, from preparation to finishing, enabling you to achieve a professional-looking result.
1. Preparation and Planning
Before embarking on the installation, meticulous planning is crucial for a successful outcome. The first step involves gathering the necessary tools and materials, including:
- Ceramic tiles
- Mortar
- Grout
- Tile spacers
- Notched trowel
- Level
- Tape measure
- Tile cutter or wet saw
- Rubber mallet
- Grout float
- Bucket
- Sponge
- Safety glasses
- Gloves
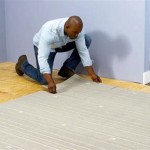
Once the materials are assembled, it’s essential to prepare the shower area. This involves removing the old shower fixtures, demolishing the existing shower pan, and cleaning the substrate thoroughly. Ensure the substrate is level, smooth, and free of debris. If necessary, apply a waterproof membrane to the shower pan to prevent water damage.
2. Installing the Tile
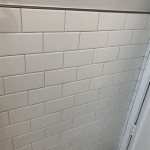
With the shower area prepared, the process of tiling can begin. Begin by installing the first row of tiles, ensuring a straight and level starting point. Use tile spacers to maintain even gaps between the tiles. Apply a thin layer of mortar to the shower wall using a notched trowel, creating a smooth and consistent surface. Press the tile firmly into the mortar, ensuring it’s level and flush with the surrounding tiles.
Continue installing tiles in rows, working from the bottom to the top. Remember to use tile spacers to maintain consistent gaps between tiles. For corners and curved surfaces, carefully cut the tiles using a tile cutter or wet saw. As you progress, use a level to ensure the tiles are installed straight and true. Leave space for the shower door or curtain track, and remember to install the fixtures after the tiles are laid.
3. Grouting and Sealing
Once the tiles are installed, the next step is grouting. Mix the grout according to the manufacturer’s instructions, ensuring a smooth and consistent consistency. Apply the grout to the gaps between the tiles using a grout float, pressing firmly to fill the spaces. Allow the grout to dry thoroughly before cleaning the excess with a damp sponge.
After the grout has dried, seal the tiles and grout to prevent water penetration and staining. Apply a sealant with a brush or roller, ensuring even coverage. Allow the sealant to dry completely before using the shower.
4. Finishing Touches
The final step involves installing the shower fixtures and finishing touches. Install the showerhead, faucet, and any other fixtures, ensuring they are securely attached and functioning correctly. Clean the shower thoroughly to remove any remaining debris or sealant residue.
With the installation complete, your bathroom shower is ready for use. Regular cleaning and maintenance are essential to preserve the beauty and functionality of your newly tiled shower.

The Complete Guide To Installing Tile On Shower Or Bathtub Walls

How To Tile A Shower At Home Diy Guide For Beginners

Step By How To Install 12x12 Ceramic Tile In A Shower Rubi Blog Usa

Part 1 How To Install Tile On Shower Tub Wall Step By

6 Mistakes To Avoid With Shower Tile Daltile

A Diy Shower Tile Step By

How To Install Ceramic Tiles On The Bathroom Wall Beautiful Exactly Finishing

How To Lay Tile In A Bathroom 5 Easy Steps Rubi Blog Usa

40 Free Shower Tile Ideas Tips For Choosing Why

How To Install Inexpensive Ceramic Tile In Your Shower
Related Posts