How To Prepare Backer Board For Tile Installation In A Shower Pan
Installing tile in a shower pan requires a sturdy and waterproof substrate. Backer board, a specialized material designed for wet areas, provides the necessary strength and moisture resistance. Proper preparation of the backer board is crucial for a successful and long-lasting tile installation. This article will guide you through the essential steps to prepare backer board for tile installation in a shower pan.
1. Selecting the Right Backer Board
There are two primary types of backer boards commonly used for shower pan installations: cement board and waterproof membrane-covered backer board. Understanding the advantages and disadvantages of each will help you make the best decision for your project.
Cement Board
Cement board, typically made of Portland cement and fiberglass mesh, is a durable and cost-effective option. It offers excellent moisture resistance and can be easily cut and shaped. However, it requires meticulous sealing to prevent water penetration. Due to its porous nature, cement board can absorb moisture if not properly sealed.
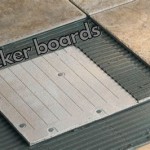
Waterproof Membrane-Covered Backer Board
Waterproof membrane-covered backer board consists of a core made of either cement or a combination of cement and polymers, covered with a waterproof membrane. This type of backer board simplifies the installation process by eliminating the need for separate waterproofing layers. The integrated membrane provides an extra layer of protection against water damage. However, it is generally more expensive than cement board.
2. Preparing the Shower Pan
Before installing the backer board, it is essential to ensure the shower pan is properly prepared and level.
Cleaning and Drying the Shower Pan
Start by thoroughly cleaning the shower pan, removing any debris, dirt, or old adhesive residue. Allow the shower pan to completely dry before proceeding. Any remaining moisture can compromise the adhesion of the backer board.
Checking for Level
Use a level to verify the shower pan's surface is level. Any significant slopes or uneven areas will need to be addressed with leveling compounds or mortar before installing the backer board. Ensuring the shower pan is level will prevent water from pooling and promote proper drainage.
3. Installing the Backer Board
With the shower pan prepared, you can proceed with installing the backer board. The process involves securing the board to the pan using construction adhesive and screws.
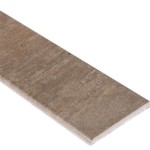
Cutting the Backer Board
Measure and cut the backer board to fit the dimensions of the shower pan. When cutting, use a utility knife or a circular saw with a carbide-tipped blade designed for cutting cement board. Ensure the cuts are straight and precise for a neat and professional installation.
Applying Construction Adhesive
Apply a generous layer of construction adhesive evenly across the back of the backer board panels using a notched trowel. The notches will create a consistent thickness of adhesive for a strong bond.
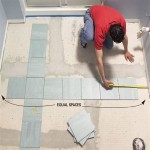
Securing the Backer Board
Position the backer board panels on the shower pan and press firmly to ensure full contact with the adhesive. Secure the panels with screws, spaced approximately 8 inches apart. Drive the screws into the backer board, leaving a slight gap between the screw head and the surface to allow for expansion and contraction.
4. Sealing the Backer Board
To prevent water from penetrating the backer board, it is crucial to seal all the seams, joints, and edges. This step is particularly important for cement board, which is naturally more porous than waterproof membrane-covered backer board.
Applying Waterproof Membrane
For cement board, apply a waterproof membrane, such as liquid membrane or a sheet membrane, to all seams and joints. These membranes create a waterproof barrier that prevents water penetration. Follow the manufacturer's instructions for application and drying time.
Using Sealant
For waterproof membrane-covered backer board, a sealant is usually sufficient. Apply a high-quality silicone sealant along all seams, joints, and edges to create a waterproof seal. Smooth the sealant to create a smooth and continuous barrier.
5. Preparing for Tile Installation
Once the backer board is properly sealed, it's ready for tile installation. Before installing tiles, it's essential to take a few additional steps to ensure a successful and long-lasting installation.
Cleaning the Backer Board
Thoroughly clean the entire backer board surface to remove any dirt, dust, or residual sealant. A damp cloth is usually sufficient for this task.
Applying a Primer
Depending on the type of tile and adhesive being used, you may need to apply a primer to the backer board. A primer promotes adhesion and ensures a strong bond between the adhesive and the backer board. Consult the tile manufacturer's recommendations for specific primer requirements.
By following these steps, you can prepare the backer board for tile installation in a shower pan, ensuring a waterproof and durable foundation for your tiling project.

Proper Way To Set Wallboard For Shower

How To Build A Shower Pan 2 Methods Diytileguy

How To Build A Tile Shower Pan Icreatables Com

Xps Tile Backer Board Shower Tray Base Niche

3 Shower Pan Choices For A Solid Tile Floor Installation Fine Homebuilding

How To Build A Shower Pan

How To Install Goboard Tile Backer Board Diytileguy

How To Install Cement Board For Tile Bower Power

How To Diy A Shower Pan The Space Between

How To Build A Shower Pan Family Handyman
Related Posts