How to Cut Holes in Tile with Precision Edges: A Guide for DIYers
Cutting holes in tile with precise edges is a common need for many DIY projects, whether it’s installing electrical outlets, plumbing fixtures, or ventilation systems. While it may seem daunting at first, it’s a skill that can be mastered with the right tools and techniques. This guide will walk you through the process, providing step-by-step instructions and tips for achieving professional-looking results.
Essential Tools and Materials
Before you begin, gather the following tools and materials:
- Tile cutter: This is the most common tool for cutting straight lines in tile. Look for a model with a scoring wheel and a breaking lever.
- Tile nippers: These are used for trimming and shaping irregular cuts.
- Wet saw: A wet saw is essential for cutting large or intricate holes in tile. It uses a water-cooled diamond blade to prevent overheating and chipping.
- Hole saw: This specialized drill bit is used for cutting circular holes in tile. Choose a hole saw with a diameter that matches the size of the hole you need.
- Drill: You’ll need a drill to use the hole saw.
- Safety glasses: Protect your eyes from flying debris.
- Gloves: Protect your hands from sharp edges.
- Masking tape: Use masking tape to mark the cutting lines and prevent chipping.
- Pencil: For marking the cutting lines on the tile.
- Tile adhesive: This is used to secure the tile after making the cut.
- Grout: This is used to fill in the gaps between the tile and the surrounding surface.
Cutting Straight Lines in Tile
For simple straight cuts, a tile cutter is usually sufficient. Follow these steps:
- Mark the cutting line: Use a pencil to mark the cutting line on the tile. Make sure the line is straight and clear.
- Score the tile: Place the tile cutter on the cutting line and apply even pressure to the scoring wheel. Make a single, deep score across the entire length of the line.
- Break the tile: Position the tile on the edge of a sturdy surface. Apply pressure to the tile on either side of the score line until it breaks cleanly.
- Clean up edges: Use tile nippers to clean up any rough edges.
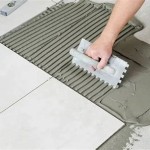
Cutting Holes in Tile
For cutting holes in tile, a wet saw or hole saw is the best choice. Here’s how to use each:
Using a Wet Saw
- Mark the hole: Use a pencil to mark the outline of the hole on the tile.
- Secure the tile: Secure the tile to the wet saw’s cutting table using clamps or a vice.
- Start the saw: Start the wet saw and allow it to reach its operating speed.
- Cut the hole: Slowly guide the diamond blade along the marked outline, making sure it’s perpendicular to the tile.
- Finish the cut: Once the hole is cut, stop the saw and remove the tile from the table.
Using a Hole Saw
- Mark the center: Use a pencil to mark the center of the hole on the tile.
- Secure the tile: Secure the tile to a sturdy surface using clamps or a vice.
- Drill the pilot hole: Use a drill bit slightly smaller than the diameter of the hole saw to drill a pilot hole at the marked center.
- Attach the hole saw: Attach the hole saw to the drill.
- Cut the hole: Using slow, steady pressure, drill the hole saw through the tile. Use water to cool the bit and prevent chipping.
- Finish the cut: Once the hole is cut, remove the hole saw from the drill.
Tips for Success
Here are some additional tips for achieving precise cuts in tile:
- Use masking tape: Applying masking tape along the cutting lines will help prevent chipping and cracking.
- Use a straight edge: A straight edge will ensure that the cutting line is perfectly straight.
- Apply even pressure: Consistent pressure is crucial for a clean and accurate cut.
- Use water: When using a wet saw or a hole saw, use water to keep the blade cool and prevent overheating.
- Clean up the edges: Use tile nippers to clean up any rough edges after making the cut.
By following these steps and tips, you can confidently cut holes in tile with precision edges, adding a professional touch to your DIY projects. Remember to prioritize safety throughout the process and always wear protective gear. With practice and patience, you’ll master this skill and enjoy the satisfaction of creating beautiful and functional finishes with your own hands.

Split Blender 4 Manual

Split Blender 4 Manual

The Easy Fix To Classic 3d Printing Design Problem And How It In Blender

Split Blender 4 Manual

Knife Tool How Can I Cut An Edge From A Plane Blender Stack Exchange

Create A 3d Isometric Bathroom Scene In Blender Discover Learn

Split Blender 4 Manual

Create A 3d Isometric Bathroom Scene In Blender Discover Learn

Maya How To Do Taper With A Twist Custom Shape The Sweep Tool

Create A 3d Isometric Bathroom Scene In Blender Discover Learn
Related Posts