How to Install Tile Backsplash on Painted Drywall in a Bathroom
Installing a tile backsplash in a bathroom can significantly elevate the room's aesthetic and provide a durable surface for cleaning. However, working with painted drywall presents some unique challenges that require specific preparation steps. This article outlines the detailed process of installing a tile backsplash on painted drywall, ensuring a successful and aesthetically pleasing outcome.
Preparation is Key: Setting the Stage for Success
Successful tile installation hinges on proper preparation. These initial steps ensure a secure and long-lasting backsplash:
-
Clean the Wall:
Thoroughly clean the drywall surface with a degreaser to remove any residue, oils, or grime. This ensures optimal adhesion for the tile mortar. -
Remove Existing Outlets and Switches:
Disconnect the power supply to the bathroom and carefully remove any electrical outlets or switches situated within the backsplash area. Label the wires with electrical tape for easy reinstallation. -
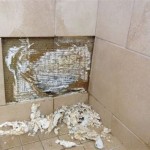
Assess Wall Condition:
Inspect the painted drywall for any imperfections like cracks, holes, or unevenness. Repair any blemishes using patching compound and allow it to dry completely before proceeding. -
Prime the Wall:
Apply a high-quality bonding primer to the entire backsplash area. This enhances adhesion and creates a uniform surface for the mortar. -
Measure and Mark:
Measure the desired backsplash area and mark the outline on the wall using a pencil and a level. Be sure to consider the height of the countertop for proper placement and alignment.
By meticulously completing these preparation steps, you create a foundation for a successful and professional-looking tile installation.
Laying the Foundation: Applying Mortar and Tile
After the preparation stage, it’s time to apply mortar and install the tile. Adhering to the following steps will ensure a strong and aesthetically appealing backsplash.
-
Prepare Mortar:
Mix the thin-set mortar according to the manufacturer's instructions. The consistency should be similar to peanut butter, ensuring a smooth and even application. -
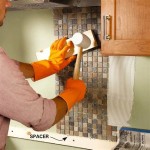
Apply Mortar:
Using a notched trowel, apply a thin layer of mortar to the prepared wall area. The trowel's notches will create grooves for the tile to sit in, ensuring proper ventilation and drainage. -
Install Tile:
Begin installing the tiles, starting from a corner or a central point. Press each tile firmly into the mortar, ensuring a level and even placement. Use spacers to maintain consistent grout lines. -
Cut Tile:
For areas requiring cuts around corners, outlets, or switches, utilize a tile cutter or wet saw. Measure carefully and make precise cuts to ensure a clean and seamless finish. -
Leveling:
Use a level to check the tile's alignment and make adjustments as needed. A tile leveling system can also be helpful for achieving a consistently flat surface. -
Allow Mortar to Cure:
Allow the mortar to cure according to the manufacturer's instructions. This ensures that the tile is securely bonded to the wall.
These meticulous steps ensure a secure and level tile installation, setting the stage for the final finishing touches.
Completing the Backsplash: Grouting and Finishing Touches
Once the mortar has cured, the final step involves applying grout and adding the finishing touches:
-
Clean Tile Surface:
Thoroughly clean the tile surface to remove any loose mortar or debris before applying grout. This ensures a clear and even grout application. -
Apply Grout:
Mix the grout according to the manufacturer's instructions. Apply grout using a rubber float, pressing it into the tile joints at a 45-degree angle. Remove excess grout with a damp sponge. -
Clean and Seal:
After the grout has set, clean any remaining residue from the tile surface with a damp sponge. Allow the grout to cure completely before sealing it. Sealing protects the grout from stains and moisture. -
Reinstall Outlets and Switches:
Once the grout has fully cured, carefully reinstall the electrical outlets and switches, connecting the wiring according to the original configuration. -
Caulking:
Apply caulk along the edges of the backsplash where it meets the countertop and walls. This creates a water-resistant barrier and prevents moisture penetration.
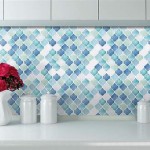
These final steps ensure a professional-looking and functional backsplash, completing the transformation of your bathroom.
Installing a tile backsplash on painted drywall requires careful planning and meticulous execution. By following these detailed instructions, you can achieve a stunning and long-lasting addition to your bathroom.

How To Prepare Drywall For A Tile Backsplash Mr Handyman

How To Install Backsplash Bathroom Tile Easy Simple

How To Prepare Drywall For A Tile Backsplash Mr Handyman

How To Add L And Stick Tile A Wall Drywall

How To Install Tile Backsplash Fixthisbuildthat

How To Install Tile Backsplash Fixthisbuildthat

How To Install A Shower Tile Wall Bathroom

L And Stick Tile How To Install On A Wall Porch Daydreamer

Learn How To Prep A Wall For Tile

How To Tile Over Existing Brepurposed
Related Posts