Replacing the tile in your bathroom can be a great way to spruce up the look of the room. Replacing tile can also be a more cost-effective solution than buying a whole new suite of fixtures. Whether you’re replacing tile around your bathtub, sink, or floor, the process is relatively simple and straightforward. With a few tools and materials, you can replace your bathroom tile in just a few hours.
Before you begin, it’s important to make sure that the area you’re working on is clean and free of debris. Remove all furniture and other items from the area and vacuum the surface to remove any dirt or dust. Once the area is clean, you can start the process of replacing the tile.
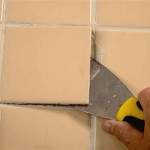
The first step is to remove the existing tile. Use a hammer and chisel to pry up the tiles from the surface. Be careful not to damage the surface underneath. Once the tile is removed, you can use a putty knife to remove the adhesive that held the old tiles in place. You can then vacuum the area to remove any remaining dust.
Next, you need to measure the area you are tiling. Make sure to measure twice and cut once to ensure that the tiles fit correctly. Once you have the measurements, you can cut the new tile to size with a tile saw. If you don’t have a tile saw, you can use a wet saw to do the job.
Once the tiles are cut, you can apply the adhesive to the back of each tile. Spread the adhesive evenly and press the tile into position. Make sure to press the tile firmly so that it adheres to the surface. Allow the adhesive to dry completely before applying grout to the joints between the tiles.
Finally, use a damp sponge to wipe away the excess grout and leave the surface clean and smooth. Allow the grout to dry completely before replacing any furniture or other items in the area. With a few simple steps, you can easily replace the tile in your bathroom and give it a fresh new look.


Related Posts


