How To Remove Dried Caulk From Tile
Removing dried caulk from tile can seem daunting, but with the right tools and techniques, it can be a manageable task. This article will guide you through the process, outlining the necessary steps and precautions to take for a successful caulk removal.
1. Gather Necessary Tools and Materials
Before beginning, assemble all required tools and materials. This preparation will streamline the process and prevent interruptions. Essential items include a utility knife or caulk removal tool, a scraper (plastic or metal), safety glasses, work gloves, a shop vacuum, and potentially a caulk softener if the caulk proves particularly stubborn.
2. Prepare the Work Area
Protecting surrounding surfaces is crucial. Cover adjacent areas with painter's tape or masking paper to prevent accidental damage from tools or stray caulk debris. Adequate ventilation is also important, particularly if using a caulk softener containing chemical solvents.
3. Test the Caulk
Different caulk types react differently to removal methods. Test a small, inconspicuous area of the caulk first to determine its hardness and adhesion. This test will help inform the best removal approach and prevent unnecessary damage to the tile.
4. Soften the Caulk (If Necessary)
For stubbornly adhered caulk, a caulk softener can significantly ease the removal process. Apply the softener according to the manufacturer's instructions, allowing sufficient dwell time for it to penetrate and weaken the caulk's bond. Ensure proper ventilation when using chemical softeners.
5. Begin Removal with a Utility Knife or Caulk Removal Tool
Carefully score the caulk along the edges where it meets the tile. Use a sharp utility knife or a specialized caulk removal tool. The goal is to break the seal between the caulk and the tile without scratching or gouging the tile surface. Maintain a shallow angle and apply consistent pressure to avoid slipping.
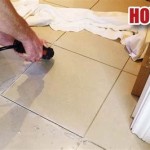
6. Utilize a Scraper
After scoring the caulk, use a scraper, preferably plastic to minimize the risk of scratching the tile, to lift and remove loosened sections. Hold the scraper at a low angle to the tile and apply steady pressure, working in short, controlled strokes. For particularly stubborn areas, a metal scraper might be necessary, but exercise extreme caution to prevent damage to the tile.
7. Vacuum Loose Debris
Throughout the process, regularly vacuum loose caulk debris to maintain a clean work area and prevent re-adhesion. This also improves visibility and allows for more precise removal of the remaining caulk.
8. Address Remaining Caulk Residue
Small pieces of caulk may remain adhered to the tile even after scraping. A caulk remover or mineral spirits can help dissolve these remnants. Apply the remover according to the manufacturer’s instructions, using a cloth or sponge to gently rub the affected area. Thoroughly rinse the area with clean water after removing the residue.
9. Clean the Tiles
Once all the caulk is removed, clean the tiles thoroughly with a suitable tile cleaner. This will remove any remaining residue from the caulk remover or softener, as well as any general dirt or grime accumulated during the process. This final cleaning ensures a pristine surface for re-caulking.
10. Inspect and Prepare for Re-Caulking
After cleaning, carefully inspect the tile and grout lines for any damage. Address any necessary repairs before proceeding with re-caulking. Ensure the area is completely dry before applying new caulk. Proper surface preparation is key to a successful and long-lasting caulk seal.
11. Preventing Caulk Build-up
To avoid excessive caulk build-up in the future, consider applying a thin bead of caulk during initial application. Using a caulk finishing tool can also help create a smooth, consistent bead that’s less prone to trapping dirt and grime.
12. Choosing the Right Caulk
Selecting the appropriate caulk type for the specific tile and application is essential for long-term performance and ease of future removal. Consider factors like moisture exposure, temperature fluctuations, and substrate compatibility when choosing a caulk.
13. Safety Precautions
Always prioritize safety when removing caulk. Wear safety glasses to protect your eyes from debris and ensure adequate ventilation, especially when using chemical softeners. Sharp tools should be handled carefully to avoid injury. If unsure about any part of the process, consult a professional.

How To Remove Old Caulk From Your Tub And Tile Heatherstudios

How To Remove Silicone Sealant From Tile Glass Metal And Wood

How To Remove Old Caulk Dap Global

Remove Dried Caulk From Tile

How To Remove Silicone From Tiles A Step By Guide

How To Clean Black Moldy Shower Or Kitchen Tile And Silicone Caulking Two Methods No Scrubbing

How To Remove Silicone From Tiles A Step By Guide

Remove Dried Caulk From Tile

Tile Caulk Cleaning And Whitening Doityourself Com

Easily Remove Silicone Caulk Without Chemicals
Related Posts