A Step-by-Step Guide to Regrouting Your Shower Tile
Regrouting shower tile is a home improvement project that can significantly enhance the appearance and longevity of a bathroom. While it may seem daunting, the process is manageable for DIY enthusiasts with basic tools and a bit of patience. This guide provides a comprehensive walkthrough of the steps involved in successfully regrouting shower tile.
1. Gather Necessary Tools and Materials
Before beginning, ensure all required tools and materials are readily available. This preparation streamlines the process and prevents interruptions. The following items are essential:
* Grout removal tool * Grout float * Bucket * Sponge * Grout sealant * Safety glasses * Dust mask * Gloves * Grout * Drop cloths * Utility knife * Caulk * Caulk gun2. Prepare the Shower Area
Proper preparation is crucial for successful regrouting. Begin by thoroughly cleaning the shower area with a suitable tile cleaner to remove any soap scum, mildew, or hard water deposits. This ensures proper adhesion of the new grout. Next, protect adjacent fixtures and surfaces with drop cloths or painter's tape.
* Clean the shower thoroughly. * Protect surfaces with drop cloths. * Ensure adequate ventilation.3. Remove the Old Grout
Removing the existing grout is a critical step requiring careful execution. Utilize a grout removal tool, available at most hardware stores, to meticulously remove the old grout from between the tiles. Take care not to damage the tiles during this process. For stubborn grout, a utility knife with a sharp blade can be helpful. Wear safety glasses and a dust mask to protect yourself from debris.
* Use a grout removal tool. * Exercise caution to avoid damaging tiles. * Wear safety glasses and a dust mask.4. Clean the Grout Lines
Once the old grout is removed, thoroughly clean the grout lines with a vacuum cleaner and a damp sponge. This removes any remaining debris and dust, creating a clean surface for the new grout to adhere to. Ensure the area is completely dry before proceeding.
* Vacuum the grout lines. * Wipe clean with a damp sponge. * Allow to dry completely.5. Mix the Grout
Following the manufacturer's instructions, mix the grout in a clean bucket. The consistency should be similar to peanut butter; too runny, and it won't hold its shape; too thick, and it will be difficult to apply. Small batches are recommended, especially for larger areas, to prevent the grout from drying out before application.
* Follow manufacturer's instructions precisely. * Aim for a peanut butter-like consistency. * Mix in small batches to prevent drying.6. Apply the New Grout
Using a grout float held at a 45-degree angle, press the grout firmly into the grout lines, ensuring they are completely filled. Work in small sections, removing excess grout with the edge of the float as you go. This consistent pressure ensures a uniform and durable finish.
* Use a grout float at a 45-degree angle. * Press grout firmly into the lines. * Remove excess grout with the float's edge.7. Clean the Excess Grout
After allowing the grout to haze over (usually about 15-20 minutes), use a damp sponge to carefully wipe away the excess grout from the tile surface. Rinse the sponge frequently in clean water, wringing it thoroughly to avoid leaving too much water on the tiles. This prevents a hazy film from forming on the tile surface.
* Allow grout to haze over before cleaning. * Use a damp sponge to remove excess grout. * Rinse sponge frequently in clean water.8. Allow the Grout to Cure
Allow the grout to cure completely according to the manufacturer's instructions, typically 24-72 hours. Avoid using the shower during this period to prevent disturbing the newly applied grout. Proper curing ensures maximum strength and durability.
* Follow manufacturer's curing time recommendations. * Avoid shower use during curing period.9. Apply Grout Sealer
Once the grout has cured, apply a grout sealer to protect it from moisture, stains, and mildew. This is a crucial step in maintaining the new grout's appearance and extending its lifespan. Follow the sealer manufacturer's instructions for application and drying time.
* Apply grout sealer after curing. * Protect against moisture and stains. * Follow sealer manufacturer's instructions.10. Caulk Where Necessary
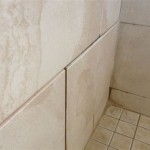
Apply a bead of caulk where the tile meets other surfaces, such as the bathtub or shower pan. This creates a waterproof seal and prevents water damage. Smooth the caulk with a wet finger for a clean, professional finish. Allow the caulk to dry completely before using the shower.
* Caulk where tile meets other surfaces. * Create a waterproof seal. * Allow caulk to dry completely.
A Step By Guide On How To Regrout Bathroom Tiles Barretts Of Maynooth

A Step By Guide On How To Regrout Bathroom Tiles Mccarthy S Homevalue

How To Regrout Shower Tiles A Step By Guide Wale

A Step By Guide On How To Regrout Shower Wall

How To Regrout Bathroom Tiles By Mira Showers

How To Regrout Tiles Step By Guide

A Step By Guide On Bathroom Restorations Universal Tradesman

How To Regrout Tiles For A Show Home Finish Checkatrade

How To Regrout A Shower Wall Step By Guide

How To Regrout A Shower And Make It Look Like New Angi
Related Posts