How to Repair Broken Floor Tiles in a Bathroom Sink Area
Broken floor tiles in the bathroom sink area can be an eyesore and create an uneven surface. Repairing them is essential to maintain the aesthetics and safety of the bathroom. Here's a comprehensive guide on how to fix broken floor tiles in a bathroom sink area:
1. Safety Precautions
Before starting any repairs, ensure safety by wearing safety glasses, gloves, and a dust mask to protect yourself from flying debris and dust. Additionally, turn off the water supply to the sink to prevent flooding.
2. Remove Broken Tiles
Use a chisel and hammer to carefully remove the broken tiles. Place the chisel at the edge of the tile and tap the hammer gently to chip it off. Continue chiseling until all the broken pieces are removed. Avoid damaging the surrounding tiles or the subfloor underneath.
3. Prepare the Area
Once the broken tiles are removed, clean the area thoroughly using a damp cloth to remove any dust or debris. Inspect the subfloor for any damage or loose tiles and repair them if necessary.
4. Apply Thinset Mortar
Spread a thin layer of thinset mortar over the prepared area using a notched trowel. Ensure the layer is level and covers the area where the new tile will be placed.
5. Set the New Tile
Position the new tile on the thinset mortar and press down firmly to ensure proper adhesion. Use a level to check that the tile is aligned correctly and is level with the surrounding tiles.
6. Remove Excess Thinset
Use a damp sponge or cloth to wipe away any excess thinset mortar that may have oozed out from the edges of the tile. Smooth the surrounding area to create a clean and even surface.
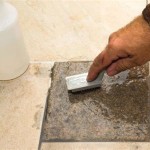
7. Grout the Tiles
After the thinset mortar has set, apply grout to the spaces between the tiles. Use a grout float or sponge to work the grout into the gaps, filling them completely. Remove excess grout with a damp sponge.
8. Seal the Grout
Once the grout has dried, apply a grout sealer to protect it from water and stains. Use a fine-tipped brush to apply the sealer evenly over the grout lines.
9. Clean and Inspect
Clean the repaired area with a damp cloth to remove any remaining debris or sealer residue. Inspect the repaired area to ensure it is level, secure, and aesthetically pleasing.
Tips:
- Choose tiles that are compatible with the existing floor and match the design and color scheme of the bathroom.
- Allow sufficient time for the thinset mortar and grout to dry before using the sink area.
- If the broken tiles are large or the damage extends beyond the surface, consider contacting a professional tile installer for assistance.
- Regularly inspect and clean the bathroom floor to prevent future damage and maintain its appearance.

How To Repair A Ed Tile Without Replacing Orientbell Tiles

How To Fix Ed Tile The Home Depot

Ed Floor Tiles 6 Steps To Repair The Ultratech Cement

How To Repair Broken Tile Part One

How To Fix Tile Problems Chips Scratches And S Walls Floors

Installing A Broken Tile Mosaic

Ed Floor Tiles 6 Steps To Repair The Ultratech Cement

How To Fix Tile Problems Chips Scratches And S Walls Floors

Installing A Broken Tile Mosaic

How To Fix Ed Tile The Home Depot
Related Posts