How to Install Porcelain Tile on Concrete Floor
Porcelain tiles are a popular choice for flooring due to their durability, low maintenance, and timeless appearance. Installing porcelain tiles on a concrete floor can be a rewarding DIY project that adds value to your home. Here's a comprehensive guide to help you achieve a professional-looking installation:
1. Prepare the Concrete Floor
Before installing the tiles, it's crucial to prepare the concrete floor. Ensure it's level, clean, and free from any debris, coatings, or moisture. Level any uneven areas using self-leveling compound and remove any existing adhesives, sealers, or paints with a grinder or wire brush.
2. Install Backer Board
Backer board, such as cement board or fiberboard, provides a stable surface for the tiles. Cut the backer board into strips that span the width of the floor. Apply thin-set mortar to the concrete floor and set the backer board in place, ensuring that it's level and securely fastened with screws or nails.
3. Install Tile Underlayment
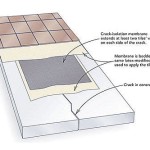
Tile underlayment, such as a moisture barrier or soundproofing membrane, provides additional protection and comfort. Roll out the underlayment over the backer board, ensuring it's flat and free of wrinkles. Overlap the edges by a few inches and secure them with tape.
4. Mix and Apply Thin-Set Mortar
Thin-set mortar is a specialized adhesive used to bond the tiles to the underlayment. Mix the mortar according to the manufacturer's instructions, using a drill with a paddle attachment. Apply the mortar to the underlayment using a notched trowel, creating ridges that allow for proper bonding.
5. Install the Tiles
Starting from one corner, press the porcelain tiles into the thin-set mortar, aligning them evenly. Use tile spacers to maintain consistent spacing between tiles. Firmly press them into place and tap them gently with a rubber mallet to ensure good bonding.
6. Grout the Joints
Once the tiles are installed, allow the mortar to cure for the recommended time. Grouting fills the joints between the tiles, providing a protective and aesthetic finish. Mix the grout according to the manufacturer's instructions and apply it to the joints using a rubber float. Remove any excess grout with a damp sponge.
7. Seal the Tile
Sealing the tiles protects them from moisture and stains. Choose a high-quality sealant specifically designed for porcelain tiles. Apply the sealant using a brush or sponge, and allow it to cure for the recommended time.
Tips for Success:
- Use a level and straightedge to ensure the floor is level and flat.
- Allow ample time for the mortar and grout to cure before walking on the floor.
- Clean up any excess mortar or grout immediately to prevent staining.
- Protect the tiles from foot traffic during the curing process.
- Consider hiring a professional for large or complex installations.
How To Tile Onto Concrete Floors Porcelain Super
How To Lay Floor Tiles On Concrete Stonesuper
:max_bytes(150000):strip_icc()/can-you-install-tile-directly-on-concrete-1822600-04-458f7bb6c78348c1835cf8054ef36553.jpg?strip=all)
How To Install Tile Over Concrete
Porcelain Tile Installation Over A Concrete Floor Like Pro Matrixgc

How To Lay A Tile Floor On Concrete Diy Homeimprovement
Porcelain Tile Installation Over A Concrete Floor Like Pro Matrixgc

How To Install Ceramic Tiles On Concrete Floor Tile Installation
Porcelain Tile Installation Over A Concrete Floor Like Pro Matrixgc

Diy Laying Porcelain Tile On A Concrete Porch

How To Lay Tile On Concrete With Pictures Wikihow
Related Posts


