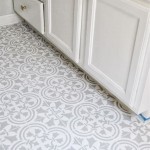
Effortless Floor Refresh With Self-Stick Vinyl Tiles
Revitalizing your floors has never been so easy with self-stick vinyl tiles. Whether you're a seasoned DIY enthusiast or a novice embarking on your first flooring project, these innovative tiles offer a stress-free and cost-effective way to transform your living spaces. Read on to discover the essential aspects of working with self-stick vinyl tiles and achieve a flawless floor refresh with minimal effort.
Choosing the Right Tiles
The first step towards a successful floor transformation is selecting the perfect tiles. Self-stick vinyl tiles come in a wide range of styles, textures, and colors, making it easy to find options that complement your existing décor and personal preferences. Consider the size of your room, the amount of foot traffic it receives, and your desired aesthetic when choosing tiles.
Preparing Your Surface
Proper surface preparation is crucial for ensuring a smooth and long-lasting installation. Begin by thoroughly cleaning and drying your subfloor to remove any dirt, dust, or debris. Level any uneven surfaces using a self-leveling compound or underlayment. Ensure your subfloor is smooth, flat, and free of imperfections before proceeding with the installation.
Applying the Tiles
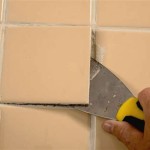
Self-stick vinyl tiles are incredibly easy to install. Simply peel off the backing paper and press the tile firmly into place. Start by laying down tiles in the center of the room and work your way outwards. Use a utility knife to cut tiles along edges and corners as needed. Press down firmly on each tile and overlap the edges slightly to prevent gapping.
Trimming and Finishing
Once all tiles are in place, remove any excess material around the edges using a utility knife or a multi-tool. Install baseboards or quarter rounds around the perimeter of your floor to conceal any gaps and complete the professional look. Finally, give your new floor a thorough clean to remove any dust or debris left over from the installation process.
Maintenance and Care
Self-stick vinyl tiles are incredibly durable and easy to maintain. Regular cleaning with a damp mop and mild detergent is sufficient to keep your floor looking its best. Avoid using abrasive cleaners or harsh chemicals, as they can damage the surface of the tiles. Protect your floor from heavy furniture by using furniture pads or casters.
Additional Tips for a Flawless Installation:
- Allow your tiles to acclimate to room temperature for at least 24 hours before installation.
- Use a straight edge or chalk line to ensure straight and even alignment.
- Remove any bubbles or air pockets by pressing down firmly on the tiles or using a rolling pin. li>Seal the edges of your floor with a clear silicone caulk if you're installing it in a moisture-prone area.
Conclusion:
Refresh your floors effortlessly with the ease and affordability of self-stick vinyl tiles. By following these simple steps and considering the essential aspects outlined above, you can achieve a stunning and durable flooring solution that will transform your living spaces. Embrace the transformative power of these innovative tiles and unlock the potential of your home's décor with a floor refresh that's both stylish and stress-free.

7 Things To Know Before Trying L And Stick Flooring

How To Update Your Floor With Tile Stickers My Family Thyme

How To Install L And Stick Vinyl Tiles Houseful Of Handmade

How To Lay L And Stick Vinyl Tile Flooring Hubpages

My Full Review Of Chasing Paper L And Stick Floor Tiles

How To Update Your Floor With Tile Stickers My Family Thyme

Diy L And Stick Vinyl Floor Tile Stickers The Turquoise Home

How To Install Vinyl L And Stick Tile 1905 Farmhouse

Transform A Laundry Room Floor With L And Stick Tiles Diy Beautify Creating Beauty At Home

How To Install L Stick Floor Tile The Turquoise Home
Related Posts


