The Definitive Guide to Installing Backsplash Tiles
Backsplash tiles are an essential element of any kitchen, adding style, protection, and functionality to your cooking space. Installing them can be a challenging task, but by following this comprehensive guide, you can achieve professional-looking results with ease.
Materials and Tools
* Backsplash tiles * Thinset mortar * Grout * Caulk * Tile spacers * Notched trowel * Grout float * Sponge * Level * Tape measure * PencilPreparing the Wall
* Ensure the wall is clean, dry, and free of any dirt, debris, or grease. * If necessary, apply a primer to help the thinset adhere to the wall. * Use a level to ensure the wall is perfectly flat. Any unevenness can affect the final installation.Laying Out the Tiles
* Determine the center point of the wall and mark it. * Place the first tile in the center and use a level to ensure it's straight. * Insert tile spacers between the tiles to maintain uniform gaps. * Continue laying tiles row by row, working outwards from the center.Applying Thinset Mortar
* Use a notched trowel to apply a thin layer of thinset mortar to the back of each tile. * Hold the trowel at a 45-degree angle and create small ridges in the mortar. * Avoid applying too much mortar, as it can cause the tiles to sag.Setting the Tiles
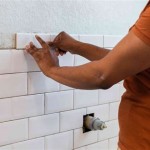
* Press the tiles firmly onto the wall, aligning them with the spacers. * Use a level to ensure each tile is level and flat. * Lightly tap the tiles with a rubber mallet or a block of wood to ensure secure adhesion.Grouting
* Once the tiles are set, allow the thinset mortar to cure for 24 hours. * Mix the grout according to the manufacturer's instructions. * Use a grout float to apply the grout to the joints between the tiles. * Press the grout into the joints, filling them completely.Cleaning and Caulking
* Remove excess grout with a sponge and water. * Wipe the tiles clean with a damp cloth. * Apply caulk around the edges of the backsplash where it meets the countertops and cabinets. * Smooth the caulk with your finger or a caulk tool.Finishing Touches
* Allow the grout and caulk to cure for several days. * Seal the grout and tiles to protect them from moisture and stains. * Enjoy your new, stylish, and functional backsplash!
How To Install Tile Backsplash Forbes Home

How Tile A Backsplash Choosing And Installing The Rubi Blog Usa

How To Tile A Backsplash Tutorial For Beginners

How To Install A Tile Backsplash The Home Depot

A Complete How To Guide For Replacing Installing Backsplash The Seattle Times

How To Tile A Backsplash Step By Guide

How To Install A Kitchen Backsplash The Best And Easiest Tutorial

How To Install A Tile Backsplash Part 1 Buildipedia Diy

Avoid These Common Diy Backsplash Installation Mistakes

How Much Does Backsplash Installation Cost 2024 Data Angi
Related Posts