How To Tile A Bathroom Floor Using Cement Board
Tiling a bathroom floor is a significant undertaking that can dramatically improve the aesthetics and functionality of the space. The longevity and success of a tile installation heavily rely on the preparation of the subfloor. Utilizing cement board as an underlayment provides a stable, moisture-resistant base, crucial in the humid environment of a bathroom. This article outlines the steps involved in tiling a bathroom floor using cement board, ensuring a professional and durable finish.
Preparation is Key: Assessing the Subfloor and Gathering Materials
Prior to commencing any tiling project, a thorough assessment of the existing subfloor is paramount. The subfloor, typically constructed of plywood or OSB, must be structurally sound and free from any signs of rot, water damage, or significant deflection. Deflection, or movement in the subfloor, can lead to cracked tiles and grout lines over time. If any structural issues are identified, they must be addressed before proceeding. This may involve replacing damaged sections of the subfloor or reinforcing joists to reduce flexing.
Once the structural integrity of the subfloor is verified, its flatness should be evaluated. Imperfections such as humps or dips can cause tiles to sit unevenly, creating an unsightly and potentially hazardous surface. A long level or straightedge can be used to identify any irregularities. Minor imperfections can be corrected with self-leveling compound, while more significant variations may require the application of thin-set mortar to feather out the surface.
With the subfloor prepared, the necessary materials need to be gathered. These include:
- Cement board (typically ¼ inch or ½ inch thickness, depending on the application)
- Cement board screws or nails (specifically designed for cement board)
- Thin-set mortar (modified for use with cement board and tile)
- Tile of choice
- Grout
- Grout sealer
- Caulk (silicone or latex-based, for sealing edges)
- Measuring tape
- Pencil
- Level
- Straightedge
- Trowel (sized according to the tile being used)
- Notched trowel (to spread thin-set)
- Cement board scoring tool or utility knife
- Hammer
- Drill (with appropriate drill bits)
- Mixing bucket
- Grout float
- Grout sponge
- Safety glasses
- Gloves
- Dust mask
Ensuring all required materials are readily available will streamline the installation process and minimize delays.
Installing Cement Board: A Solid Foundation for Tile
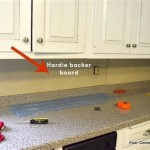
The installation of cement board is a critical step in creating a durable and moisture-resistant tile floor. The cement board acts as a bonding surface for the tile and helps to prevent cracking and movement. This section details the process of cutting, securing, and treating the seams of the cement board for optimal performance.
Before cutting, the area to be covered with cement board should be accurately measured. Layout the cement board sheets to minimize cuts and waste. Use a measuring tape and pencil to mark the cutting lines on the cement board. Cement board can be cut using a scoring tool and a utility knife. Score the board along the marked line several times, then snap the board along the score. Alternatively, a power saw with a specialized cement board blade can be used for faster and cleaner cuts. When using power tools, always wear safety glasses and a dust mask to protect against debris and dust.
Once the cement board is cut to size, it is ready to be installed. Apply a thin layer of thin-set mortar to the subfloor using a notched trowel. This layer of mortar, often referred to as a "mortar bed," provides additional support and helps to fill any minor imperfections in the subfloor. Position the cement board sheets onto the mortar bed, ensuring they are snug against each other, leaving a small gap (approximately 1/8 inch) between the sheets and around the perimeter of the room. These gaps allow for expansion and contraction, preventing stress on the tile installation.
Secure the cement board to the subfloor using cement board screws or nails, spaced approximately 6-8 inches apart throughout the sheet and along the edges. Drive the fasteners flush with the surface of the cement board, but avoid over-tightening, which can damage the board. Ensure that the fasteners penetrate the subfloor adequately to provide a secure hold.
After the cement board is securely fastened, the seams between the sheets need to be treated. Apply a generous layer of thin-set mortar to the seams, filling the gaps completely. Embed fiberglass mesh tape into the wet mortar, pressing it firmly into place. Apply another layer of thin-set mortar over the mesh tape, feathering it out to create a smooth, seamless transition. This process strengthens the seams and prevents cracking along the joints.
Allow the thin-set mortar to cure completely according to the manufacturer's instructions before proceeding to the next step. This typically takes 24-48 hours.
Tiling the Floor: Achieving a Professional Finish
With the cement board properly installed, the tiling process can begin. Careful planning and execution are essential for achieving a professional and aesthetically pleasing result. This section details the steps involved in laying out the tile, applying thin-set mortar, setting the tile, and grouting the finished floor.
Before applying thin-set mortar, it is crucial to dry-lay the tiles. This involves placing the tiles on the floor without adhesive to determine the optimal layout, taking into account the size and shape of the room, the tile pattern, and any potential obstacles. Consider the placement of full tiles and cut tiles to minimize small, awkward cuts and to create a balanced and symmetrical appearance. The goal is to achieve a layout that is both visually appealing and structurally sound.
Once the dry layout is finalized, mark the center lines of the room using a measuring tape and pencil. These center lines will serve as a guide for starting the tile installation. Mix the thin-set mortar according to the manufacturer's instructions in a clean mixing bucket. Ensure that the mortar is thoroughly mixed to a smooth, consistent consistency. Avoid adding too much water, as this can weaken the mortar and compromise its bonding strength.
Using a notched trowel, apply a layer of thin-set mortar to a small section of the floor, typically no more than a few square feet at a time. The size of the notch on the trowel should be appropriate for the size and type of tile being used. Hold the trowel at a 45-degree angle and spread the mortar evenly, creating ridges that will provide a strong bond with the tile. Avoid applying mortar to a larger area than can be tiled within the open time of the mortar, which is the amount of time the mortar remains workable before it begins to dry.
Carefully place the tiles onto the thin-set mortar, aligning them with the layout lines and maintaining consistent spacing between the tiles. Use tile spacers to ensure uniform grout lines. Press each tile firmly into the mortar, using a slight twisting motion to ensure good contact. Periodically check the level of the tiles using a level to ensure that they are sitting flush with each other. Adjust the tiles as needed by gently tapping them with a rubber mallet.
As you progress, use a wet sponge to wipe away any excess mortar from the surface of the tiles. This will prevent the mortar from drying on the tiles and making them difficult to clean later. Allow the thin-set mortar to cure completely according to the manufacturer's instructions before proceeding to the next step. This typically takes 24-48 hours.
After the thin-set mortar has cured, the tiles are ready to be grouted. Remove the tile spacers and clean the grout lines to remove any debris. Mix the grout according to the manufacturer's instructions in a clean mixing bucket. Apply the grout to the tile surface using a grout float, working diagonally across the tiles to force the grout into the grout lines. Ensure that all the grout lines are completely filled.
Once the grout lines are filled, use a grout sponge and clean water to wipe away the excess grout from the surface of the tiles. Rinse the sponge frequently and work in small sections. Be careful not to remove too much grout from the grout lines. After the initial cleaning, allow the grout to haze over slightly before wiping the tiles again with a clean, damp sponge. This will remove the remaining grout residue and reveal the clean tile surface.
Allow the grout to cure completely according to the manufacturer's instructions. This typically takes 24-72 hours. After the grout has cured, apply a grout sealer to the grout lines to protect them from stains and moisture. Apply the sealer according to the manufacturer’s instructions. The seams where the tile meets the walls or other fixtures should be caulked with a flexible caulk, such as silicone or latex caulk. This will create a waterproof seal and prevent water damage. Apply the caulk smoothly and evenly, and clean up any excess caulk with a damp cloth.

How To Install Cement Board On A Floor Diy Family Handyman

Cement Board Underlayment Installation

How To Install Cement Board In 3 Easy Ways Q2 2024 Infographic

How To Install Hardiebacker Cement Board On Floors James Hardie Pros

Guest Bathroom Renovation Insulation And Cement Board Installation

Cement Board Installation On Floors 5 Mistakes To Avoid Diytileguy

How To Install Cement Board For Tile Bower Power

Installing Cement Board In The Bathroom Angie S Roost

Installing Cement Board Sincerely Sara D Home Decor Diy Projects

How To Install Cement Board For Tile Bower Power
Related Posts