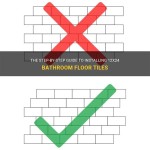
How To Replace Shower Floor Tile
Replacing shower floor tile can revitalize a bathroom, addressing issues like cracks, chips, mold growth, or simply updating the aesthetic. While it requires a degree of skill and patience, this project is achievable for many homeowners with the right tools, materials, and a methodical approach. The following guide provides a comprehensive overview of the process, from preparation to installation and grouting.
Preparation: Assessing the Existing Tile and Gathering Supplies
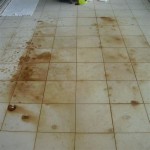
Before commencing the tile replacement, a thorough assessment of the existing shower floor is crucial. This involves identifying the type and extent of damage, the materials used in the original installation (such as the type of grout and mortar), and any underlying issues like water damage which might require additional remediation. Once the assessment is complete, you can compile a list of necessary tools and materials.
Essential tools for this project include a tile scraper (or hammer and chisel for stubborn tiles), a grout saw or grout removal tool, a wet saw (for cutting tiles), a notched trowel, a rubber grout float, a sponge, buckets, safety glasses, gloves, a dust mask, and a utility knife. It is also advisable to have a vacuum cleaner or shop vac for cleaning debris.
The selection of new tile is a key consideration. Shower floor tile must be durable, water-resistant, and slip-resistant. Popular options include ceramic, porcelain, and natural stone tile, specifically those rated for wet environments. The choice should be based on personal preference, budget, and the overall design scheme of the bathroom. Ensure sufficient tile is purchased to cover the entire shower floor, accounting for cuts and potential breakage. Other materials include thin-set mortar (specifically formulated for tile installation in wet areas), grout (epoxy grout is recommended for its water resistance and durability), sealant, and backer board screws (if replacing the subfloor).
Removing the Old Tile and Preparing the Subfloor
The removal of existing tile constitutes the most labor-intensive part of the project. Prior to removal, protect the surrounding areas, such as the shower walls and floor, with drop cloths or plastic sheeting. Ensure proper ventilation by opening windows or using a fan.
The initial step involves removing the grout. Use a grout saw, grout removal tool, or oscillating multi-tool with a grout removal attachment to carefully extract the grout surrounding each tile. Take care not to damage the adjacent tiles or shower pan. Once the grout is removed, begin prying up the existing tiles. Using a tile scraper or a hammer and chisel, work your way under the tile, applying steady pressure to loosen it from the mortar bed. Dispose of the removed tiles and grout properly.
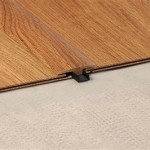
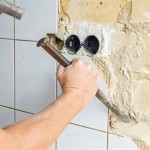
After the tiles are removed, inspect the subfloor for damage. Common subfloor materials include cement backer board or plywood. If the subfloor is damaged or deteriorated, it must be replaced. Remove the old subfloor using a drill and pry bar. Install new cement backer board or plywood, ensuring it is properly secured to the framing studs with backer board screws. The subfloor should be level and free of any debris. The primary concern when replacing the subfloor is to ensure the waterproofing membrane remains intact or is properly reapplied to prevent water leaking into the subfloor.
Clean the subfloor thoroughly using a vacuum cleaner or shop vac to remove any remaining debris, mortar, or grout. A clean and even surface is essential for proper adhesion of the new tile.
Installing the New Tile: Mortar Application and Tile Placement
With the subfloor prepared, the next step is to apply the thin-set mortar. Mix the thin-set mortar according to the manufacturer's instructions, achieving a consistency similar to peanut butter. Using a notched trowel, apply the mortar in an even layer to a small section of the subfloor, typically no more than a few square feet at a time. The notch size of the trowel will depend on the size of the tile being installed; consult the tile and mortar manufacturer's recommendations for guidance.
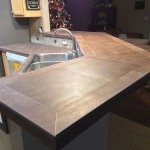
Position the tiles carefully onto the mortar bed, pressing them firmly into place. Use tile spacers to maintain consistent spacing between the tiles. Begin laying the tiles from the center of the shower floor outwards, ensuring the pattern is aligned and the tiles are level. Periodically check the levelness of the tiles using a level, making adjustments as needed. For tiles that require cutting, use a wet saw to achieve precise cuts. Wearing safety glasses is paramount when using a wet saw.
Once all the tiles are laid, allow the mortar to cure according to the manufacturer's instructions, typically 24-48 hours. Avoid walking on the tiles during this curing period. Remove the tile spacers after the mortar has cured.
Grouting and Sealing: Finishing the Shower Floor
After the mortar has cured and the tile spacers are removed, proceed with grouting. Mix the grout according to the manufacturer's instructions, achieving a smooth and consistent consistency. Using a rubber grout float, apply the grout to the tile joints, working it in at a 45-degree angle to ensure complete coverage. Remove excess grout from the tile surfaces with the grout float.
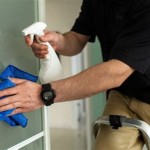
After allowing the grout to set for a short period (typically 15-30 minutes), use a damp sponge to clean the tile surfaces, removing any remaining grout residue. Rinse the sponge frequently in a bucket of clean water. Be careful not to remove grout from the joints. It is best to let grout set up before using a damp sponge. Some installers use a vinegar-water mixture to get rid of lingering grout haze.
Allow the grout to cure according to the manufacturer's instructions, typically 24-72 hours. After the grout has cured, apply a sealant to the grout lines to protect them from water damage and staining. Apply the sealant according to the manufacturer's instructions. This step is particularly important for epoxy grout, which is inherently more water-resistant, though a sealant can still enhance its protective qualities. Allow the sealant to dry completely before using the shower.
Finally, inspect the finished shower floor for any imperfections or areas that require additional attention. Address any issues promptly to ensure the longevity and performance of the new tile installation.

Easy Budget Friendly Shower Floor Replacement Scrap The Tiles Manmadediy

In Over My Head Replacing Shower Floor Tiles Doityourself Com Community Forums

3 Shower Pan Choices For A Solid Tile Floor Installation Fine Homebuilding

How To Retile A Shower Floor Art Tile Renovation

How To Re Tile Shower Floor Hometalk

Shower Floor Repair Demo And Pre Pan Creative Tile Works

How To Retile A Shower Floor Art Tile Renovation

How To Retile A Shower Floor Art Tile Renovation

Shower Floor Repair Demo And Pre Pan Creative Tile Works

Here S How Add A Shower With Ceramic Tile Floor
Related Posts