Can You Install Cork Flooring Over Tile Floor? A Comprehensive Guide
The question of whether cork flooring can be installed over a tile floor arises frequently during home renovation projects. Cork flooring, lauded for its comfort, sustainability, and sound-dampening qualities, is an attractive alternative to traditional hard flooring options. Tile flooring, on the other hand, is prized for its durability and resistance to water damage, typically found in bathrooms, kitchens, and entryways. Combining these two materials seems logical in some scenarios, offering a blend of both advantages. However, the feasibility of installing cork directly over tile necessitates careful consideration of several factors, encompassing preparation, installation methods, and potential drawbacks.
This article provides a comprehensive exploration of the possibilities and challenges involved in installing cork flooring over tile. It will examine the necessary prerequisites, outline the appropriate installation techniques, and discuss the potential issues that may arise, enabling informed decision-making for those contemplating this flooring approach.
Key Point 1: Assessing the Existing Tile Floor
Before proceeding with the installation of cork flooring over tile, a thorough assessment of the existing tile surface is paramount. The condition of the tile floor directly impacts the success and longevity of the cork installation. Addressing any existing issues prior to installation is crucial. This assessment involves several key steps.
First, the flatness of the tile floor must be evaluated. Cork flooring, especially thinner planks or tiles, requires a relatively even subfloor to prevent uneven wear, bowing, or cracking. Significant variations in the tile surface height, such as lippage (where one tile extends beyond the level of an adjacent tile), need to be corrected. A level can be used to determine the extent of any unevenness. In cases of substantial unevenness, self-leveling compound might be required to create a smooth, uniform surface for the cork flooring.
Second, the integrity of the existing tile should be examined. Any loose, cracked, or missing tiles must be addressed. Loose tiles should be re-adhered using appropriate thin-set mortar. Cracked tiles should be replaced to prevent instability and potential damage that could transfer to the cork floor above. Missing tiles should be replaced with appropriately sized and matching replacements, if available. If matching tiles are not readily available, the gaps can be filled with a cementitious patching compound.
Third, the cleanliness of the tile floor is crucial. The surface must be free from dirt, grease, wax, and any other contaminants that could interfere with the adhesion of the cork flooring or the underlayment. A thorough cleaning with a degreasing cleaner, followed by rinsing and drying, is essential. In some cases, a light sanding of the tile surface may be necessary to improve adhesion, providing a slightly roughened surface for the adhesive to grip.
Fourth, the type of tile can also influence the installation process. Highly polished or glazed tiles, while aesthetically pleasing, may present adhesion challenges. The smoothness of the surface can hinder the bonding of adhesives. In such instances, mechanical abrasion, using a floor sander or grinding tool, can be employed to create a more receptive surface. However, caution should be exercised to avoid damaging the underlying substrate.
Finally, moisture levels should be assessed. Both the tile and the subfloor beneath the tile must be dry to prevent moisture-related problems, such as mold growth, adhesive failure, and warping of the cork flooring. Moisture meters can be used to measure the moisture content of the tile and the subfloor. If elevated moisture levels are detected, remediation measures, such as the use of dehumidifiers or vapor barriers, may be necessary before proceeding with the cork flooring installation.
Key Point 2: Choosing the Right Installation Method
Selecting the appropriate installation method is critical for achieving a successful and durable cork floor over tile. Two primary methods are commonly used: a floating installation and a direct glue-down installation. Each method has its advantages and disadvantages, and the best choice depends on factors such as the type of cork flooring, the condition of the tile floor, and the desired aesthetic outcome.
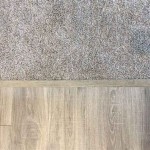
A floating cork floor typically involves the use of cork planks or tiles that are designed with interlocking edges. These edges snap together, creating a cohesive surface that is not directly adhered to the tile floor. Instead, the floating floor rests on an underlayment, which provides cushioning, sound insulation, and a moisture barrier. The underlayment is placed directly over the tile floor, and the cork planks or tiles are then assembled on top. This method is often preferred for its ease of installation and the ability to accommodate minor imperfections in the tile floor. It also allows for expansion and contraction of the cork flooring due to changes in temperature and humidity, which can prevent buckling or warping. However, a floating floor can feel slightly less solid underfoot compared to a glue-down installation.
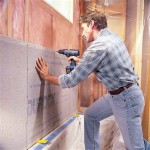
A direct glue-down installation involves adhering the cork flooring directly to the tile floor using a suitable adhesive. This method requires a meticulously prepared tile surface, as any imperfections or unevenness will be directly transmitted to the cork flooring. A proper adhesive, specifically designed for cork flooring and compatible with the tile substrate, is essential. The adhesive is applied to the tile floor, and the cork planks or tiles are carefully positioned and pressed into place. This method provides a more solid and stable feel underfoot, but it is more labor-intensive and requires greater precision during installation. It also makes it more difficult to replace individual cork planks or tiles if they become damaged. Furthermore, the glue-down method is less forgiving of moisture issues, as trapped moisture can lead to adhesive failure and mold growth.
When planning a glue-down installation, it is vital to skim coat the tile floor with a cement-based patching compound to fill in grout lines thoroughly. This creates a smooth, uniform surface for optimal adhesion. If grout lines are visible through the cork, it detracts from the overall appearance and can lead to uneven wear.
Regardless of the chosen installation method, it is crucial to acclimatize the cork flooring to the room's environment for several days before installation. This allows the cork to adjust to the temperature and humidity levels, minimizing expansion or contraction after installation. Following the manufacturer's instructions for installation and adhesive application is also essential, as these instructions are tailored to the specific product and will ensure optimal results.
Key Point 3: Addressing Potential Problems and Considerations
Even with careful preparation and proper installation techniques, several potential problems and considerations can arise when installing cork flooring over tile. Addressing these potential issues proactively can help to prevent headaches and ensure a long-lasting, aesthetically pleasing result.
One common concern is the potential for moisture problems. Tile floors are often installed in areas prone to moisture, such as bathrooms and kitchens. If moisture is present in the subfloor or the tile itself, it can migrate into the cork flooring, leading to swelling, warping, and mold growth. Using a moisture meter to assess the moisture levels is crucial, and a moisture barrier should be installed between the tile floor and the cork flooring to prevent moisture migration. This is especially important in basements or other areas with high humidity.
Another consideration is the height of the finished floor. Installing cork flooring over tile will raise the floor level, which can affect door clearances and transitions to adjacent rooms with different flooring types. Doors may need to be trimmed to prevent them from dragging on the new floor, and transition strips may be necessary to create a smooth and safe transition between rooms. Carefully measuring the existing floor height and the thickness of the cork flooring and underlayment (if applicable) is essential to anticipate and address these issues.
The durability of the cork flooring is another factor to consider. While cork is known for its resilience and comfort, it is not as resistant to scratches and dents as some other flooring materials, such as tile or hardwood. Heavy furniture, pets with sharp claws, and high-traffic areas can all contribute to wear and tear on the cork flooring. Using furniture pads under heavy objects, regularly sweeping or vacuuming to remove dirt and debris, and applying a protective sealant can help to prolong the life of the cork flooring. Choosing a thicker cork product with a durable finish can also improve its resistance to wear and tear.
Finally, the aesthetic compatibility of the cork flooring with the existing tile floor should be considered. While the tile floor will be covered by the cork, the overall aesthetic of the room should be taken into account. Choosing a cork flooring color and pattern that complements the existing décor can help to create a cohesive and visually appealing space. Sample planks or tiles should be brought into the room and viewed under different lighting conditions to ensure that the chosen cork flooring complements the overall design.
In conclusion, while installing cork flooring over tile is feasible, careful assessment, thorough preparation, the right installation method, and proactive problem-solving are essential for a successful outcome. Considering these factors will help to ensure a durable, aesthetically pleasing, and long-lasting cork floor.

Advantages Of A Cork Floating Floor Over Glue Down Tiles Cancork

How To Install A Cork Floor Young House Love

Advantages Of A Cork Floating Floor Over Glue Down Tiles Cancork

Cork Flooring Tiles Or Floating Floor Icork

Complete Guide To Cork Flooring Installation Deerfoot Carpet

Cork Flooring Pros And Cons Is It The Right Choice For You

How To Install A Cork Floor Young House Love

Complete Guide To Cork Flooring Installation Deerfoot Carpet

Glue Down Cork Flooring Pure Floor Wall Tiles

Advantages Of A Cork Floating Floor Over Glue Down Tiles Cancork
Related Posts