How To Remove Tiles From Bathroom Wall Without Breaking
Removing tiles from a bathroom wall without breaking them is a meticulous process requiring patience, the right tools, and a systematic approach. While complete success in preserving every tile is not always guaranteed, employing the techniques outlined in this article will significantly increase the chances of salvage and reduce damage during the removal process. The objective is to weaken the bond between the tile and the underlying substrate without applying excessive force that could lead to cracking or shattering.
Before commencing the removal procedure, it is essential to understand the factors contributing to tile adhesion. The type of adhesive used (mortar, thin-set, or mastic), the substrate material (drywall, cement board, or plaster), and the age of the installation all play a crucial role in determining the difficulty of removal. Older installations may have stronger bonds due to the hardening and aging of the adhesive over time. Furthermore, the quality of the initial installation can influence the ease of removal; poorly applied adhesive or inadequate coverage can sometimes, paradoxically, make removal easier in certain spots.
Safety is paramount during any demolition work. Eye protection, such as safety glasses or goggles, is crucial to prevent debris from entering the eyes. Wearing gloves will protect hands from sharp tile edges and potential contact with irritants. A dust mask or respirator is recommended to avoid inhaling dust and airborne particles. Ensure adequate ventilation in the bathroom by opening windows or using a fan to minimize dust exposure.
Preparing the Work Area and Gathering Tools
The initial step involves preparing the bathroom to minimize mess and streamline the removal process. Cover the floor with drop cloths or plastic sheeting to protect it from debris and potential damage from falling tiles. Remove any fixtures or accessories, such as towel bars, soap dishes, or shelving, that may obstruct access to the tiles. Shut off any power to electrical outlets in the immediate vicinity of the work area to prevent electrical accidents. If plumbing fixtures are close to the tiles being removed, protect them with padding or coverings to prevent scratches or dents.
The success of tile removal largely depends on having the correct tools at hand. A grout removal tool, such as a grout saw or a rotary tool with a grout removal attachment, is essential for removing the grout surrounding the tiles. A putty knife, a thin, flexible blade designed for scraping, is used to gently pry tiles away from the wall. A utility knife can be used to score caulk lines. A heat gun can soften adhesive, making it easier to separate the tile and the substrate. A hammer may be necessary, but should be used with extreme caution and in conjunction with a chisel to avoid directly impacting the tile and causing breakage. A pry bar can be helpful for larger tiles, but must be used carefully, as excessive force can easily break tiles or damage the underlying wall. A shop vacuum is useful for cleaning up dust and debris as the work progresses. Safety glasses, gloves, and a dust mask are crucial for personal protection.
Before beginning the removal, inspect the grout lines thoroughly. If the grout is heavily stained or damaged, it can indicate underlying moisture issues that might affect the tile's adhesion. Note any areas where the grout is missing or cracked, as these spots may offer an easier starting point for tile removal. Consider taking photographs of the tile arrangement before removal to aid in reinstallation, if desired.
Removing the Grout
The first critical step is removing the grout surrounding the tiles. This weakens the bond and allows for easier tile separation. Use a grout removal tool, such as a grout saw or a rotary tool with a grout removal attachment. A grout saw is a manual tool with a small, abrasive blade designed to cut through grout lines. While it requires more physical effort, it offers greater control and reduces the risk of damaging the tiles. A rotary tool with a grout removal attachment is faster and more efficient, but it necessitates careful handling to avoid scratching or chipping the tiles. A triangular oscillating tool with a grout removal blade is also a popular and effective choice.
Regardless of the tool chosen, proceed with patience and precision. Apply gentle pressure and move the tool along the grout lines in a controlled manner. Avoid pressing too hard, as this can damage the adjacent tiles. Overlap the grout lines slightly to ensure complete removal. Pay particular attention to corners and edges, where grout tends to accumulate and create a stronger bond. Remove loose grout debris with a shop vacuum to maintain a clear view of the work area.
If the grout is particularly hard or stubborn, consider using a grout softening solution. Apply the solution to the grout lines and allow it to soak for the recommended time. This can help break down the grout and make it easier to remove. Steam cleaners can also be effective in softening grout. Apply steam to the grout lines for several minutes before attempting removal.
After removing the majority of the grout, use a utility knife to carefully score along any caulk lines where the tiles meet the tub, shower, or counter. Caulk can create a strong bond and prevent tile removal. Run the knife along the caulk line several times to ensure a clean separation.
Separating the Tiles from the Substrate
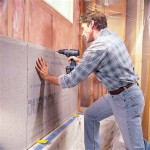
Once the grout has been removed, the next step is to carefully separate the tiles from the underlying substrate. Start by attempting to insert a putty knife or a thin, flexible scraper behind the tile. Focus on areas where the grout was missing or cracked, as these spots may offer an easier entry point. Gently tap the putty knife with a hammer to encourage it to slide behind the tile without applying excessive force.
Work the putty knife around the perimeter of the tile, gradually loosening the bond. Apply gentle pressure and avoid forcing the tool, as this can lead to cracking or shattering the tile. If resistance is encountered, try using a heat gun to soften the adhesive. Apply heat to the tile surface for a few seconds, then try inserting the putty knife again. The heat can help weaken the adhesive and make removal easier.
For larger tiles, consider using a pry bar in conjunction with the putty knife. Insert the pry bar behind the tile and gently apply leverage to separate it from the wall. Use caution to avoid applying excessive force, as this can damage the tile or the substrate. Work slowly and methodically, gradually increasing the leverage until the tile begins to loosen. Once the tile is partially separated, continue working around the perimeter with the putty knife to completely detach it from the wall.
If a tile refuses to budge despite these efforts, consider sacrificing it to gain access to the surrounding tiles. Use a hammer and chisel to carefully break the tile into smaller pieces. Start by scoring the tile with the chisel, then gently tap it with the hammer. Avoid applying excessive force, as this can damage the surrounding tiles. Once the tile is broken into smaller pieces, remove them with pliers or a pry bar. This will expose the adhesive underneath, allowing for easier removal of the adjacent tiles.
As tiles are removed, carefully clean the back with a scraper or putty knife to remove any remaining adhesive. Label each tile with its original location to facilitate reinstallation, if desired. Store the removed tiles in a safe place to prevent damage.
After removing all the tiles, inspect the substrate for any damage. Repair any cracks or holes with patching compound before installing new tiles or preparing the wall for painting or wallpapering. Clean the area thoroughly to remove any remaining dust and debris.

How To Remove Floor And Wall Tiles Without Breaking Them

Easy Diy Guide On Removing Tiles From Walls Fantastic Handyman Au

How To Remove Floor Tiles Without Breaking Them Ideas By Mr Right

How To Remove A Tile Backsplash Homeserve Usa

How To Remove Wall Tiles

Remove Wall Tiles Without Damaging Plasterboard

The Best Way To Remove Old Shower Tile

How To Remove Tile Without Breaking

Preparing Walls For Tiling Removing Old Tiles Bathroom Guru

How To Remove Wall Tiles 11 Steps With Pictures Wikihow
Related Posts