Can You Put Tile Backsplash on Drywall? A Comprehensive Guide
The installation of a tile backsplash is a common home improvement project, enhancing both the aesthetic appeal and the functionality of a kitchen or bathroom. A frequent question that arises during the planning stages revolves around the suitability of drywall as a substrate for tile. Understanding the properties of drywall, the preparation required, and the necessary materials is crucial for a successful and long-lasting tile installation.
This article will explore the viability of installing tile backsplash directly onto drywall, outlining the potential advantages and disadvantages, and providing a detailed guide to ensure proper installation techniques are employed. The goal is to equip the reader with the knowledge to make informed decisions and execute a durable tile backsplash project.
Understanding Drywall as a Substrate
Drywall, also known as gypsum board, is a widely used construction material for interior walls and ceilings. It consists of a gypsum core sandwiched between two layers of paper. Its popularity stems from its ease of installation, cost-effectiveness, and fire-resistant properties. However, drywall is inherently porous and susceptible to moisture damage. This characteristic raises concerns about its suitability as a substrate for tile, particularly in areas prone to water exposure, such as kitchen backsplashes and bathroom walls.
Properly installed and maintained drywall provides a relatively smooth and even surface. This smoothness is advantageous for tile installation, as it minimizes the need for extensive surface preparation. The flatness of drywall allows for consistent tile adhesion and reduces the risk of uneven tile placement. Nevertheless, the paper facing of drywall can delaminate when exposed to moisture or when heavy objects, like tiles, are directly adhered to it. This potential for delamination is a primary concern when considering drywall as a substrate.
In areas with high humidity or direct water contact, the potential for drywall failure increases significantly. The absorption of moisture weakens the drywall, compromising its structural integrity and potentially leading to tile detachment. This is especially true if the grout lines are not properly sealed or if the tiles themselves are porous, allowing water to seep behind the backsplash.
Preparation is Key: Ensuring a Solid Foundation
The success of installing tile backsplash directly onto drywall hinges on meticulous preparation. This preparation involves several critical steps designed to mitigate the risks associated with moisture and adhesion issues. Skipping or inadequately performing these steps can significantly reduce the lifespan of the tile backsplash and lead to costly repairs.
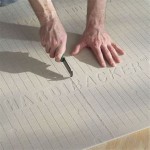
First, the drywall surface must be thoroughly cleaned. Remove any dust, dirt, grease, or loose paint. A mild detergent and water solution can be used for cleaning, followed by a thorough rinsing and drying. Residual contaminants can interfere with the adhesion of the thin-set mortar and compromise the bond between the tile and the drywall, so thorough cleaning is essential. After the cleaning, and after complete drying, inspect the drywall for any damage, such as cracks, dents, or water stains. Repair any imperfections with joint compound and sand smooth. Ensuring a smooth and even surface is critical for proper tile alignment and adhesion.
Priming the drywall surface is an indispensable step. Use a high-quality primer specifically designed for use under tile. An acrylic latex primer is generally recommended, as it provides good adhesion and moisture resistance. Apply the primer evenly, following the manufacturer's instructions. Allow the primer to dry completely before proceeding to the next step. The primer serves as a barrier against moisture penetration and enhances the bond between the drywall and the thin-set mortar. It also helps to prevent the thin-set mortar from drying out too quickly, ensuring proper curing.
In areas subject to significant moisture exposure, such as behind sinks or stoves, consider applying a waterproof membrane over the primed drywall. This membrane provides an extra layer of protection against water penetration and further reduces the risk of drywall damage. Several types of waterproofing membranes are available, including liquid-applied membranes and sheet membranes. Choose a membrane that is compatible with both drywall and thin-set mortar, and follow the manufacturer's instructions for application.
Selecting the Right Materials and Techniques
The choice of materials and the application techniques employed play a significant role in the longevity and performance of a tile backsplash installed on drywall. Using the appropriate thin-set mortar, grout, and sealing products is crucial for creating a durable and water-resistant installation.
Select a high-quality thin-set mortar specifically formulated for tile installation on drywall. Modified thin-set mortars, which contain polymers to enhance adhesion and flexibility, are generally preferred. These mortars provide a stronger bond and are more resistant to cracking and delamination. Follow the manufacturer's instructions for mixing the thin-set mortar, ensuring a consistent and workable consistency. Avoid adding excessive water, as this can weaken the mortar and reduce its adhesive properties.
When applying the thin-set mortar, use a notched trowel to create ridges on the drywall surface. The size of the notch depends on the size and type of tile being used. Press each tile firmly into the thin-set mortar, using a slight twisting motion to ensure good contact. Maintain consistent spacing between the tiles, using tile spacers to achieve uniform grout lines. Remove any excess thin-set mortar from the tile surfaces before it dries.
After the thin-set mortar has cured completely, typically after 24-48 hours, apply grout to fill the spaces between the tiles. Select a grout that is resistant to water and staining. Epoxy grouts are an excellent choice for backsplashes, as they are non-porous and highly durable. Cement-based grouts can also be used, but they require sealing to prevent water penetration. Apply the grout according to the manufacturer's instructions, and remove any excess grout from the tile surfaces. Once the grout has cured, apply a sealant to the grout lines to further protect against water damage. Reapply the sealant periodically, as needed, to maintain its effectiveness.
Consider using lightweight tiles. Heavy tiles place more stress on the drywall, increasing the risk of delamination. Glass, ceramic, and thin porcelain tiles are generally lighter than natural stone tiles. If using heavier tiles, additional support may be necessary, such as adding a layer of cement backer board over the drywall.
In summary, installing tile backsplash on drywall is possible, but it requires careful planning, thorough preparation, and the use of appropriate materials and techniques. By understanding the properties of drywall, implementing proper preparation steps, and selecting the right materials, it is possible to create a durable and aesthetically pleasing tile backsplash.

Can You Tile Over Drywall Must See

How To Install Tile Backsplash Fixthisbuildthat

Subway Tile Backsplash Diy For Beginners Bless This Nest

A Subway Tile Backsplash Install Art Renovation

How To Prepare Drywall For A Tile Backsplash Mr Handyman

How To Install Tile Backsplash Fixthisbuildthat

Help Cement Board Sheetrock More Drywall For Tiling Kitchen Backsplash Hometalk

How To Prepare Drywall For A Tile Backsplash Mr Handyman

Removing Backsplash And Repairing Drywall Made With Grace Grit

Help Cement Board Sheetrock More Drywall For Tiling Kitchen Backsplash Hometalk
Related Posts