Can I Install Tile Backsplash On Drywall?
Installing a tile backsplash is a popular home improvement project that can significantly enhance the aesthetic appeal and functionality of a kitchen or bathroom. A common question that arises during the planning phase is whether tile can be directly installed onto drywall. The answer is generally yes, but careful preparation and adherence to best practices are crucial for a successful and long-lasting installation. This article will outline the necessary steps, considerations, and potential pitfalls associated with installing tile backsplashes directly onto drywall surfaces.
Drywall, also known as gypsum board, is a common building material used for interior walls and ceilings. It consists of a gypsum core sandwiched between two layers of paper. While drywall provides a smooth and relatively stable surface, it’s not inherently designed to withstand the weight and moisture associated with tile installations, especially in high-humidity environments like kitchens and bathrooms. Therefore, specific preparations are essential to ensure the tile adheres properly and the drywall remains intact over time.
The durability of a tile backsplash installed on drywall hinges on several factors, including the type of tile, the quality of the drywall, the presence of moisture, and the effectiveness of the installation techniques employed. Heavier tiles, such as natural stone or large-format ceramic tiles, place more stress on the drywall, increasing the risk of detachment or even drywall damage. Similarly, drywall that has been previously damaged by moisture or has been poorly installed may not provide a suitable substrate for tiling.
Before embarking on a tile backsplash installation on drywall, a thorough assessment of the existing drywall is paramount. Any signs of water damage, mold, or structural weakness must be addressed before proceeding. Failure to do so can lead to significant problems down the line, including tile failure, mold growth, and costly repairs. Replacing the damaged drywall section might be necessary to ensure a solid foundation for the tile.
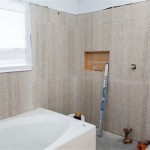
Preparing the Drywall Surface
Proper preparation of the drywall surface is non-negotiable for a successful tile backsplash installation. This involves cleaning, sanding, and priming the drywall to create a strong bond between the tile adhesive (thin-set mortar) and the drywall surface. Skipping these steps can compromise the adhesion and lead to premature tile failure.
The first step is to thoroughly clean the drywall. This removes any dust, grease, or other contaminants that could interfere with the adhesion of the thin-set mortar. A damp sponge or cloth with a mild detergent can be used for this purpose. Ensure the drywall is completely dry before proceeding to the next step.
Next, lightly sand the drywall surface using a fine-grit sandpaper (around 120-150 grit). This creates a slightly textured surface that provides a better grip for the thin-set mortar. Avoid excessive sanding, which can damage the drywall paper. After sanding, remove all sanding dust with a clean, dry cloth or vacuum.
Priming the drywall is a critical step. A high-quality primer designed for tile installations should be applied to the sanded drywall surface. The primer serves several important functions: it seals the drywall, preventing moisture from penetrating into the gypsum core; it enhances the adhesion of the thin-set mortar; and it creates a consistent surface for tiling. Follow the manufacturer's instructions for the primer application and drying time.
While some installers might consider using a moisture-resistant drywall (often referred to as “green board”) in kitchen and bathroom environments, it is essential to note that green board is water-resistant, not waterproof. In areas directly exposed to water, such as shower walls, cement board is a far superior choice. For a backsplash, which is generally not directly exposed to constant streams of water, properly prepared and primed standard drywall can be acceptable, especially away from the immediate sink area, but the use of a quality primer/sealer is crucial.
Choosing the Right Thin-Set Mortar
The selection of the appropriate thin-set mortar is another key determinant of a successful tile backsplash installation on drywall. Thin-set mortar is a cement-based adhesive used to bond tiles to a substrate. Different types of thin-set mortar are formulated for different types of tiles and substrates. Using the wrong type of thin-set mortar can result in poor adhesion and tile failure.
For most tile backsplash installations on drywall, a modified thin-set mortar is recommended. Modified thin-set mortars contain polymers that enhance their adhesion, flexibility, and water resistance. These polymers improve the bond strength between the tile and the drywall, making it more durable and less likely to crack or detach over time. Look for thin-set mortars specifically designed for use with drywall and the type of tile you are installing.
When selecting a thin-set mortar, consider the size and weight of the tiles. Larger and heavier tiles require a thin-set mortar with greater strength and sag resistance. Some thin-set mortars are formulated specifically for large-format tiles and can handle the increased weight without sagging or slipping during installation.
Read the manufacturer's instructions carefully before mixing and applying the thin-set mortar. Follow the recommended mixing ratio of powder to water to achieve the correct consistency. Over-watering the thin-set mortar can weaken its bond strength, while under-watering can make it difficult to work with. Mix the thin-set mortar thoroughly using a drill with a mixing paddle until it is smooth and free of lumps.
Apply the thin-set mortar to the drywall surface using a notched trowel. The size and shape of the notches on the trowel determine the amount of thin-set mortar that is applied and the depth of the ridges that are created. The size of the notches should be appropriate for the size and type of tiles being installed. Hold the trowel at a 45-degree angle and spread the thin-set mortar evenly over the surface, creating consistent ridges.
Addressing Potential Moisture Issues
Moisture is the primary enemy of drywall. Prolonged exposure to moisture can cause the drywall to swell, soften, and eventually crumble. In a kitchen or bathroom environment, where moisture is prevalent, it is essential to take precautions to protect the drywall from water damage.
As mentioned earlier, using a high-quality primer/sealer is crucial to create a moisture barrier on the drywall surface. The primer seals the pores of the drywall, preventing water from penetrating into the gypsum core. Choose a primer specifically designed for use in wet areas and apply multiple coats for added protection. Pay particular attention to areas around sinks, countertops, and other potential sources of water.
Proper grouting is also essential for preventing moisture from seeping behind the tiles. Grout fills the spaces between the tiles and provides a watertight seal. Choose a high-quality grout that is designed for use in wet areas. Epoxy grout is a good option, as it is more resistant to water, stains, and chemicals than cement-based grout. Follow the manufacturer's instructions for mixing and applying the grout.
Caulking is another important step in preventing moisture intrusion. Caulk is a flexible sealant that is used to fill gaps around the edges of the tile backsplash, where it meets the countertop, cabinets, or other surfaces. Choose a high-quality caulk that is waterproof and mildew-resistant. Apply the caulk smoothly and evenly, ensuring that all gaps are completely sealed.
Regular maintenance and inspection can help to identify and address potential moisture issues before they become major problems. Check the grout and caulk regularly for cracks or damage. Repair any cracks or damage promptly to prevent water from seeping behind the tiles. Wipe up any spills or splashes immediately to prevent water from soaking into the grout or caulk.
In summary, while installing a tile backsplash directly onto drywall is feasible, it requires meticulous preparation, careful material selection, and proactive moisture management. By following these guidelines, homeowners can achieve a beautiful and durable tile backsplash that will enhance their kitchen or bathroom for years to come. Always consult with a qualified professional if unsure about any aspect of the installation process.

How To Install Tile Backsplash Fixthisbuildthat

How To Install Tile Backsplash Fixthisbuildthat

How To Add Subway Tile Backsplash Over Drywall Transform Your Kitchen For 100

How To Install Tile Backsplash Fixthisbuildthat

How To Prepare Drywall For A Tile Backsplash Mr Handyman

How To Add Subway Tile Backsplash Over Drywall Transform Your Kitchen For 100

How To Prepare Drywall For A Tile Backsplash Mr Handyman

A Subway Tile Backsplash Install Art Renovation

Can You Install A Ceramic Tile Backsplash On Drywall Today S Homeowner

Subway Tile Backsplash Diy For Beginners Bless This Nest
Related Posts