How to Re-Tile a Bathroom Floor on a Budget
Retiling a bathroom floor represents a significant home improvement project that can dramatically enhance the space's aesthetics and functionality. However, professional tiling services can be expensive. Successfully completing the project on a budget necessitates meticulous planning, resourcefulness in material selection, and diligent execution of each step. This article provides a detailed guide on how to retile a bathroom floor while minimizing expenses, focusing on practical strategies and cost-effective techniques.
Phase 1: Planning and Preparation
The initial stage involves thorough planning and preparation, which are crucial for minimizing errors and unexpected expenses. This phase encompasses assessing the existing floor, determining the quantity of materials needed, and selecting appropriate tools.
Assessment of the Existing Floor: The first step is a careful inspection of the current floor. Note any existing damage, such as cracked tiles, loose grout, or water damage. The condition of the subfloor is particularly important. A damaged or uneven subfloor will require repair or replacement before tiling, potentially adding to the overall cost. Determine the existing flooring material (e.g., linoleum, ceramic tile, vinyl). Removal methods will vary depending on the material, and some may require specialized tools or professional assistance.
Accurate Measurement and Material Calculation: Precise measurements are essential for accurate material estimation. Measure the length and width of the bathroom floor, noting any irregularities or areas that deviate from a standard rectangular shape. Multiply the length and width to calculate the total square footage. Add an extra 10-15% to this figure to account for cuts, waste, and potential errors. This buffer ensures sufficient material to complete the project without running short. The square footage calculation directly informs the quantity of tiles required, as well as the amount of grout, thin-set mortar, and sealant.
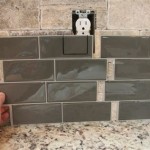
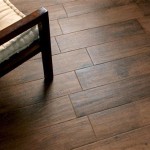
Budget-Conscious Tile Selection: The choice of tiles significantly affects the overall cost. Ceramic and porcelain tiles are generally more affordable than natural stone options like marble or granite. Consider the size of the tiles; smaller tiles often require more grout and can be more time-consuming to install, potentially increasing labor costs if professional installation is considered. Look for discounted or clearance tiles at local home improvement stores or online retailers. Sample tiles should be obtained to assess the appearance and texture within the bathroom's lighting conditions. The slip resistance of the tiles is another crucial factor, especially in a bathroom environment. Select tiles with a sufficient coefficient of friction (COF) to prevent slips and falls.
Tool Acquisition and Rental Considerations: A variety of tools are required for tiling, including a tile cutter (manual or wet saw), trowel, grout float, sponge, bucket, measuring tape, level, safety glasses, and gloves. Evaluate which tools are already available and which need to be purchased or rented. Renting specialized tools like a wet saw can be more cost-effective than purchasing them if they will not be used frequently for other projects. Ensure all tools are in good working condition before starting the project. A well-stocked toolbox will contribute to a smoother and more efficient tiling process.
Phase 2: Removal and Subfloor Preparation
This phase focuses on removing the old flooring and preparing the subfloor to ensure a stable and level surface for the new tiles.
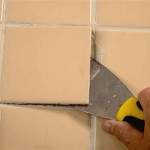
Safe and Effective Removal of Existing Flooring: The removal process varies depending on the type of existing flooring. For tile, use a hammer and chisel to carefully break and remove the tiles. Wear safety glasses and gloves to protect against flying debris. For vinyl or linoleum, use a utility knife to cut the material into manageable strips and then peel it away from the subfloor. A floor scraper may be necessary to remove stubborn adhesive residue. Proper disposal of the removed flooring material is crucial. Check local regulations for disposal guidelines and consider renting a dumpster if necessary to handle a large volume of debris.
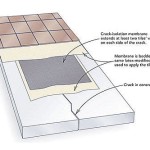
Subfloor Inspection and Repair: Once the old flooring is removed, thoroughly inspect the subfloor for any damage. Look for signs of water damage, rot, or unevenness. Repair any damaged areas before proceeding. This may involve replacing sections of the subfloor with new plywood or cement board. Level any uneven areas with a self-leveling compound. Ensure the subfloor is clean and free of debris before applying the thin-set mortar. A clean and level subfloor is essential for a successful and long-lasting tiling installation.
Application of Cement Board (if necessary): In some cases, it may be necessary to install cement board over the existing subfloor, particularly in areas prone to moisture exposure. Cement board provides a stable and waterproof surface for tiling. Cut the cement board to size using a utility knife and score-and-snap technique. Secure the cement board to the subfloor using cement board screws. Tape and mud the seams between the cement board sheets with alkali-resistant mesh tape and thin-set mortar to create a seamless and waterproof surface. Allow the thin-set mortar to cure completely before proceeding with the tiling process.
Phase 3: Tile Installation
This phase involves the actual installation of the tiles, requiring careful attention to detail and adherence to proper techniques.
Dry Laying and Layout Planning: Before applying any mortar, dry lay the tiles across the floor to determine the best layout. This allows for adjustments to minimize cuts and ensure a visually appealing pattern. Start at the center of the room and work outwards. Use spacers to maintain consistent grout lines. Adjust the layout as needed to avoid small slivers of tile along the edges. A well-planned layout will result in a more professional-looking and efficient installation.
Application of Thin-Set Mortar: Mix the thin-set mortar according to the manufacturer's instructions. Use a notched trowel to apply the mortar to the subfloor, spreading it evenly and creating ridges. The size of the notched trowel will depend on the size of the tiles. Apply the mortar in small sections to prevent it from drying out before the tiles are set. Press each tile firmly into the mortar, using a slight twisting motion to ensure good adhesion. Use tile spacers to maintain consistent grout lines. Periodically check the level of the tiles with a level to ensure a flat and even surface. Clean any excess mortar from the tile surfaces with a damp sponge.
Cutting Tiles for Edges and Obstacles: A tile cutter or wet saw is essential for cutting tiles to fit around edges, corners, and obstacles. Manual tile cutters are suitable for straight cuts on ceramic tiles, while wet saws are better for more complex cuts and porcelain tiles. Wear safety glasses when using a tile cutter or wet saw. Mark the desired cut line on the tile and carefully guide the tile through the cutting tool. Smooth the edges of the cut tiles with a tile file or sandpaper to remove any sharp edges. Precise cuts are crucial for a professional-looking finish.
Phase 4: Grouting and Sealing
The final phase involves applying the grout, cleaning the tile surface, and sealing the grout lines to protect against moisture and stains.
Grout Application and Removal of Excess Grout: Allow the thin-set mortar to cure completely according to the manufacturer’s instructions, typically 24-48 hours, before applying the grout. Mix the grout according to the manufacturer's instructions. Apply the grout to the tile surface using a grout float, working it into the grout lines at a 45-degree angle. Remove excess grout from the tile surface with a damp sponge, rinsing the sponge frequently. Be careful not to remove too much grout from the grout lines. Allow the grout to dry slightly, and then use a clean, dry cloth to buff the tile surface and remove any remaining grout haze.
Cleaning and Polishing the Tile Surface: After the grout has cured completely, typically 24-72 hours, thoroughly clean the tile surface with a mild detergent and water. Remove any remaining grout residue or stains. Polish the tile surface with a clean, dry cloth to restore its shine. A clean and polished tile surface will enhance the overall appearance of the finished floor.
Sealing the Grout Lines: Sealing the grout lines is essential to protect them from moisture, stains, and mildew. Apply a grout sealant to the grout lines using a small brush or applicator. Allow the sealant to penetrate the grout and then wipe away any excess sealant from the tile surface. Reapply the sealant every 1-2 years to maintain its protective properties. Sealing the grout lines will significantly extend the life of the grout and help keep the bathroom floor looking its best.

The Easy Way To Update Bathroom Tile Without Replacing It

1000 Diy Bathroom Makeover That Doesn T Look Your Home Renewed

33 Ways To Upgrade Your Al Bathroom Without Losing Deposit

7 Tile Tips For Baths On A Budget

Easy Ways To Replace Bathroom Tiles With Pictures Wikihow

Budget Bathroom Makeover With A Wow Factor Flawless C Designed

6 Ideas To Remodel Your Bathroom On A Budget Dumpsters Com

Bathroom Flooring Ideas The Home Depot

Tips To Makeover A Bathroom On Budget Attley S Reveal

Bathrooms On A Budget 33 Chic Yet Bathroom Ideas Real Homes
Related Posts