How to Re-Tile a Bathroom on a Budget Plan
Remodeling a bathroom can significantly enhance a home’s value and functionality. However, professional bathroom renovations can quickly become expensive. Re-tiling a bathroom oneself presents a cost-effective alternative, allowing for a customized upgrade without incurring substantial labor costs. This article details a comprehensive guide to re-tiling a bathroom on a budget, covering planning, material selection, preparation, installation, and finishing.
Effective budget planning is paramount before commencing any re-tiling project. This involves assessing the current bathroom condition, identifying specific tiling needs, and establishing a realistic financial limit. A thorough evaluation of existing fixtures, plumbing, and supporting structures will help determine the scope of the project and potential unforeseen expenses. Furthermore, researching various tile options and their associated costs is crucial for making informed decisions that align with budget limitations.
1. Planning and Budgeting
The initial stage involves meticulous planning and budgeting. This includes measuring the area to be tiled, selecting appropriate materials, and estimating the total cost. Precise measurements are essential to accurately calculate the quantity of tiles required. Consider adding an extra 10-15% to the total tile quantity to account for cuts, breakage, and potential errors during installation. Develop a detailed spreadsheet outlining all anticipated expenses, including tiles, grout, adhesive, tools, and any necessary preparatory materials. It's also prudent to allocate a contingency fund for unexpected issues that may arise during the renovation process.
Prioritize identifying areas where cost savings can be achieved. This may involve opting for less expensive tile options, reusing existing fixtures where possible, or performing some of the preparatory work oneself. Compare prices from different suppliers to secure the most competitive rates on materials. Remember to factor in delivery charges and potential discounts for bulk purchases. Thorough planning and diligent budgeting are vital for ensuring that the re-tiling project remains within the defined financial parameters.
Consider the aesthetic aspects during the planning phase. Research different tile patterns, colors, and textures to determine the desired look. Visualizing the final outcome helps in making informed decisions regarding tile selection and layout. Online resources and home improvement stores often provide design tools and inspiration to assist in the planning process. It’s recommended to create a detailed sketch or digital rendering of the re-tiled bathroom to guide the installation process and ensure design consistency.
2. Material Selection and Procurement
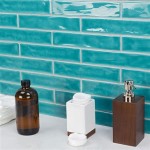
Selecting affordable yet durable materials is essential for re-tiling a bathroom on a budget. Ceramic tiles are often the most economical choice, offering a wide range of styles, colors, and sizes. Porcelain tiles, while more expensive, provide greater durability and water resistance, making them a suitable option for high-moisture areas such as showers and floors. Consider exploring discount tile outlets or salvage yards for potential deals on discontinued or surplus tile. Online marketplaces can also offer competitive pricing on tile and related materials.
The choice of grout and adhesive also significantly impacts the longevity and appearance of the tiled surface. Opt for a high-quality grout that is resistant to mold and mildew, particularly in areas prone to moisture. Latex-modified mortars or thin-set adhesives are recommended for their bonding strength and water resistance. Purchase these materials in bulk to potentially save on per-unit costs. Read product reviews and consult with experienced professionals to ensure that the selected materials are appropriate for the specific tiling application.
Tools and equipment are another important consideration. Assess the existing tool inventory and determine which items need to be purchased or rented. Essential tools for re-tiling include a tile cutter (manual or wet saw), notched trowel, grout float, sponge, measuring tape, level, and safety glasses. Borrowing tools from friends or renting them from local hardware stores can help reduce upfront expenses. Consider purchasing a tiling starter kit that includes essential tools at a discounted price. Properly maintaining and cleaning tools after each use will extend their lifespan and prevent the need for frequent replacements.
3. Preparation and Demolition
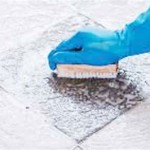
Thorough preparation is crucial for a successful re-tiling project. This involves removing existing tiles, cleaning the underlying surface, and ensuring that it is level and structurally sound. Before commencing demolition, protect surrounding fixtures and surfaces with drop cloths or plastic sheeting. Wear safety glasses, gloves, and a dust mask to protect oneself from debris and potential hazards during the removal process.
Carefully remove existing tiles using a chisel and hammer or a specialized tile removal tool. Start from the corners or edges and work inward, being mindful of any underlying plumbing or electrical wiring. Once the tiles are removed, use a scraper to remove any remaining adhesive or grout. Clean the surface thoroughly with a vacuum cleaner and a damp sponge to remove dust and debris. Inspect the underlying surface for cracks, damage, or unevenness. Repair any imperfections with patching compound or self-leveling mortar.
Ensure that the surface is clean, dry, and level before applying the adhesive. Prime the surface with a suitable primer to improve adhesion and prevent moisture penetration. For floors, consider installing a backer board to provide a stable and waterproof substrate for the tiles. Allow the primer and backer board to dry completely before proceeding with the tile installation. Proper preparation is essential for achieving a professional-looking finish and preventing future tile failures.
4. Tile Installation
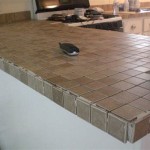
The installation process requires patience and precision to ensure a visually appealing and durable tiled surface. Begin by planning the tile layout, starting from the most visible areas of the bathroom. Use a level to ensure that the tiles are aligned correctly and that there are no gaps or unevenness. Apply the adhesive to the surface using a notched trowel, creating even ridges that will provide a strong bond with the tiles.
Place the tiles onto the adhesive, pressing firmly to ensure good contact. Use tile spacers to maintain consistent grout lines. Periodically check the alignment and level of the tiles using a level. Cut tiles as needed using a tile cutter or wet saw to fit around fixtures, corners, and edges. Allow the adhesive to dry completely according to the manufacturer's instructions before proceeding with grouting. This typically takes 24-48 hours.
Grouting involves filling the spaces between the tiles with grout to create a waterproof and aesthetically pleasing finish. Mix the grout according to the manufacturer's instructions, ensuring a consistent consistency. Apply the grout to the tile surface using a grout float, pressing it firmly into the grout lines. Remove excess grout with a damp sponge, wiping diagonally across the tiles to avoid pulling grout out of the lines. Allow the grout to dry slightly before polishing the tiles with a clean, dry cloth to remove any remaining residue. Seal the grout with a grout sealer to protect it from staining and moisture penetration.
5. Finishing and Cleanup
The final step involves finishing and cleanup to ensure a professional-looking result. Inspect the tiled surface for any imperfections or inconsistencies. Touch up any areas where grout is missing or uneven. Clean the tiles thoroughly with a mild detergent and water to remove any remaining grout haze. Reinstall any fixtures that were removed during the preparation process.
Apply caulk to the joints between the tiles and fixtures, such as around the bathtub, shower, and sink. Caulk provides a watertight seal and prevents water from seeping behind the tiles. Choose a caulk color that matches the grout to create a seamless look. Allow the caulk to dry completely before using the bathroom. Dispose of all waste materials properly and clean up the work area.
Regular maintenance is essential for preserving the appearance and longevity of the tiled surface. Clean the tiles regularly with a mild detergent and water. Avoid using abrasive cleaners or scouring pads that can damage the tile surface. Inspect the grout lines periodically for cracks or damage and repair as needed. Reapply grout sealer every 1-2 years to maintain its protective properties. By following these finishing and cleanup procedures, the re-tiled bathroom will provide years of enjoyment and enhance the overall value of the home.

Bathroom Remodeling A Step By Guide Budget Dumpster

6 Ideas To Remodel Your Bathroom On A Budget Dumpsters Com

Builder S 5 Rules To Keep Bathroom Renovations On Budget

Tips To Makeover A Bathroom On Budget Attley S Reveal

How To Renovate Bathroom Without Removing Tiles Multipanel

Bathroom Renovation Cost How Much To Budget For A Remodel

How To Calculate Tile Needed For Your Bathroom Mercury Mosaics

7 Tile Tips For Baths On A Budget

9 Simple Ideas For Bathroom Remodel Over The Weekend

Builder S 5 Rules To Keep Bathroom Renovations On Budget
Related Posts